Installation and Care Guide Guide d’installation et d’entretien Guía de instalación y cuidado Tall Storage Case Grand casier de rangement Armario alto K-2684 M product numbers are for Mexico (i.e. K-12345M) Los números de productos seguidos de M corresponden a México (Ej. K-12345M) USA/Canada: 1-800-4KOHLER México: 001-800-456-4537 kohler.com 1147374-2-D ©2011 Kohler Co.
Tools/Outils/Herramientas Plus/Plus/Más: • 2x6s/Lambourde de 2x6/Postes de madera de 2x6 • 5/16" Lag Bolts and Washers [Min 250 lb (113.4 kg) Load Bearing] Tire-fonds de 5/16" et rondelles [capacité de charge min 250 lb (113,4 kg)] Pernos de fijación de 5/16" y arandelas [para carga mín de 250 lb (113,4 kg)] • Socket Wrenches/Clés à douilles/Llaves de dados • Siliconized Acrylic Caulk/Mastic à l'acrylique siliconée/Sellador acrílico siliconado Important Information WARNING: Risk of property damage.
Informations importantes (cont.) NOTICE: Risque d’endommagement du produit. Lors du déplacement de l’armoire, ne pas faire glisser ou charger les pieds par le côté. Respecter tous les codes de construction locaux. Información importante ADVERTENCIA: Riesgo de daños a la propiedad. Tenga cuidado al mover el gabinete a fin de evitar impactar, deslizar o cargar lateralmente las patas. ADVERTENCIA: Riesgo de daños a la propiedad. El gabinete se tiene que fijar a la pared para reducir el riesgo de que se ladee.
Prepare the Site (cont.) NOTICE: Extend the backing material beyond the width of the tall storage case to the nearest stud. This will ensure proper support for the cabinet. Front-notch the studs 1-1/2″ (38 mm) to ensure the 2x6 backing material is flush against the studs. Secure the 2x6 backing material to the studs with framing nails. Complete the finished wall. Make sure the finished wall is straight and plumb, and the floor is flat and perpendicular to the finished wall.
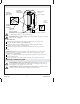
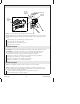
2. Install the Legs Screw Vis Tornillo Lock Washer Contre-écrou Arandela de fijación Washer Rondelle Arandela Cross Rail Rail transversal Riel transversal Rear Leg Pied arrière Pata posterior Clip Clip Clip Clip Clip Clip Front Leg Pied avant Pata frontal NOTE: To protect the finished surface of the cabinet, perform assembly tasks on a flat, padded work surface. Remove the Door Lay the cabinet on a flat, padded surface with the door facing up. Remove the door to ease the installation process.
Installer les Pieds (cont.) Retirer la porte pour faciliter la procédure d’installation. Se référer à la section ″Ajustements de la porte″ de ce guide. Attacher les pieds Positionner les ensembles de pieds tel qu’illustré; vérifier que les clips se fassent face. Sécuriser chaque montant de pied en utilisant deux vis à tête ronde n° 8 x 2″, ainsi que des rondelles d’arrêt et des rondelles plates.
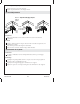
3. Secure the Cabinet Pilot Hole Trous-pilotes Orificio guía Back Rail Rail arrière Riel posterior Finished Wall Mur Fini Pared acabada Leveler Levier Nivelador Washer Rondelle Arandela Lag Bolt Tire-fond Perno de fijación WARNING: Risk of property damage. Use care when moving the cabinet to avoid impacting, sliding, or side-loading the legs. WARNING: Risk of property damage. The cabinet must be secured to the wall to reduce the risk of tipping.
Sécuriser l’armoire en place (cont.) Positionner et mettre à niveau Avec de l’assistance, lever et placer le meuble dans l’emplacement souhaité contre le mur fini. Ne pas faire glisser ou charger les pieds par le côté. Vérifier que le meuble est à niveau et que les rails arrière sont d’aplomb contre le mur. Si nécessaire, tourner le(s) vérin(s) pour ajuster l’ensemble. Vérifier que le dégagement est adéquat autour de l’armoire pour que la porte puisse s’ouvrir entièrement.
4. Install the Door Hook Crochet Gancho Bracket Support Soporte Cup Récipient Copa NOTE: To ease installation, get assistance supporting the door. NOTE: Cabinet comes with hinges installed on the inside left. To reverse door swing, use the included template (1181756-7) to mount brackets to the opposite side of the cabinet. Align the hinge hooks with the cup of the top bracket. Slide the hinge onto the top bracket. Clip the hinge onto the bracket to secure. Repeat for the lower hinge.
Instale la puerta (cont.) Encaje la bisagra en el soporte para fijar. Repita este procedimiento con la bisagra inferior. 5. Door Adjustments Bracket Support Soporte Side Côté Lado Adjustments/Réglages/Ajustes Height Hauteur Altura Depth Profondeur Profundidad Clip Clip Clip Adjustment Refer to the illustration and note the screwdriver location for the desired adjustment. Removal Apply a small amount of leverage to the door with one hand to keep the door in the full open position.
Ajustes de la puerta Ajuste Consulte la ilustración y apunte donde debe colocar el destornillador para obtener el ajuste deseado. Desmontaje Aplique un poco de palanca a la puerta con una mano para mantener la puerta en la posición completamente abierta. Presione el clip para liberar la bisagra de su soporte. Mueva la puerta hacia delante para sacar las bisagras de los soportes. 6.
Complete the Installation (cont.) Drill 1/8″ pilot holes at the marked locations. Secure the hook to the cabinet using two screws provided. Terminer l’installation Installer le bouton de porte À partir de l’arrière de la porte, insérer la vis à travers le trou percé au préalable jusqu’à l’avant. Enfiler le bouton sur la vis. Bien serrer fermement. Installer les étagères Déterminer l’emplacement souhaité des deux étagères à l’intérieur de l’armoire.
Care and Cleaning For best results, keep the following in mind when caring for your KOHLER product: Wood Surfaces • As with any smooth surface, avoid using abrasive cleaners as they will scratch the surface. Wipe the wood surface regularly to prevent buildup of soap and scum. • To protect against scratches, use felt, leather, or cork under all items placed on the wood surface. To conceal scratches, a touch-up marker is available for order.
Entretien et nettoyage (cont.) • Tous les six mois, retirer le dépôt de saleté en frottant avec un chiffon humidifié d’une solution 50/50 d’eau chaude et de détergent sans ammoniaque. Bien essuyer avec un chiffon humidifié d’eau chaude, puis sécher. Surfaces en verre et à miroir • Utiliser un détergent doux tel que liquide pour vaisselle et de l’eau chaude pour nettoyer. Ne pas utiliser de nettoyants abrasifs car ils pourraient rayer ou abîmer la surface.
Cuidado y limpieza (cont.) • • Limpie con un trapo y enjuague completa e inmediatamente con agua después de aplicar limpiadores. Enjuague y seque las superficies cercanas que se hayan rociado. Utilice una esponja o trapo suave y húmedo. Para limpiar las superficies nunca utilice materiales abrasivos como cepillos o estropajos de tallar. Para obtener información detallada de limpieza y los limpiadores a considerar, visite www.kohler.com/clean.
Garantie (cont.) www.ca.kohler.com au Canada, ou www.mx.kohler.com au Mexique. LES GARANTIES TACITES, Y COMPRIS CELLES DE COMMERCIALITÉ ET D’ADAPTATION À UN USAGE PARTICULIER, SONT EXPRESSÉMENT LIMITÉE À LA DURÉE DE LA PRÉSENTE GARANTIE. KOHLER CO. ET/OU LE REVENDEUR DÉCLINENT TOUTE RESPONSABILITÉ CONTRE LES DOMMAGES PARTICULIERS, ACCESSOIRES OU INDIRECTS.
Service Parts/Pièces de rechange/Piezas de repuesto 1147357** Hardware Kit Kit de boulonnerie Kit de herrajes 1059560** Touch-Up Marker Marqueur à retouches Plumón para retocar 1178461 Hinge Kit Kit de charnière Kit de bisagra 1147156** Shelf Étagère Estante 1147094** Door/Porte/Puerta 1153390** (Right/Droite/Derecha) 1153389** (Left/Gauche/Izquierda) Leg Kit Kit de pied Kit de patas 1147157** Support/Support/Soporte **Finish/color code must be specified when ordering.
1147374-2-D Kohler Co.
Kohler Co.
1147374-2-D