
Operating Guide


2. Install the Legs
NOTE: To protect the finished surface of the cabinet, perform assembly tasks on a
flat, padded work surface.
Remove the Door
Lay the cabinet on a flat, padded surface with the door facing up.
Remove the door to ease the installation process. Refer to the ″Door Adjustments″
section of this guide.
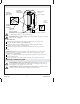
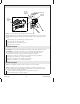
Attach the Legs
Position the leg assemblies as shown; verify the clips are facing each other.
Secure each leg post using two #8 x 2″ panhead screws, lock washers, and flat
washers.
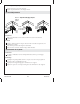
Install the Cross Rail
Oriented as shown, position the cross rail above the clips between the right and
left leg assemblies.
Evenly press down on the cross rail until the clips are fully engaged. You may
need to apply slight pressure on each end until it clicks in place.
Installer les Pieds
REMARQUE: Pour protéger la surface finie de l’armoire, procéder au tâches
d’assemblage sur une surface de travail plate et matelassée.
Retirer la porte
Coucher le meuble sur une surface plate et matelassée, avec la porte tournée ver
le haut.
Screw
Vis
Tornillo
Front Leg
Pied avant
Pata frontal
Rear Leg
Pied arrière
Pata posterior
Clip
Clip
Clip
Cross Rail
Rail transversal
Riel transversal
Lock Washer
Contre-écrou
Arandela de fijación
Washer
Rondelle
Arandela
Clip
Clip
Clip
Kohler Co. 5 1147374-2-D