
Installation Guide
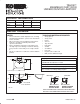


SEALANT
3/8” D.
5/8”
LAVATORY
MARBLE SLAB
INSTALLATION
WOOD COUNTER
INSTALLATION
LAVATORY
SEALANT
NOTE: WATERPROOF UNPROTECTED OVERHANG
AREA ON THE UNDERSIDE OF WOOD COUNTER
1.05>116
4”
3/8” COLD
1-1/4” OUTLET
3/8” HOT
(S)
(T)
18”
8-1/2”
3/8”
1-1/2” R.
6-1/8”
20”
4” 4”
2”
4”
114409-2-CB
2000 Kohler Co.
TAHOE
ENAMELED CAST IRON
UNDERCOUNTER LAVATORY
PRODUCT INFORMATION
Fixture*: basin area water depth
Lavatory 16” x 12” 5”
Outlet 1-11/16” D.
* Approximate measurements for comparison only.
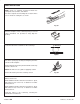
BEFORE YOU BEGIN
NOTES
These instructions contain important care, cleaning,
and warranty information – please leave instructions
for the consumer.
Due to the nature of the installation, undercounter
lavatories should be installed by trained and
experienced installers.
Prior to installation, unpack the new lavatory and
carefully inspect it for damage. Return the lavatory
to its protective carton until you are ready to install
it.
Do not use adhesives or adhesive sealants with this
product.
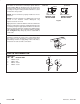
TOOLS AND MATERIALS REQUIRED
Safety glasses
Safety shoes
Pencil
Scissors
Tape measure
Putty knife
Sealant
Screwdriver
Hole saw
Keyhole saw or saber saw
Drill (1/2” dia. drill bit or larger)
Roughing-In Notes
Fixture dimensions are nominal and conform to tolerances
in ASME/ANSI Standard A112.19.1M.
( T ) Pop-up drain 14-1/8”, grid drain 13-1/4”.
( S ) 10” (Based on 12” riser which may require cutting).
Holes in undercounter fixture are oversized. Drill fitting
holes in counter according to fitting rough-in.