
Installation Guide

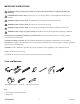

1. Prepare the Site
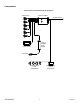
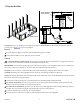
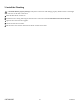
Drain Cutout
1/16" (2 mm)
Min
Water-Resistant
Deck Material
NOTICE: Measure y
our product for site preparation. Note the model number on the back of the bath, then visit the
product page at
kohler.com for more information.
Flooring
Provide adequate support for the bath. Install additional support as needed.
Verify that the suboor is lev
el. Adjust for level as needed.
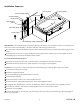
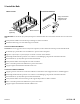
Framing
CAUTION: Risk of product damage. Do not support the bath by the rim. The bath must be supported by the feet
or base. Plan to shim under the bath as needed when leveling the bath.
IMPORTANT! Several included bath components will be powered by the control
amplier with 25' (7.6 m) cables. Plan
the location of the control amplier so the cables will reach without being under tension.
NOTICE: Use wood studs to construct the bath frame. Metal framing may adversely aect vibracoustic quality.
NOTICE: If installing the control amplier between studs, the stud spacing should be 16" (406 mm).
NOTE: The framing illustrated is less the nished wall and deck materials. Allow for the nished wall and deck material
thicknesses when constructing the framing.
Construct the framing, taking into account the thickness of the nished wall and deck materials.
For drop-in installations, provide a 1/16" (2 mm) to 1/8" (3 mm) gap between the framing and the underside of the
bath rim to ensure that the bath is not supported by the rim.
For under-mount installations, provide a 1/16" (2 mm) to 1/8" (3 mm) gap between the framing and the top surface of
the bath rim to ensure that the weight of the framing does not rest on the bath rim.
Construct stud framing or a pocket for the control
amplier.
Provide a means to route the user interface cable through the wall to the control amplier.
Kohler Co. 7
1297608-2-E