
Installation Guide

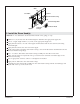


4. Install the Steam Control
WARNING: Risk of personal injury. Do not install the Steam Control User Interface outside the
steam enclosure. The User Interface must be installed within the enclosure to allow the sensors to
regulate the temperature and control the flow of steam.
Make sure that the power is turned off at the main breaker panel before proceeding.
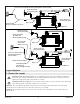
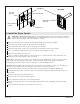
Locate the control pad on the wall 60″ (1524 mm) from the floor.
At the selected location, drill a hole 1-1/4″ (32 mm) in diameter.
Center the wall mount on the 1-1/4″ (32 mm) hole, and mark the screw hole locations.
Use a 1/4″ drill bit to drill holes for the wall anchors at the marked locations.
Insert the wall anchors into the holes.
Apply a continuous bead of silicone sealant in the groove on the back side of the wall mount, and
secure the wall mount with the screws provided.
NOTICE: Do not pinch, nail, wedge, or use undue force when handling the control connector and the
control pad wire. Any damage may result in control kit failure. If the control pad is not installed
immediately, protect the control connector with tape or other shielding material.
NOTICE: When installing the control kit, allow room in the control cable for a drip loop. The drip loop
will discourage moisture from following the control cable to the steam generator.
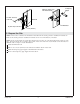
Pull the steam control connector and cable from the steam generator through the drilled hole.
Carefully plug the control connector to the control pad wire using the double-end female connector
(provided).
Snap the control pad onto the wall mount.
Restore the power at the main breaker panel.
Turn on both water and power to the steam generator.
Test the control pad to ensure it is functioning properly. Refer to the ″Operating the Steam Control″
section.
Allow the silicone sealant to cure for 24 hours before use.
60" (1524 mm)
to Floor
Ø 1-1/4"
(32 mm)
Control Connector
Control Pad
Back View
Wall Mount
Apply silicone sealant
to groove.
Kohler Co. 7 1230489-2-C