
Installation Guide


Installation
CAUTION: Risk of personal injury or product damage. Cast iron sinks are very
heavy. Get help lifting the sink.
Cut out the opening by carefully following the pencil line traced from the
template.
NOTE: This sink is designed to be installed flush with or slightly lower than the
surrounding tile.
Measure and compare the thickness of the sink rim and the tile. The rim thickness
on this sink is 3/8″ (1 cm) plus or minus 1/32″ (1 mm). Because of the varying
thickness of the tile and sink, or if adhesive or mortar bed installation is used,
make allowances to shim the sink, or route the underlayment as required.
Position the sink in the countertop opening. Verify the fit and position.
Carefully remove the sink.
Install the faucet and strainer(s) to the sink according to the manufacturer’s
instructions.
Place a 1″ (2.5 cm) spot of sealant at each corner of the frame where it will contact
the sink.
NOTE: Apply additional sealant if using shims.
Carefully reposition the sink in the countertop opening.
NOTE: If the tiled countertop transitions into a laminated countertop, the laminated
countertop must be installed after the tile has been installed to ensure a flush
transition between the two surfaces.
Tile and grout to allow an acceptable space between the tile and sink.
To absorb the vibration from a garbage disposal, apply sealant between the sink
and tile directly adjacent to the sink rim. This will prevent the grout from cracking
around the sink.
Allow the sealant to cure for at least 30 minutes before proceeding.
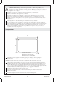
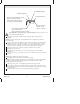
Sink/Evier/Fregadero
Sealant/Mastic/Sellador
Tile/Carreau/Azulejo
Mortar or Adhesive
Mortier ou colle
Mortero o adhesivo
Water Resistant Underlayment
Sous-couche étanche
Base de la cubierta resistente al agua
Route or shim as required to level tile.
Mettre les carreaux à niveau.
Utilice cuñas o rebaje según sea
necesario para nivelar el azulejo.
Kohler Co. 9 1053526-2-C