
Installation Guide


6. Install the Waterway
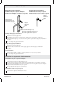
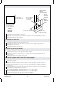
Insert the escutcheon into the rough opening. The double ribs of the leak shield
should be facing up.
If the leak shield makes contact with the elbow: Enlarge the hole in the back of
the leak shield to 1-1/4″ (3.2 cm).
Thread the adapter onto the nipple using the provided 11 mm bit, 11 mm or 7/16″
socket, extension and socket wrench. Use masking tape to hold the bit in place, as
the bit could fall off and cause damage.
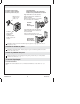
IMPORTANT! The escutcheon should sit loosely at this point. If it is tight against the
wall, use a longer pipe nipple.
Align the groove in the waterway with the double ribs on the leak shield.
Press the waterway into place over the adapter. Secure the waterway to the
adapter with the screw provided.
Verify that the escutcheon does not turn or shift.
IMPORTANT! If the escutcheon is still loose after this step, use a shorter pipe nipple.
Installer le passage d’eau
Placer l’applique à l’intérieur de l’ouverture de raccordement. Les doubles arrêtes
de l’anti fuites devrait faire face vers le haut.
Si l’anti-fuites fait contact avec le coude: Élargir l’orifice à l’arrière de l’anti-fuites
de 1-1/4″ (3,2 cm).
Visser l’adaptateur sur le mamelon en utilisant la mèche fournie de 11 mm, la
douille de 11 mm ou de 7/16″, clé à rallonge et à douille. Utiliser du ruban cache
pour maintenir la mèche en place car celle-ci pourrait tomber et causer des
dommages.
IMPORTANT! L’applique devrait reposer légèrement à ce point. Si c’est serré contre
le mur, utiliser un plus long mamelon.
Aligner la rainure dans le passage d’eau avec les doubles arrêtes de l’anti-fuites.
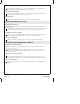
Waterway
Passage eau
Vía de agua
Screw
Vis
Tornillo
Escutcheon
Applique
Chapetón
Adapter
Adaptateur
Adaptador
Socket Wrench With Bit
Clé à douille avec mèche
Llave de dados con broca
Extension
Extension
Extensión
Leak Shield
Protection
contre fuites
Protector
contra fugas
1095094-2-A 10 Kohler Co.