
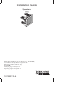
Installation Guide
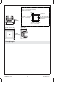
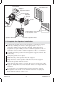

4. Install the Speaker Support
CAUTION: Risk of product damage. Do not use power
screwdrivers to install the support.
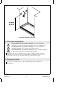
Thread the setscrews into the speaker support until the tops of
the setscrews are flush with the surface of the speaker support.
Measure the finished wall thickness.
NOTE: The clamp arms can be removed and turned upside down to
allow installation to thicker walls.
If appropriate, flip the clamp arms to accommodate thicker wall
materials. Refer to the above illustration.
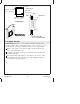
Insert the speaker wires into the opening of the speaker support.
Tuck the clamp arms into the slots of the speaker support.
Apply a bead of silicone sealant into the groove around the
backside of the support lip.
Position the support with the drain slot down.
Insert the support into the cutout.
Flip clamp arms for thicker
wall material,
1-1/4" (3.2 cm) – 2" (5.1 cm).
Apply silicone
sealant.
Tuck clamp
arms into slots.
Support
Drain Slot
Thread setscrew
in until flush.
Do not use
power screwdriver.
Thinner Wall,
3/16" (5 mm) – 1-1/4" (3.2 cm)
Insert support
and untuck
clamp arms.
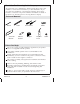
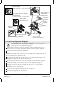
Speaker
Gasket
Cover
Gasket
Kohler Co. 7 1070937-2-A