
Installation Guide


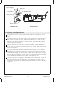


2. Piping Configurations
Verify the location of the components and the orientation of all
ports.
Decide in advance on the location and orientation of the diverter.
The location of the shower, and the handshower, as well as the
direction in which the inlets/outlets point, will affect the piping
and connectors needed.
Allow clearance for the valve outlets, handles, and handshower
hoses. For use with an optional spout, also allow clearance for the
spout connection.
You can extend the distance between the transfer valve and the
braided hose connection with 1/2″ copper piping below the rim
of the bath/whirlpool, but it may not be safe or practical. A long
run of piping will mean a long run of room-temperature standing
water when the handshower is first activated for use.
Secure long runs of piping to the underside of the deck or rim. If
the piping cannot be secured at a point near the transfer valve,
secure the piping from underneath with lumber or other suitable
support.
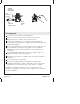
Jog in Piping
Jog in Piping
Diverter
Mixer Valve
To Handshower
To Shower
Wall-Mount Deck-Mount
113228-2-CC 6 Kohler Co.