OWNER'S MANUAL AEGIS ® LH630, LH640, LH685, LH690, LH755, LH775 LIQUID-COOLED HORIZONTAL CRANKSHAFT
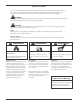
Safety Precautions To ensure safe operations please read the following statements and understand their meaning. Also refer to your equipment owner's manual for other important safety information. This manual contains safety precautions which are explained below. Please read carefully. WARNING Warning is used to indicate the presence of a hazard that can cause severe personal injury, death, or substantial property damage if the warning is ignored.
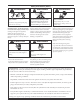
Safety Precautions (Cont.) WARNING WARNING WARNING Accidental Starts can cause severe injury or death. Carbon Monoxide can cause severe nausea, fainting or death. Explosive Gas can cause fires and severe acid burns. Disconnect and ground spark plug leads before servicing. Avoid inhaling exhaust fumes, and never run the engine in a closed building or confined area. Charge battery only in a well ventilated area. Keep sources of ignition away. Accidental Starts! Disabling engine.
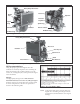
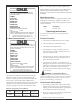
Heavy-Duty Air Cleaner Reservoir Oil Fill Cap Dipstick RectifierRegulator Spark Plug Spark Plug Radiator Oil Filter Electric Starter Oil Drain Plug Oil Drain Plug Figure 1. Typical Kohler Aegis® Carbureted Engine. Heavy-Duty Air Cleaner Reservoir Radiator Fuel Injector Ignition Coil ECU Fuse Holders Wire Harness Figure 2. Typical Kohler Aegis® EFI Engine. Oil Recommendations Using the proper type and weight of oil in the crankcase is extremely important.
NOTE: Synthetic oils meeting the listed classifications may be used with oil changes performed at the recommended intervals. However to allow piston rings to properly seat, a new or rebuilt engine should be operated for at least 50 hours using standard petroleum based oil before switching to synthetic oil. A logo or symbol on oil containers identifies the API service class and SAE viscosity grade. See Figure 4.
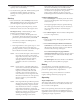
For Models LH630, LH640, LH685, LH690 IMPORTANT ENGINE INFORMATION THIS ENGINE MEETS U.S. EPA PH2, EC STAGE II (SN:4) AND CA 2008 AND LATER EXH EMISSION REGS FOR SI SORE FAMILY TYPE APP DISPL. (CC) MODEL NO. SPEC. NO. SERIAL NO. BUILD DATE OEM PROD. NO. EMISSION COMPLIANCE PERIOD: EPA: CARB: CERTIFIED ON: REFER TO OWNER'S MANUAL FOR HP RATING, SAFETY, MAINTENANCE AND ADJUSTMENTS 1-800-544-2444 www.kohlerengines.com KOHLER CO.
4. A warm battery has much more starting capacity than a cold battery. 5. Use fresh winter grade fuel. NOTE: Winter grade gasoline has higher volatility to improve starting. Do not use gasoline left over from summer. Starting 1. Place the throttle control midway between the slow and fast positions. Place the choke control (non-EFI engines only) into the on position. 2. Start the engine by activating the key switch. Release the switch as soon as the engine starts.
NOTE: Do not operate this engine continuously at angles exceeding 20° in any direction. Engine damage could result from insufficient lubrication. Cooling NOTE: If debris builds up on the radiator, cooling system, or other external areas, stop the engine immediately and clean. Operating the engine with blocked or dirty cooling system areas can cause extensive damage due to overheating. See Clean Air Intake/Cooling Area, page 14.
Check Oil Level The importance of checking and maintaining the proper oil level in the crankcase cannot be overemphasized. Check oil BEFORE EACH USE as follows: 1. Make sure the engine is stopped, level, and is cool so the oil has had time to drain into the sump. 2. To keep dirt, debris, etc., out of the engine, clean the area around the dipstick before removing it. 3. Remove the dipstick; wipe oil off. Reinsert the dipstick into the tube and press all the way down. See Figure 6.
6. Apply a thin film of clean oil to the rubber gasket on the new filter. 7. Install the new oil filter to the filter adapter. Hand tighten the filter (clockwise) until the rubber gasket contacts the adapter, then tighten the filter an additional 3/4 to 1 turn. 8. Fill the crankcase with new oil of the proper type, to the ‘‘F’’ mark on the dipstick. Refer to Oil Type and Check Oil Level on pages 4 and 9. Always check the level with the dipstick before adding more oil. 9.
3. If equipped, remove the coolant drain plugs located on each side of the engine block. See Figure 12. Drain the coolant into a suitable container. After the coolant has drained completely, apply pipe sealant with Teflon® (Loctite® No. 592 or equivalent), to the threads and reinstall the plugs. Torque the two plugs to 36.7 N·m (325 in. lb.). Figure 10. Coolant Levels on Reservoir. Draining Cooling System 1. Stop the engine and allow it to cool sufficiently. 2. Check if the radiator is cool to the touch.
2. Reinstall and tighten the radiator cap. 3. Start and run the engine for five minutes, or until it reaches operating temperature. Stop the engine and allow it to cool. Inner Element 4. Drain the cooling system (Refer to Draining Cooling Systems). 5. Fill the cooling system (see Filling Cooling System). Filling Cooling System 1. Check the condition of cooling system hoses, clamps, and associated components. Replace as required. 2.
3. After the main element is removed, check the condition of the inner element. It should be replaced whenever it appears dirty, typically every other time the main element is replaced. Clean the area around the base of the inner element before removing it, so dirt does not get into the engine. See Figure 17. Air Intake System and Air Cleaner Components Air Cleaner Housing/End Cap Assembly Make sure air cleaner housing including the dust ejector valve and the end cap is in good condition and not cracked.
3. The v-groove of each pulley (upper and lower) should not be bent, nicked, or damaged. Pulley mounting areas and lower pulley shims should be free of any cracks or elongation. See Figure 20. NOTE: Operating the engine with a restricted air intake screen or radiator, damaged/broken fan assembly, or missing fan shroud will cause engine damage due to overheating. Ignition System Carbureted Engines - Use an electronic Capacitive Discharge (CD) ignition system.
NOTE: Do not clean the spark plug in a machine using abrasive grit. Some grit could remain in the spark plug and enter the engine, causing extensive wear and damage. EFI Engines: A special, high volume, high pressure filter with greater filtration capabilities and internal surface area is used. See Figure 24. Fuel Filter 3. Check the gap using a wire feeler gauge. Adjust the gap to 0.76 mm (0.030 in.) by carefully bending the ground electrode. See Figure 23. 4.
Carburetor Troubleshooting and Adjustments In compliance with the government emission standards, the carburetor is calibrated to deliver the correct fuel-to-air mixture to the engine under all operating conditions. The carburetor cannot be adjusted, except for low idle speed (RPM). Carburetor servicing is to be performed by an authorized Kohler Engine Service Dealer only. See Figure 26. NOTE: To ensure correct engine operating at altitudes above 1525 meters (5000ft.
*NOTE: The actual low idle speed depends on the application -- refer to equipment manufacturer's recommendations. Troubleshooting If the MIL comes on, or the engine becomes hard to start, runs roughly, or stalls at low idle speed, initial checks should be made in the following areas: When an EFI engine is started cold, the ECU will be using internal programming for cold running, and the idle speed may vary from the manual setting. Do not attempt to perform any readjustment during this ‘‘warm-up’’ period.
Storage If the engine will be out of service for two months or more, use the following storage procedure: 1. Clean the exterior surfaces of the radiator and engine. On EFI engines, avoid spraying water at the wiring harness or any of the electrical components. 2. Change the oil and filter while the engine is still warm from operation. See Change Oil and Filter on page 9. 5. Remove the spark plugs. Add one tablespoon of engine oil into each spark plug hole. Install plugs, but do not connect the plug leads.
LIMITED 3 YEAR KOHLER AEGIS® ENGINE WARRANTY Kohler Co. warrants to the original retail consumer that each new KOHLER AEGIS® engine sold by Kohler Co. will be free from manufacturing defects in materials or workmanship in normal residential service for a period of three (3) years from date of purchase, provided it is operated and maintained in accordance with Kohler Co.’s instructions and manuals.
(c) For warranty repairs, the engine must be presented to a Kohler Co. service center as soon as a problem exists. Call 1-800-544-2444 or access our website at: www.kohlerengines.com, for the names of the nearest service centers. The warranty repairs should be completed in a reasonable amount of time, not to exceed 30 days. If you have any questions regarding warranty rights and responsibilities, you should contact Kohler Co. at 1-920-457-4441 and ask for an Engine Service representative.