
Installation Guide

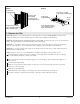


2. Install the Whirlpool
IMPORTANT! Use maximum 1/8″ (3 mm) thick spacers under the bath rim to ensure the rim does not
contact the deck.
NOTICE: Do not lift the whirlpool by the piping or pump, or use the piping or pump for structural
support of the whirlpool. To avoid damage to the whirlpool, lift at the sides of the whirlpool.
If the subfloor is not level, shim the whirlpool support blocks or molded supports as necessary.
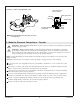
Option 1: Install Using Construction Adhesive
NOTE: Some models come with support blocks; some models have molded supports.
Apply a generous amount of high-quality construction adhesive to the bottom of the support blocks
or molded supports.
With help, carefully lift the whirlpool into position.
Fit maximum 1/8″ (3 mm) spacers under the bath rim so the rim does not contact the deck.
Apply weight to the bath basin until the adhesive sets.
Option 2: Install Using a Cement or Mortar Bed
NOTE: Do not use gypsum cement or drywall compound for this application, as they will not provide an
acceptable, durable bond.
NOTE: Lay plastic film on wooden subfloors if desired to prevent water absorption.
Set the basin area in 1″ (25 mm) to 2″ (51 mm) of mortar cement.
Stud
Cement or
Mortar Bed
Clear space for pump.
Option 1
Furring
Strip
Nail
Option 2
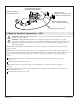
Three Wall Alcove or
Corner Installations
Support Blocks
Apply construction
adhesive.
Banding Straps
Cut the Pump
Banding Straps
Drill a small hole
through the nailing-in
flange at each stud.
Kohler Co. 5 1193346-2-D