Installation Guide Purist™ Effervescent Bath K-1191-L, K-1191-R, K-1191-LC, K-1191-RC M product numbers are for Mexico (i.e. K-12345M) Los números de productos seguidos de M corresponden a México (e.j.
Important Information WARNING: When using electrical products, basic precautions should always be followed, including the following: DANGER: Risk of electric shock. Connect only to a circuit protected by a Ground-Fault Circuit-Interrupter (GFCI). WARNING: Risk of electric shock. A licensed electrician should make all electrical connections. WARNING: Risk of electrical shock. Disconnect power before servicing. WARNING: Risk of injury or property damage.
Important Product Information (cont.) Electrical Requirements The installation must have a Class A Ground-Fault Circuit-Interrupter (GFCI). The GFCI protects against line-to-ground shock hazard. Use a 240V, 15A, 60 Hz dedicated service. An equipment grounding terminal is provided in the field wiring compartment.
Thank You For Choosing Kohler Company We appreciate your commitment to Kohler quality. Please take a few minutes to review this manual before you start installation. If you encounter any installation or performance problems, please don’t hesitate to contact us. Our phone numbers and website are listed on the back cover. Thanks again for choosing Kohler Company.
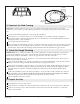
System Controll ( On/Off ) Bathing Well Rim Bathing Well Effervescence Port Overflow Drain Overflow Channel Chromatherapy Lights Chromatherapy Light Control Pump Motor 1. List of New Terms Bathing well-The deep portion on the bath used by the bather. Bathing well rim-The high rim between the bathing well and the overflow channel. Water will cascade over the bathing well rim and into the overflow channel when entering the bath.
12-3/16” 3-15/16” (31cm) (10cm) 46” (116.8cm) 23” (58.4cm) PUMP/CONTROL ACCESS 1-3/16” (3cm) 25-3/16” (64cm) 1-3/8” (3.5cm) 72” (182.9cm) 6-3/8” (16.2cm) 24” (61cm) 6” (15.2cm) 1-1/2” O.D. 7/16” (1.1cm) 132 2. Roughing In Information NOTICE: Unless otherwise specified, floor support under the bath must provide for a minimum of 80 lbs./square foot (390 Kg./square meter) loading. Consult local and national codes for a minimum air gap requirements when installing a spout on the faucet deck.
9-1/2" (24.1cm) 7" (17.8cm) Deck 6-1/2" (16.5cm) 3. Construct the Stud Framing NOTICE: Provide unrestricted service access to the pump, in-line heater and control box. You must construct an access panel to provide sufficient clearance for servicing the pump, in-line heater, and control box. Construct stud framing designed for your particular installation. Frame the floor, or construct a frame for a raised installation in accordance with the roughing-in information.
Pump Drainage Banding Straps Suction Line Outer Rim Drainage 2" MIN. (5.1cm) Inner Rim Suction Line Bathing Well 6. Position the Unit CAUTION: Risk of product damage. Do not lift or support the unit by the pump or piping. With help, carefully lift the unit into place. Cut and discard the banding straps from the pump. Insert the drain tailpiece into the trap. 7. Install the Plumbing CAUTION: Risk of property damage. Ensure a watertight seal on the drain connections.
System Control ("On/Off") Junction Box Line 1 (Black) Black Ground (Green) Green Electrician to provide suitable strain relief Line 2 (Black) Chromatherapy Light Control Black Bonding Lugs Follow Local Codes 8. Make the Electrical Connections NOTE: The product model number is printed on a label on the pump side of the unit. This label also identifies the electrical rating of the product. WARNING: Risk of electrical shock.
Test Run the Bath (cont.) Verify that the chromatherapy lights are operating. Upon start-up the lights should be changing through the color sequence. Press the light control switch (located directly across the bath from the power switch). The lights should stop sequencing and stay one color. Press the light control switch again and lights will deactivate. Check the harness connections for leakage one more time. Press the ″On/Off″ control switch again to turn off the unit. The switch will also turn off.
Finished Deck Material Bath Access Panel Silicone Sealant Framing Water–Resistant Wall Material 10. Complete the Finished Wall or Deck NOTICE: Provide unrestricted service access to the pump, in-line heater, and control box. You must construct an access panel to provide sufficient clearance for servicing the pump, in-line heater, and control box. Protect the product surface. Cover the framing with water-resistant wall material.
Chromatherapy Lights 13. Using Your Bath Fill the Bath NOTE: Please read these steps carefully before you operate your bath. NOTE: The water temperature in the bath should not exceed 104° F (40° C) or the heater will not operate. IMPORTANT! Like any other bath, prevent flooding the area around the unit by entering the filled bathing well slowly. This will allow the system to properly drain excess water. Fill the unit 4” (10.2cm) to 6” (15.2cm) from the bathing well rim.
14. Chromatherapy Light Operation The submerged chromatherapy lights automatically turn on in the stationary setting when you start the bath. Press the “Lights” control switch (located on the opposite side of the pump control) once and the submerged chromatherapy lights will slowly cycle through the color spectrum (sweep mode). The light control switch pulses blue for five seconds at the start of the sweep mode. Press the “Lights” control switch again to lock the chromatherapy lights in a particular color.
1012493-2-A Kohler Co.
Kohler Co.
USA: 1-800-4-KOHLER México: 001-877-680-1310 Canada: 1-800-964-5590 kohler.com ©2002 Kohler Co.