
Installation Guide


2
116351-2-AA (-)
Kohler Co., Kohler, WI
CONSTRUCT CABINET AND SUPPORT
FRAME
Measure the actual size of the sink below the rim flange.
The cabinet opening should equal the sink dimensions to
ensure a minimum gap between the sink apron and the
cabinet.
If the sink is not available at the time of cabinet and
support frame construction, make allowances to add
wood filler strips or spacers to the cabinet opening after
you install the cabinet, and before you install the sink.
Measure
Sink Below
Rim Flange
Carefully measure and sketch the cut-out area according
to the measurements taken from the actual sink. Cut out
the countertop.
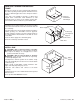
Construct and level a wood support and frame inside the
cabinet opening. Use 2x4 lumber and 1/2” plywood.
Provide adequate clearance for water supplies between
the support and the finished wall. Locate and cut a hole
for the drain.
Route the water supply lines and drain piping.
Clean the countertop around the cutout.
Water Supplies
2x4 Frame
1/2” Plywood
Support
Drain Hole
2x4 Frame
Countertop
INSTALL SINK
CAUTION: Risk of personal injury or product
damage. Handle with care. Vitreous china can break
or chip if the fittings are overtightened, or if the
product is handled carelessly.
CAUTION: Risk of personal injury or property
damage. Large vitreous china sinks are very heavy.
Get help lifting the sink.
Carefully lift the sink into position in the cabinet. Verify
proper fit, and modify the cut-out area as needed to obtain
a satisfactory fit.
Apply a bead of high-quality sealant around the sink
edges. Carefully wipe away any excess.
Install the sink strainer, and connect to the drain
assembly.
Install the faucet. Be sure to follow all instructions packed
with the faucet.
Clean up with a non-abrasive cleaner.
Apply
Sealant
Apply
Sealant