
Installation Guide
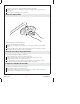


1. Install the Showerhead
NOTE: The shower arm with flange are not provided.
Remove the existing showerhead and shower arm, if applicable.
Install the shower elbow. Make sure the shower elbow is securely mounted and
has adequate strength to support the showerhead.
Apply a bead of plumbers putty or other sealant to the back of the flange
according to the manufacturer’s instructions.
Place the flange onto the long end of the shower arm just below the threads, as
illustrated.
Apply thread sealant tape to the threads of each end of the shower arm.
Place the shower arm in the shower elbow.
Carefully tighten the shower arm onto the shower elbow with a clean strap
wrench.
Press the flange against the finished wall/ceiling.
Secure the flange to the shower arm by tightening the setscrew.
Remove any excess putty.
Turn on the water and allow water to flow through the shower arm to flush the
system of any debris.
Turn off the water.
Hand tighten the showerhead to the shower arm.
Use a clean strap wrench to completely tighten the showerhead to the shower
arm.
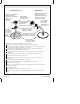
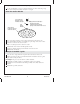
Shower Elbow
Coude de douche
Codo de ducha
Showerhead
Pomme de douche
Cabeza de ducha
Apply plumbers putty.
Appliquer du mastic
de plomberie.
Aplique masilla de plomería.
Shower Arm (not included)
Bras de douche (non fourni)
Brazo de ducha (no incluido)
Flange (not included)
Bride (non fournie)
Reborde (no incluida)
Wall/Mur/Pared
Ceiling/Plafond/Techo
Setscrew
(not included)
Vis de retenue
(non fournie)
Tornillo de
fijación
(no incluida)
Apply thread sealant tape.
Appliquer du ruban
d'étanchéité pour filetage.
Aplique cinta
selladora
de roscas.
Apply thread sealant tape.
Appliquer du ruban
d'étanchéité pour filetage.
Aplique cinta selladora
de roscas.
Setscrew
(not included)
Vis de retenue
(non fournie)
Tornillo de fijación
(no incluida)
Kohler Co. 3 1141989-2-B