
Installation Guide


2
1007250-2-A
Kohler Co., Kohler, WI, U.S.A.
COUNTERTOP INSTALLATIONS:
Position the template on the countertop.
For Wall-mount faucets: Be sure to provide sufficient
spout overhang into the lavatory basin. See the
roughing-in notes for minimum spout length information.
For Countertop Faucets: Pay special attention to the
spout and handle fit clearance when locating the faucet,
as noted below. Use the template to locate the faucet
spout hole centerline on the countertop. This centerline is
recommended to provide adequate clearance between
the edge of the lavatory and the spout.
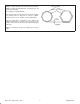
Check for adequate clearance between the backsplash,
faucet spout and handles, and lavatory. We recommend
clearance of at least 1” (2,5cm) between:
the installed lavatory and the faucet spout,
the installed lavatory and the end of the faucet
handles, and
the faucet spout and handles and the
backsplash.
Refer to the faucet installation instructions for required
clearance, and mark the preferred faucet hole locations
using a soft lead pencil.
Trace the template on the countertop using a soft lead
pencil.
Outside
Edge of
Lavatory
Backsplash
Fig. #2
Cut-out
Line
Spout
Centerline
1” (2,5cm)
Minimum
Clearance
Cut out the opening by carefully following the pencil line
traced from the template.
Temporarily set the lavatory into the countertop cutout to
check for fit.
Remove the lavatory from the countertop cutout.
Fig. #3
Drill the faucet holes.
Install the faucet according to the manufacturer’s
instructions.
Install the drain. For pop-up drains, use the custom
linkage provided with this lavatory instead of the linkage
supplied with the drain.
Install the custom linkage as shown. Adjust and/or bend
the linkage as required to achieve smooth, effective
pop-up drain operation. Only bend the linkage at the
location shown at right.
Fig. #4
Bend Here Only
Custom Linkage
Lift Rod
Adjust Here