
Installation Guide


1014299-2-B
Kohler Co.
6
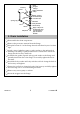
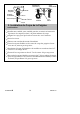
Stopper
Rod
Seal Hole
Body Nut
Apply 3 layers of
sealant tape and
a small bead of
pipe sealant to
threads
Tailpiece
Stopper Nut
Body
Thumb
Screw
Link
Rod
Clip
Lift Rod
Faucet
Seal
1/2”
(1.3cm)
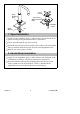
3. Drain Installation continued
- Insert the seal into the body seal hole. Insert the short end of the rod
into the body seal hole and under the stopper for regular i nstallations.
For vandal-resistant installations, fit the rod through the hole in the
stopper. Secure with body nut.
- Remove and adjust the stopper so it lifts about 3/8” (1cm) when
opened. To adjust, loosen the stopper nut and s horten or lengthen the
stopper as needed. Tighten the stopper nut.
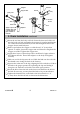
- Apply three layers of thread tape and a small bead of pipe sealant to
the tailpiece threads. Thread the tailpiece to the body and tighten
securely.
- Slide one end of the clip onto the rod. Slide the link onto the rod with
the thumb screw facing the back of the lavatory.
- Squeeze the other end of the clip, aligning the hole with the rod. Move
the link to the proper position by squeezing the clip and sliding it
along the rod. Push the rod down to the drain open position.
- Insert the lift rod into the hole in the faucet and then into the hole in
the link. If necessary, you may bend the link to fit your installation.
- Tighten the thumb screw on the link so the lift rod knob is 1/2”
(1.3cm) a bove the lift rod hole as shown in the illustration.