
Installation Guide


3
Kohler Co.
1010448-2-D
DETERMINE YOUR DRAIN STYLE AND FOLLOW THE
APPROPRIATE INSTALLATION STEPS.
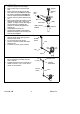
DRAIN (CP AND PB FINISHES)
S Remove the protective seal from the
flange.
S Apply a 1/2” (1.3cm) diameter ring of
plumbers putty around the underside
of the flange. Insert the flange into the
bidet drain hole.
S Assemble the gasket (tapered side up)
and washer to the flange, and partially
thread nut to the flange. Do not fully
tighten the nut at this time.
S Install the body washer and body to
the flange, and wrench-tighten.
S Position the body so the seal hole is
facing toward the back of the bidet.
S Hand-tighten the nut.
S Remove any excess plumbers putty.
Flange
Apply Plumbers
Putty
Gasket
Washer
Nut
Body Washer
Seal Hole
Body
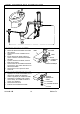
DRAIN (OTHER FINISHES)
S Remove the flange from the body.
S Thread the nut completely onto the
body.
S Apply a 1/2” (1.3cm) diameter ring of
plumbers putty around the underside
of the drain flange.
S Insert the drain body up into the
underside of the bidet drain hole.
S Position the body so the seal hole is
facing toward the back of the bidet.
S Thread the flange onto the drain body
from the topside of the bidet.
S Securely hand-tighten the nut from the
underside of the bidet.
S Remove any excess plumbers putty.
Seal
Hole
Flange
Apply Plumbers
Putty
Body
Nut
Bidet
Underside
S Assemble the nylon washer, metal
washer, and nut onto the long end of
the rod.
S Assemble the nylon washer and
rubber washer onto the short end of
the rod.
Rod
Nut
Nylon Washer
Nylon Washer
Metal Washer
Rubber Washer