
Installation Guide


316
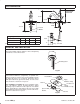
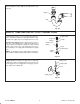
Fig. #1
5-3/8”
6-1/4”
2-1/4”
2-13/16”
MAX.
1” D.
11-3/4”
2-1/2”
1-1/4” O.D.
4”
2-5/8”
6”
3/8” O.D.
TUBING
2-3/4” MINIMUM
CLEARANCE
REQUIRED
2
113345-2-BA (B)
Kohler Co., Kohler, WI
ROUGHING-IN
Roughing-In Notes
A B C D
With escutcheon 2-3/8” 6-3/8” 2-11/16” 11-5/8”
With round base 2-1/4” 6-1/4” 2-13/16” 11-3/4”
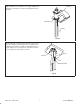
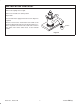
FAUCET INSTALLATION
Thread mounting stud into bottom of faucet body being
careful not to cross-thread stud.
Fig. #2
Mounting Stud
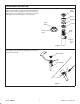
Select either round base, (single hole), or optional elon-
gated escutcheon, (3-hole). Place a ring of plumbers putty
on underside of base or escutcheon. Center the spacer
with gasket attached, (gasket side down), over the center
hole. Position escutcheon over spacer.
For installation on marble: Do not use plumbers putty.
Use self-adhesive gaskets provided. Remove paper
backing to expose adhesive. Center gaskets over outside
holes, apply adhesive side down. Center the spacer with
gasket attached, (gasket side down), over the center hole.
Position escutcheon over spacer.
Fig. #3
Escutcheon
Round Base
Apply
Plumbers Putty
Apply
Plumbers Putty
Spacer With
Gasket
Gasket
Gasket