
Installation Guide


Before You Begin (cont.)
The cabinet and frame shown in these instructions are generic
and may not represent the actual design or structure.
Due to the nature of undercounter installations, Kohler Co.
recommends that undercounter sink installations be performed by
trained and experienced installers.
To ensure a safe and damage-free installation, two people should
install the sink.
All information in these instructions is based on the latest product
information available at the time of publication. Kohler Co.
reserves the right to make revisions in the design of products
without notice, as specified in the Price Book.
1. Preparation
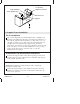
Undercounter Installations
Check to see if the faucet can be completely assembled to the
countertop and the sink.
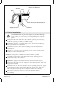
Determine this by taking the countertop thickness plus the sink
rim thickness, 5/8″ (1.6 cm) plus or minus 1/32″ (1 mm), and
comparing that measurement to the available shank length
between the base of the faucet assembly and the mounting nut. If
the available shank length is the same or longer than needed,
proceed. If not, select a thinner countertop or another faucet.
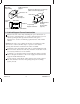
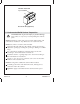
Tile-In Installations
Tile backer board installed over plywood is the recommended
underlayment for installing this sink. Tile should be bonded to
the backer board with dry set or latex Portland mortar.
Acceptable underlayments include:
•
Tile backer board over 3/4″ (1.9 cm) exterior grade plywood
•
3/4″ (1.9 cm) exterior grade plywood
IMPORTANT! Do not use:
•
Flakeboard
•
Interior grade plywood
•
Gypsum wallboard
Kohler Co. 3 1019949-2-C