
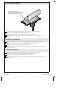
Installation and Care Guide
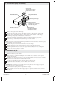
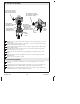

1. Install the Spray Assembly
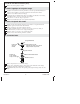
Remove the spray head and flange.
Thread the nut, metal washer, and rubber washer to the bottom of the shank.
Apply a ring of plumbers putty or other sealant to the bottom of the flange
according to the putty manufacturer’s instructions.
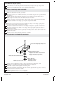
From the underside of the bidet, insert the shank through the spray hole.
From the top of the bidet, thread the flange onto the shank.
NOTE: You may need to thread the flange further down the shank to allow the spray
head to bottom out on the shank.
Thread the spray head onto the shank as far as it will go.
Thread the flange up the shank until it is snug against the sprayhead.
Wrench tighten the nut to secure the spray head assembly. Do not overtighten.
Remove any excess putty or sealant.
Installation du jet
Retirer la tête du jet et la bride.
Visser l’écrou, la rondelle métallique et la rondelle en caoutchouc sur la partie
xérieure du manche.
Appliquer un anneau de mastic ou de joint d’étanchéité sur le dessous de la bride
en suivant les instructions du fabricant du mastic.
Du dessous du bidet, insérer le manche dans l’orifice du jet.
À partir du dessus du bidet, visser la bride sur le manche.
REMARQUE: La bride devra peut-être être vissée plus bas sur la tige pour que la
tête du jet soit serré à fond sur la tige.
Visser la tête du jet le plus loin possible sur la tige.
Visser la bride vers le haut de la tige jusqu’à ce qu’elle soit bien serrée contre la
tête du jet.
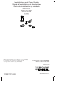
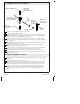
Nut/Écrou/Tuerca
Spray Head
Tête du vaporisateur
Cabeza del rociador
Flange/Bride/Brida
Shank/Tige/Vástago
Bidet/Bidet/Bidet
Rubber Washer
Rondelle en caoutchouc
Arandela de goma
Metal Washer
Rondelle métallique
Arandela de metal
Kohler Co. 3 1123727-2-D