
Installation Guide

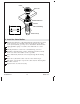

Roughing-In
1. Prepare the Site
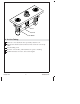
NOTE: To simplify future servicing, install an access panel to reach
the plumbing.
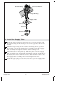
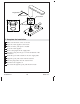
NOTICE: In standard installations, locate the valve bodies 4″ (102
mm) from the spout center, as shown in the diagram. The valve
bodies may be installed anywhere on the deck. Adjust the
dimensions as needed.
Determine the mounting hole locations for the spout and valves.
Refer to the roughing-in dimensions illustrated for proper
placement and diameter.
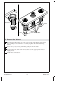
For a finished bath deck/rim less than 5/8″ (16 mm) thick: Install
wood reinforcement to the underside of the deck/rim. The
combined thickness of the reinforcing material and the deck/rim
must not exceed 3″ (76 mm).
CAUTION: Risk of property damage. Select a cutting tool
appropriate for the deck/rim surface type. Refer to the
surface manufacturer’s instructions for proper cutting
procedures.
Ø 1-3/4"
(44 mm)
5/8"
(16 mm)
8"
(203 mm)
Min
5/8"
(16 mm)
Min
3"
(76 mm)
Max
5-5/8"
(143 mm)
8-1/4"
(210 mm)
5-3/4"
(146 mm)
10-1/16"
(256 mm)
1-1/2"
Max
4"
(102 mm)
1-1/2"
Max
Kohler Co. 3 1276523-2-A