
Installation Guide


5. Install the Bath
NOTICE: Do not lift the bath by the piping or blower, or use the piping or blower for structural support
of the bath. To avoid damage to the bath, lift by the rim at the sides of the bath.
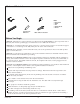
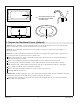
To provide access for securing the connections, temporarily position block spacers on opposing ends
between the shroud and the bath rim. Position the blocks to avoid damaging the alignment guides
located under the bath rim.
With help, carefully lift the bath into place over the shroud and onto the block spacers.
For -G2M Music Models: Refer to the installation instructions included with the amplifier for
wiring and installation details, and make the final electrical connections.
Secure all valve connections and fittings.
For USA and Mexico: Plug the blower power cord into the electrical outlet installed inside the
shroud.
Carefully remove the blocks and make sure the bath rim engages the top of the shroud on all sides.
Ensure all alignment guides are inside the shroud; there should be no gap between the bath and the
shroud.
Install the drain flange and overflow cover according to the drain instructions.
Install the faucet trim according to the trim instructions.
Close the bath drain. Fill the bath to the overflow, and check for leaks.
If desired, apply a thin, continuous bead of clear or color-matched silicone sealant to the seam
between the bath and the finished floor.
Test Run the Bath
Check all electrical connections and make sure the electrical power to the bath is on.
Fill the bath to a level at least 4″ (102 mm) above the top of the highest airjet.
Operate the bath for 5 minutes and test the airjets.
For additional information on bath operation, see the ″Operating Instructions″ section.
Temporary
Blocks
Alignment
Guides
Kohler Co. 9 1237791-2-G