
Installation Guide


112986-2-AA (A)
2 Kohler Co., Kohler, WI
TOOLS REQUIRED
Level
Drill with assorted bits
Socket wrench with 8”
extension and assorted sockets
Tape measure
Framing square
MATERIALS REQUIRED
1/4” lag bolts and washers (2)
INSTALLATION
Rough-in the supplies and
drain piping and trap.
NOTE: The supply stop handles
cannot extend more than 3-3/4” from
the finished wall when in the open
position.
Install sufficient backing behind
the finished wall to provide a
secure material for the
anchoring devices.
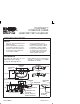
Install hanger, spring clips, and
angle bracket to wall according
to roughing-in dimensions.
Ensure spring clips are
between hanger and wall
before tightening.
Hanger
Spring Clips
Angle Bracket
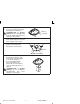
Position the lavatory on the
hanger and level.
Mark the center of each
anchoring hole through the
lavatory onto the wall.
Carefully remove the lavatory.
Level
Anchoring
Holes
Lavatory
Drill mounting holes for 1/4” lag
bolts at the marks on the wall.
Install the faucet and drain to
the lavatory according to the
manufacturer’s instructions.
NOTE: Do not fully tighten slip-joint
drain connections at this time.