
Installation Guide


Installation Guide
Guide d’installation
Guía de instalación
Rags
Chiffons
Trapos
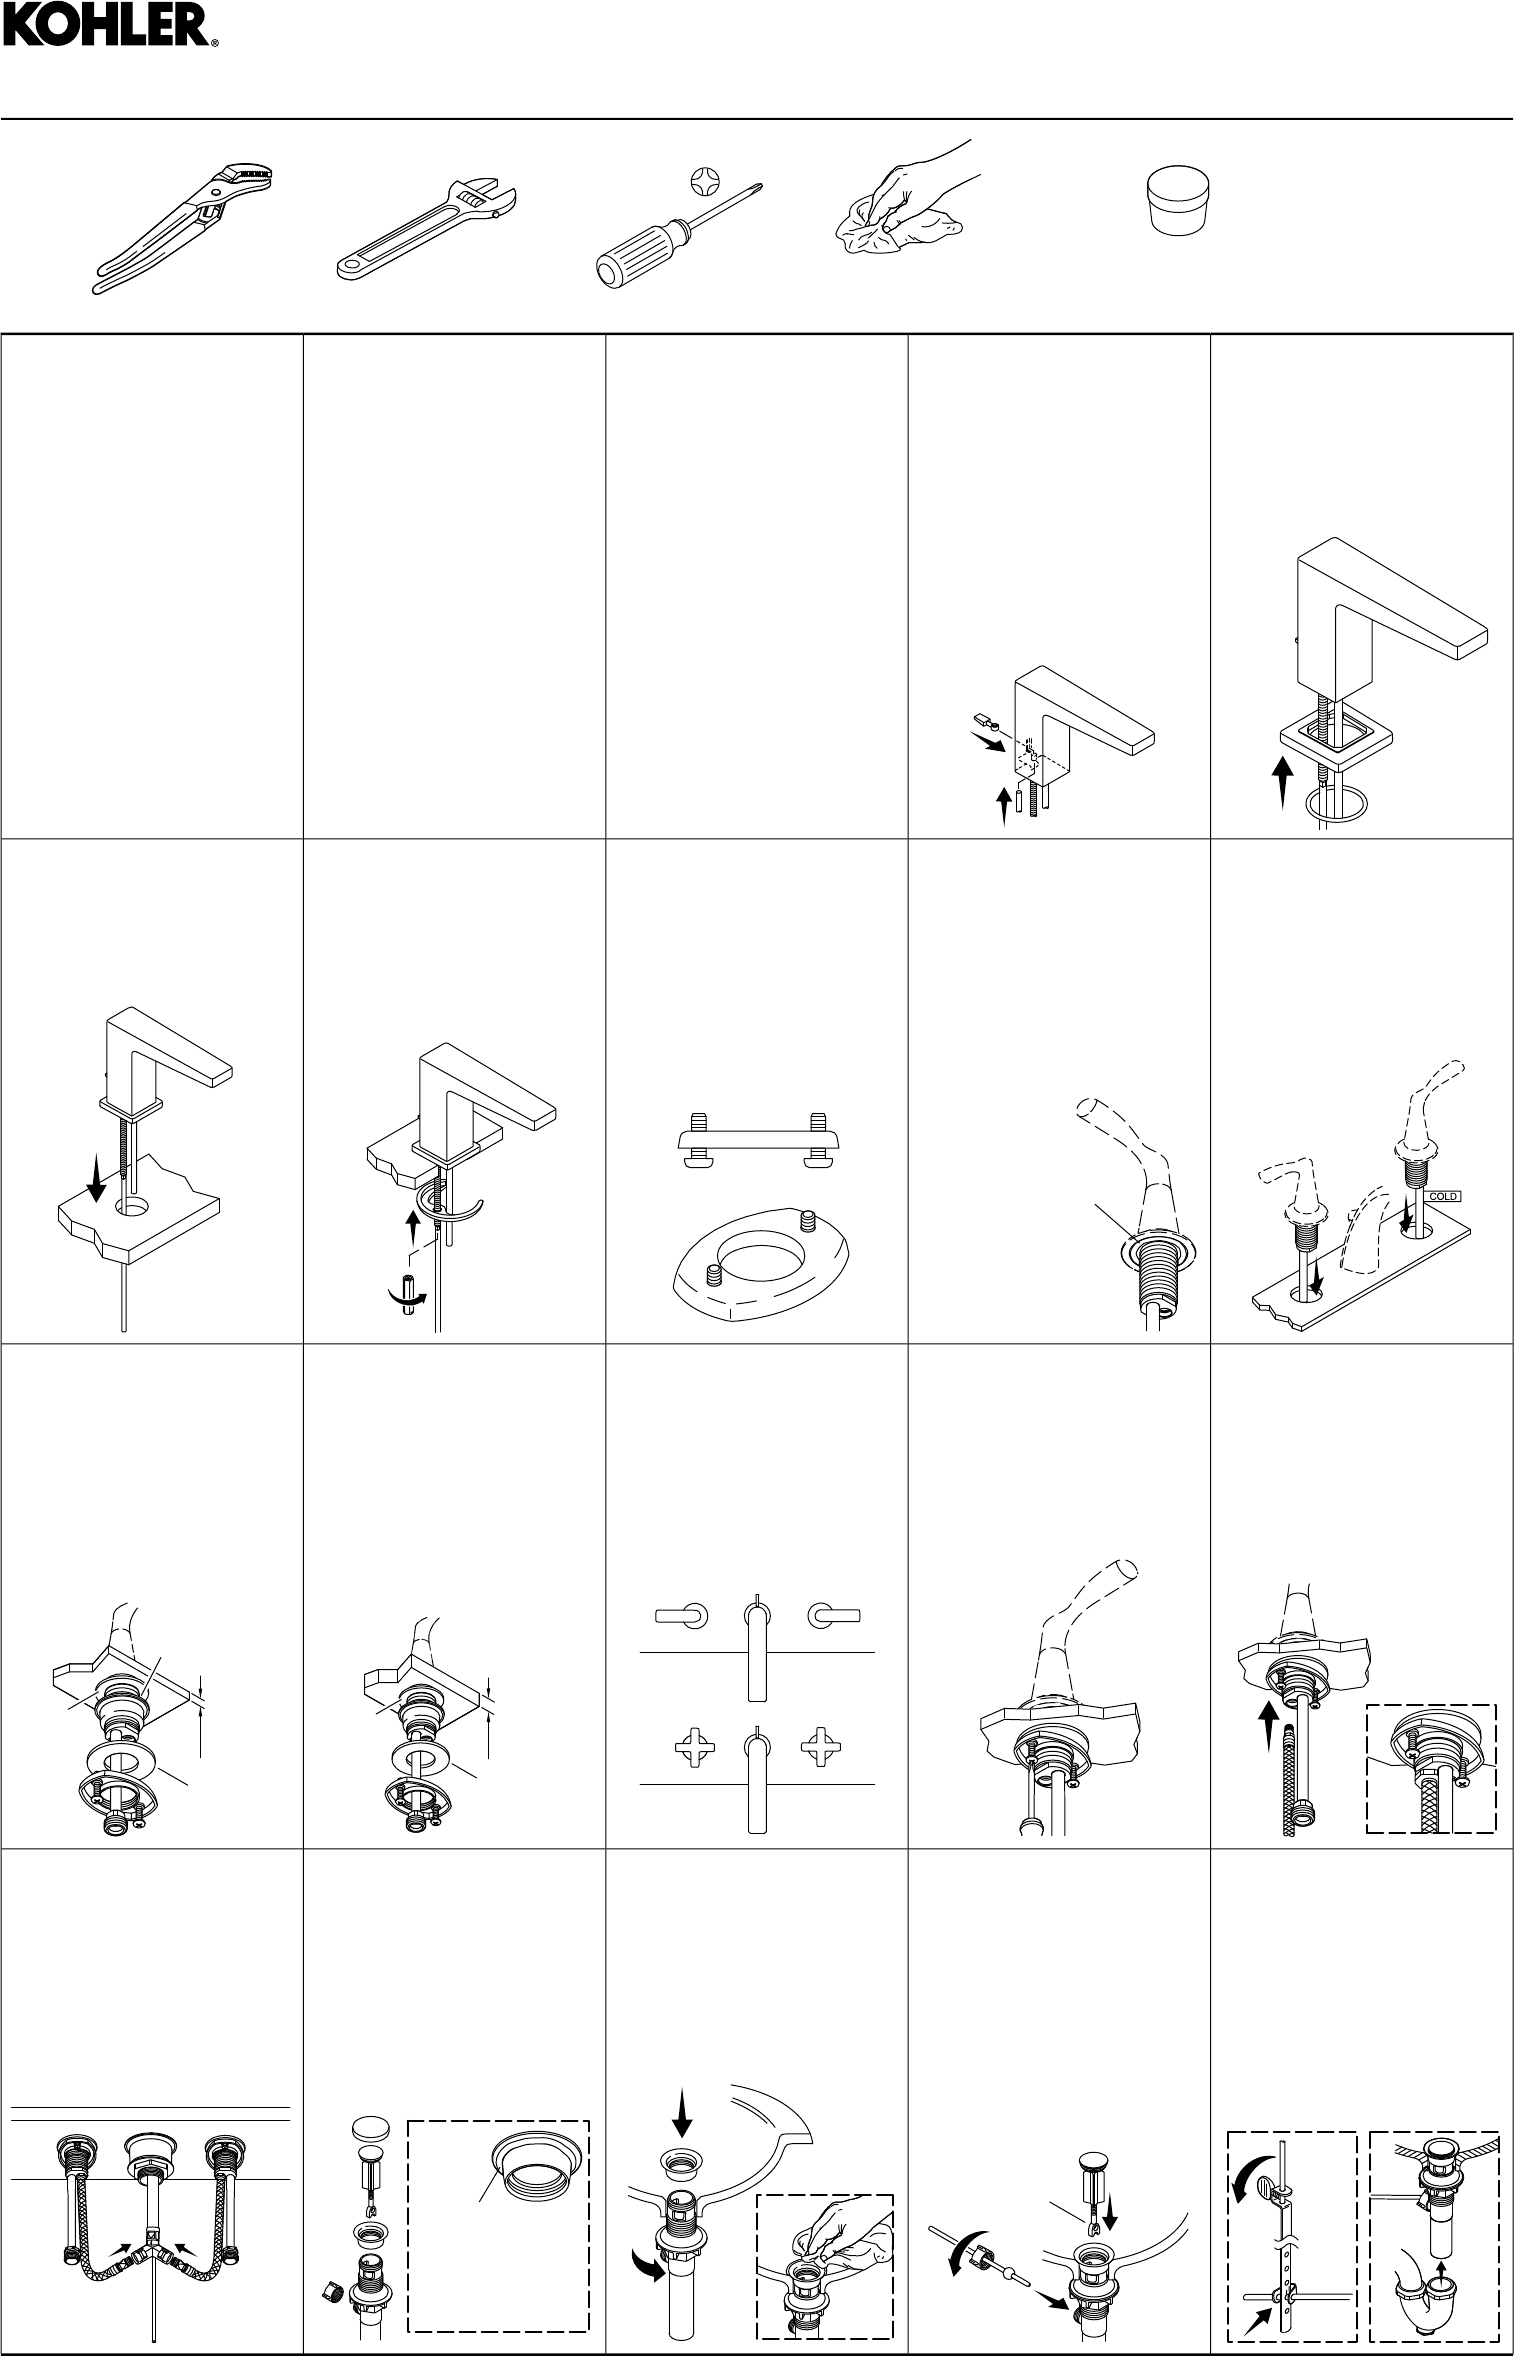
Stainless (Non-Staining) Plumbers Putty
Mastic de plombier non tachant
Masilla de plomería que no manche
2
Assemble the escutcheon and
gasket to the spout.
Assembler la plaque de finition
et le joint statique sur le bec.
Ensamble el chapetón y el
empaque al surtidor.
1
Insert the lift rod into the center
hole on the underside of the spout.
Insert the knob into the back of the
spout and attach to the lift rod.
Enfiler la tige de levage dans
l'orifice central sur le dessous du
bec. Insérer le bouton dans
l'arrière du bec et attacher sur la
tige de levage.
Introduzca el tirador en el orificio
central en la cara inferior del
surtidor. Introduzca la perilla en la
parte posterior del surtidor y
conecte el tirador.
Do not use petroleum-based
plumbers putty on marble or stone
surfaces.
Ne pas utiliser du mastic de plombier
à base de pétrole sur les surfaces en
marbre ou en pierre.
No utilice masilla de plomería
derivada del petróleo en superficies
de mármol o de piedra.
Important Information
If possible, assemble the faucet and
drain to the bathroom sink before
installing the sink.
Informations importantes
Si possible, assembler le robinet et
le drain sur le lavabo avant d'installer
ce dernier.
Información importante
De ser posible, ensamble la grifería
y el desagüe al lavabo antes de
instalarlo.
Record your model number below
for future reference:
Observe all local plumbing and
building codes.
Noter le numéro de modèle
ci-dessous pour référence
ultérieure :
Respecter tous les codes de
plomberie et de bâtiment locaux.
Anote abajo el número de su
modelo como referencia futura:
Cumpla todos los códigos locales de
plomería y de construcción.
7
Insert the "COLD" handle on the
right and the remaining handle
on the left.
Insérer la poignée « COLD »
(Froid) sur la droite et l'autre
poignée sur la gauche.
Introduzca la manija de agua fría,
identificada como "COLD", en el
lado derecho, y la otra manija en
el lado izquierdo.
Stainless (Non-Staining)
Plumbers Putty
Mastic de plombier pour
acier inoxydable (qui ne
tache pas)
Masilla de plomería que no
manche
6
Apply plumbers putty to the
underside of the handles.
Appliquer du mastic de plombier
sur le dessous des poignées.
Aplique masilla de plomería a la
cara inferior de las manijas.
5
For all of the rings, partially
thread the screws.
Enfiler les vis partiellement pour
tous les anneaux.
En todos los anillos enrosque
parcialmente los tornillos.
4
Install the bracket and secure the
faucet with the nut.
Installer le support et fixer le
robinet en place avec l'écrou.
Instale el soporte y fije la grifería
con la tuerca.
3
Insert the spout.
Insérer le bec.
Introduzca el surtidor.
12
Handtighten the hoses to the
underside of each handle.
Serrer les tuyaux sur le dessous
de chaque poignée.
Apriete a mano las mangueras
por abajo de cada manija.
11
Position the screws to the front
and back, and tighten to secure.
Placer les vis sur l'avant et
l'arrière et serrer pour fixer en
place.
Coloque los tornillos enfrente y
atrás, y apriételos hasta que
queden fijos.
10
Ensure that the handles are in
the OFF position. Align the
handles as shown.
S'assurer que les poignées sont
en position d'arrêt. Aligner les
poignées comme sur l'illustration.
Asegúrese de que las manijas
estén en la posición cerrada
(OFF). Alinee las manijas como
se ilustra.
> 5/8"
(16 mm)
Metal
Métal
Metal
Fiber
Fibre
Fibra
9
For thicker material, use or
discard the dished washer.
Loosely attach the ring.
Pour du matériau plus épais,
utiliser ou jeter la rondelle
bombée. Attacher l'anneau sans
serrer.
En el caso de material grueso,
use o deseche la arandela
cóncava. Instale el anillo sin
apretarlo.
Fiber
Fibre
Fibra
Metal
Métal
Metal
< 5/8"
(16 mm)
Dished Washer
Rondelle bombée
Arandela cóncava
8
For thin countertop or sink
material, use the dished washer.
Loosely attach the ring.
Pour un comptoir non épais ou
du matériau de lavabo, utiliser
la rondelle bombée. Attacher
l'anneau sans serrer.
En el caso de encimeras
delgadas o de material de
lavabo delgado, use la arandela
cóncava. Instale el anillo sin
apretarlo.
17
Connect the lift rod using the
spring clip. Tighten the thumb-
screw. Connect the trapway to
the tailpiece.
Raccorder la tige de levage à
l'aide de la bride à ressort. Serrer
la vis de serrage. Connecter le
siphon à la pièce de raccorde-
ment.
Conecte el tirador con el clip a
resorte. Apriete el tornillo de
mariposa. Conecte la boca de
sifón al tubo final.
Bolt
Boulon
Perno
16
Insert the rod and tighten the nut.
Then insert the stopper. If need-
ed, turn the stopper bolt to adjust
the height.
Insérer la tige et serrer l'écrou.
Insérer ensuite le bouchon. Si
nécessaire, tourner le boulon
d'arrêt pour régler la hauteur.
Introduzca el tirador y apriete la
tuerca. Luego introduzca el obtu-
rador. Si es necesario, gire el
perno del obturador para ajustar
la altura.
15
Install the flange.Tighten the nut.
Remove excess plumbers putty.
Installer la bride. Serrer l'écrou.
Retirer l'excès de mastic de
plombier.
Instale la brida. Apriete la tuerca.
Quite el exceso de masilla de
plomería.
Stainless
(Non-Staining)
Plumbers Putty
Mastic de plombier
non tachant
Masilla de plomería
que no manche
14
Disassemble the drain. Apply
plumbers putty to the underside
of the flange.
Désassembler le drain. Appliquer
du mastic de plombier sur le
dessous de la bride.
Desensamble el desagüe.
Aplique masilla de plomería a la
cara inferior de la brida.
13
Connect the tee to the hoses and
tube. Snap together until you
hear an audible click.
Raccorder le té aux tuyaux et au
tube. Enclencher ensemble
jusqu'à ce qu'un clic soit entendu.
Conecte la T a las mangueras y
al tubo. Únalas a presión hasta
que escuche un chasquido.
1355445-2-A