
Installation Guide

1. Prepare the Site
Install adequate backing material to the wall according to the sink
installation instructions.
Complete the finished wall.
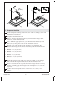
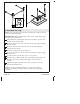
Refer to the leg Specification Sheet, and mark the hanger bolt
locations on the finished wall.
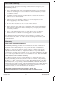
Use a drill bit appropriate for your finished wall material, and
drill 1/4″ (6 mm) pilot holes at the marked locations.
Identify your sink model in the list below to determine the
distance the hanger bolts must extend beyond the finished wall.
•
K-2239 - 1-1/4″ (32 mm)
•
K-2259 - 1-1/4″ (32 mm)
•
K-2269 - 7/8″ (22 mm)
•
K-29999 - 1-1/4″ (32 mm)
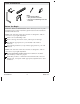
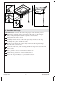
Install the hanger bolts with cap nuts (provided) so the hanger
bolts extend the required distance from the finished wall.
Remove and retain the cap nuts from the hanger bolts. You may
need to carefully grip the hanger bolts with pliers to loosen the
cap nuts.
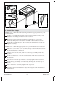
Position the sink upside down on the floor on a clean, soft
surface.
1/4"
(6 mm)
Kohler Co. 3 1312546-2-B