
Installation Guide
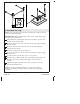

4. Install the Legs
NOTE: Use a drill bit and fastening hardware appropriate for your
wall material.
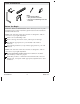
Position a wall bracket inside each traced escutcheon line, and
mark the mounting hardware hole locations.
Based upon the fastening hardware required for your wall
material, drill pilot holes at the marked wall bracket locations.
Install the wall brackets to the wall at the drilled hole locations.
Tighten securely.
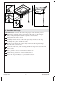
NOTE: Use a drill bit appropriate for your finished floor material.
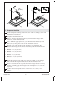
Drill two 5/16″ holes 1/2″ (13 mm) deep at the marked locations
in the finished floor material.
Lift the front of the sink, and move the leg assembly back into
position.
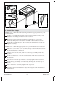
Fit the escutcheons over the wall brackets with the setscrews at
the bottom.
Use the hex wrench provided to securely tighten the setscrews.
Level the leg assembly as needed by turning the levelers up or
down.
Use a wrench to securely tighten the cap nuts.
Complete the sink installation by following the sink installation
instructions.
1312546-2-B 8 Kohler Co.