
Installation & Assembly


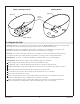


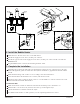

6. Install the Bubble Heater
Install the tee to the hot water valve on the bath faucet.
Thread the supply hose into the 1/4” NPT port of the tee.
Thread the opposite side of the supply hose into the 1/4” NPT port of the solenoid valve. Do not
kink the hoses.
Plug the bubble heater cord into the remaining electrical outlet.
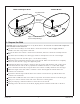
7. Complete the Installation
Carefully remove the blocks and make sure the bath rim engages the top of the shroud on all sides.
Ensure all alignment guides are inside the shroud; there should be no gap between the bath and the
shroud.
Install the drain flange and overflow cover according to the drain instructions.
Close the bath drain. Fill the bath to the overflow, and check for leaks.
If desired, apply a thin, continuous bead of clear or color-matched 100% silicone sealant to the seam
between the shroud and the finished floor.
Test Run the Bath
Check all electrical connections and make sure that the electrical power to the bath is on.
Fill the bath to a level at least 4″ (102 mm) above the top of the highest airjet.
Operate the bath for 5 minutes and test the airjets.
For additional information on bath operation, see the ″Operating Instructions″ section.
1385103-2-A 10 Kohler Co.