
Installation Guide


3. Prepare the Bath
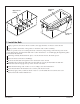
NOTICE: Refer to the drain instructions to dry fit to the bath. Do not cement and complete the drain
installation until instructed to do so.
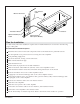
Dry fit the drain and overflow assembly to the bath. Refer to the drain instructions. Do not apply
sealant or cement to the drain components at this time.
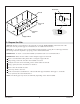
Temporarily position a 2x4 in the installation area to support the bottom of the bath opposite the
drain.
With help, position the bath (without the shroud) and drain assembly over the drain pipe. Trim the
drain pipe as needed
Loosen the drain and overflow connections from the bath.
Remove the bath, leaving the drain and overflow assembly attached to the drain pipe.
Remove the temporary 2x4 support from the installation area.
Cement and assemble the drain and overflow components. Connect the drain to the drain pipe.
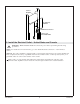
Apply slow-drying silicone adhesive to the bottom of the shroud.
Carefully position the shroud over the drain, aligning the hole with the traced mark on the floor.
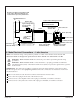
4. Prepare the Cables
IMPORTANT! The cables that will connect the control amplifier to the bath transducers, chromatherapy
control (if equipped), and the user interface are each 25’ (7.6 m) in length. Plan the location of the control
amplifier so these cables, when routed and connected, will easily reach without placing tension on the
cables.
Carefully cut the cable tie securing the coiled transducer wires to the back of the bath.
Bind all electrical cables together to allow for easier routing through the shroud.
Apply sealant to the
bottom before positioning.
Attach to the
drain pipe.
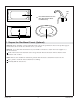
Dry fit the
drain assembly.
Temporary
2x4 Support
Kohler Co. 7 1237789-2-C