
Installation Guide


2. Install the Sink
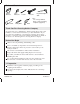
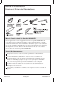
Cut out the opening by carefully following the pencil line traced
from the template.
Temporarily position the sink in the countertop opening. Verify
the fit and position.
Trace a pencil line, or apply a border of masking tape around the
outside edge of the sink.
Carefully remove the sink from the countertop opening. Return
the sink to the carton.
CAUTION: Risk of product damage. Do not use plumbers putty
on plastic surfaces, as it will damage the material.
Install the sink strainer to the sink according to the
manufacturer’s instructions.
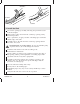
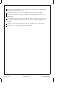
Apply a ribbon of sealant on the countertop between the edge of
the opening and the penciled guideline or masking tape border.
Spread the sealant evenly with a putty knife.
Carefully position the sink into the countertop opening so the
“Kohler” logo is to the back. Line up the sink edges with the
pencil line or masking tape.
Press the sink down firmly and evenly.
If used, remove the masking tape.
Immediately wipe away any excess sealant, and fill any voids as
needed.
Verify that the sink has not moved out of position.
Sealant
Guideline
Sealant
1019938-2-A 4 Kohler Co.