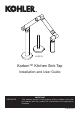
K-6227A Karbon™ Kitchen Sink Tap Installation and User Guide INSTALLER: IMPORTANT This product manual is the property of the customer and must be retained with the product for maintenance and operational purposes.
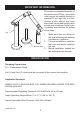
important information Due to the non-standard diameter of the remote valve (51 mm), the remote valve cannot be installed through a standard 35 mm tap hole in a sink. Choose a sink without tap holes then install the tap and remote valve through the countertop. Refer to the countertop manufacturer for drilling of the holes. Tap 1. 2. Remote Valve 3. Make sure that you follow all the local plumbing and building regulations in operation.
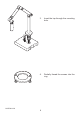
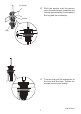
Installation Valve Hole 1. Locate the remote valve within 203 mm of the spout. Refer to the countertop manufacturer for drilling of the holes. 2. Apply silicone sealant to the underside of the concealing plate.
1109784-A2-A 3. Insert the tap through the mounting hole. 4. Partially thread the screws into the ring.
. Fit the fibre and metal washers onto the threaded shank Install the ring leaving approximately 6 mm between the ring and the countertop. Fibre Washer 6 mm Ring Metal Washer 6. 5 Turn the ring until the screws are to the front and the back. Tighten the screws securely and evenly.
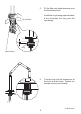
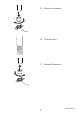
Remote Valve 7. Apply silicone sealant to the underside of the remote valve. Install the remote valve through the hole in the countertop. Hot Cold On 1109784-A2-A 8. Before tightening the remote valve, make sure that the cold water supply is on the left hand side. 9. Partially thread the screws into the ring.
Countertop 10. Slide the washer onto the remote valve threaded shank. Install the ring leaving approximately 6 mm between the ring and the countertop. Washer Ring 6 mm Ring 11. Turn the ring until the screws are to the front and the back. Tighten the screws securely and evenly.
12. Connect the inlet hose to the spout connection. Spout Connection Inlet Hose 13. Connect and tighten the supply hoses. Note! If the sink installation requires that you coil the supply hoses, maintain a 76 mm diameter inside the coil. Ø 76 mm Min Cold Hot 14. Check for leaks.
15. Remove the aerator. Key 16. Flush the lines. 17. Reinstall the aerator.
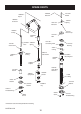
Spare Parts 1088909 Setscrew 1090946** Spout 1071700** Handle 1088909 Setscrew 1054197** Ball Joint 1088910 O-Ring 1071701 Friction Cup 1071702** Disk 1090945** Tube 1021051 Check Valve 1090949** Base 1054201 Spring 1071704** Concealing Plate 1071689** 1090943 Tube Spring 1071703 Bearing 42043 O-Ring 1095310 Check Valve 1088910 O-Ring 1090948 Valve 1018336** Mounting Nut 1090944 Adapter 1109796 1031961 Shank Valve Body w/Hoses 1090941 Sprayhead 1090942 Aerator 77950 O-Ring 22352 Washer
dimensions 52 mm 337 mm Max 102 mm 203 mm Max 176 mm Ø 67 mm 64 mm Max 1-1/4" Ø 67 mm 2" 227 mm 110 mm 64 mm 590 mm All dimensions in mm 11 1109784-A2-A
Care and cleaning Like anything of lasting quality, Kohler tapware and fittings require a certain amount of periodic care to preserve their lustrous finish. Clean your new Kohler tapware and fittings with a mild soap, rinse thoroughly with warm water and dry with a clean, soft cloth. The ideal cleaning technique is to always blot dry any water from metal surfaces. Allowing water to evaporate on metal will form water deposits.