
Instructions / Assembly


Troubleshooting
Symptom: Alignment Recommended Action
1. Top of the door panel is tilted away from the wall. A. Remove the door panel from the top track and lower the roller that is closest to the wall. See step 19.
2. Boom of the door panel is tilted away from the
wall.
A. Remove the door panel from the top track and raise the roller that is closest to the wall. See step 19.
3. Door panel does not touch the bumper. A. Determine whether the door panel top or boom is closer to the wall, and then adjust the roller closest to the wall.
4. Boom track is miscut or skewed. A. The notched wall jamb ts over the boom track to cover any miscut or skewed cuts. Seal as directed to ensure proper watertight seal. See step 27.
Symptom: Water Leaks Recommended Action
1. Water leaks between panels. A. When showering, make sure the inside panel is against the showerhead wall.
2. Water leaks between the wall jamb and the door
panel.
A. Adjust the door panel to line up with the wall jamb.
3. Water leaks under the boom track. A. Check for proper silicone sealant application. See steps 26 and 27. Apply more silicone sealant in the leak location.
Symptom: Operation (open/close) Recommended Action
1. Outside panel is dicult to move. A. Ensure a gap exists between the boom track and the door panel. If no gap exists, lower the rollers to the next hole.
B. Ensure the inside centerguide is properly secured with the self-tapping screws. See step 24.
C. Ensure the rollers are properly installed. See steps 15 and 17.
D. Clean any debris in the top track groove.
2. Inside panel is dicult to move. A. Ensure a gap exists between the boom track and the door panel. If no gap exists, lower the rollers to the next hole.
B. Ensure the inside centerguide is properly secured with the self-tapping screws. See step 24.
C. Ensure the rollers are properly installed. See steps 15 and 17.
D. Clean any debris in the top track groove.
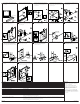
Measure distance “B” above the wall jambs.
Subtract 1/32” (1 mm) or the width of a saw
blade from “B.” Mark and cut the top track.
Position the top track over the wall jambs. Either
side of the top track may face out.
For both doors, slide a gasket over the top of the
glass panel and into each mounting hole. Press
the hanger bracket over the gasket and align the
hanger brackets with the mounting holes.
While pressing downward on the hanger
brackets, use screwdrivers to thread the bolt into
the barrel nut. Tighten until the hanger brackets
are secured rmly in place.
On the inside panel, assemble a roller to the
middle hole of each hanger bracket. Install
the rollers on the side of the door panel that is
opposite the label.
Lift the inside panel onto the inside track. The
label faces the outside of the bath/shower.
On the outside panel, assemble a roller to the
middle hole of each hanger bracket. Place the
rollers on the same side of the door panel as the
label.
Lift the outside panel onto the outside track. The
label faces the outside of the bath/shower.
If either panel needs adjustment, remove the
door and position the rollers in new holes to raise
or lower the glass.
Tilt the boom of the inside panel away from the
outside panel.
Slide the guide at an angle under the door so the
boom seal ts into the groove of the guide. Tilt
the door back into position so the guide slides
under the outside panel.
Measure and mark the center of the boom track.
Center the guide on the boom track and align
the door panels with the guide.
On the inside of the bath/shower, hold the guide
against the boom track and slide the doors from
wall to wall. If the doors bind, refer to step 19 for
the adjustment procedure.
Hold the guide in place and secure with the two
self-tapping screws. Do not overtighten!
Assemble both towel bars with a spacer on each
side of the door panel. Use a hex wrench to
tighten the screws. Do not overtighten!
Outside the bath/shower, use silicone sealant to
seal along the entire length of the wall jambs and
the boom track.
Inside the bath/shower, use silicone sealant to
seal along the entire length of the wall jambs and
where the wall jambs meet the boom track.
21414861-2-A ©2020 Kohler Co.
11 12
17
22
13
18
23
16
21
14
19
24
15
20
26
25
27
Warranty
Need help? Contact our Customer Care Center.
USA/Canada: 1-800-4KOHLER (1-800-456-4537),
Mexico: 001-800-456-4537
For service parts information, visit kohler.com/
serviceparts.
For care and cleaning information, visit kohler.com/
clean.
This product is covered under the KOHLER®
One-Year Limited Warranty, found at kohler.com/
warranty. For a hardcopy of warranty terms, contact
the Customer Care Center.