
Installation Guide


Instale los chapetones (cont.)
¡IMPORTANTE! Si va a instalar los chapetones en una superficie dispareja (como
líneas de boquilla del azulejo), aplique un sellador adecuado en el lado posterior de
los chapetones. No utilice selladores derivados del petróleo.
Enrosque los chapetones en los niples.
NOTA: Tenga cuidado de no dañar el acabado de los chapetones al apretar.
Apriete los chapetones con una llave de dado largo de 7/8″ o una llave de boca
abierta de 7/8″.
Asegúrese de que los chapetones estén alineadosyanivelunoconelotro.Apriete
más los chapetones, si es necesario.
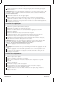
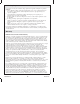
3. Install the Faucet
NOTICE: Be careful not to damage the O-rings on the escutcheons during this
procedure. The O-rings are pre-installed in the escutcheons.
Carefully slide the faucet assembly onto the escutcheons.
Using a 1/8″ hex wrench, secure the faucet assembly to the escutcheons with
setscrews. The setscrew must be flush or recessed.
NOTE: If the setscrews are not flush: Loosen the setscrews, then remove the faucet
assembly from the escutcheons. Reinsert the faucet assembly, then retighten the
setscrews.
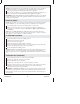
Correct
Correct
Correcto
Setscrew
Vis de retenue
Tornillo de fijación
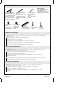
Aerator Tool
Outil pour aérateur
Herramienta para
el aireador
Kohler Co. 7 1169540-2-A