Installation and Care Guide Guide d’installation et d’entretien Guía de instalación y cuidado Single-Handle Bath & Shower Trim Garniture de baignoire et de douche à une poignée Guarnición de bañera y ducha de una manija K-R45783 M product numbers are for Mexico (i.e. K-12345M) Los números de productos seguidos de M corresponden a México (Ej. K-12345M) USA/Canada: 1-800-4KOHLER México: 001-800-456-4537 kohler.com 1183592-2-B ©2012 Kohler Co.
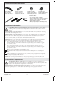
Tools/Outils/Herramientas Strap Wrench Clé à sangle Llave de correa Silicone Sealant Joint en silicone Sellador de silicona Plumbers Putty Mastic de plombier Masilla de plomería 1/8" Sealant Tape Ruban d'étanchéité Cinta selladora Plus/Plus/Más: • 1/2" Copper Tube or Nipple Tube ou mamelon en cuivre 1/2" NPT Tubo de cobre o niple de 1/2" NPT • Rags/Chiffons/Trapos • Emery Paper/Papier émeri/Papel lija Important Information CAUTION: Risk of personal injury.
Informations importantes (cont.) NOTICE: Risque d’endommagement du produit. L’utilisation de vis longues pour l’installation de la garniture peut endommager la vanne K-2971-KS. Lors de l’utilisation de cette vanne et de la garniture avec des épaisseurs de mur xérieures à 13/16″ (21 mm), utiliser le kit d’installation de mur fin 88526.
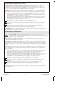
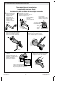
Installation/Installation/Instalación Slip-Fit Spout Installation Installation de bec montage glissant Instalación del surtidor de montaje deslizante 1 Install the tube. 2 Remove burrs Installer le tube. Finished Wall Instale el tubo. Mur fini Pared acabada Hole in Wall Orifice dans le mur Orificio en la pared 4-1/8" (105 mm) with emery paper. Retirer toutes ébarbures avec du papier émeri. Limpie las rebabas con papel lija. 3 Apply plumbers putty or sealant to the spout.
Installation/Installation/Instalación Threaded Spout Installation Installation de bec fileté Instalación del surtidor de montaje roscado 1 Apply sealant tape 2 Install the 1/2" nipple. to the 1/2" nipple. Appliquer de l'étanchéité au mamelon de 1/2". Aplique cinta selladora al niple de 1/2". Installer un mamelon de 1/2". Instale el niple de 1/2".
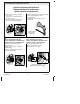
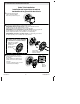
Installation/Installation/Instalación Optional Temperature Adjustment Réglage optionnel de température Ajuste opcional de temperatura 1 Turn the valve clockwise to the full 2 After several minutes, check the temperature. open position. Tourner la valve complètement vers la position ouverte. Gire hacia la derecha la válvula a la posición completamente abierta. Après quelques minutes, vérifier la température. Después de varios minutos, revise la temperatura.
Installation/Installation/Instalación Optional Temperature Adjustment Réglage optionnel de température Ajuste opcional de temperatura 4 Slowly turn the valve stem to adjust the maximum water temperature. Tourner lentement la tige de valve pour ajuster la température maximum d'eau. Gire lentamente la espiga de la válvula para ajustar la temperatura máxima del agua. 5 Tab/Languette/Lengüeta Reinstall the collar with the setscrew against the tab. Reinstall the O-ring.
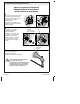
Installation/Installation/Instalación Shower Arm Installation Installation du bras de douche Instalación del brazo de ducha 1 2 Apply sealant tape. Hole in Wall Orifice dans le mur Orificio en la pared Appliquer du ruban d'étanchéité. Aplique cinta selladora. 3 Attach the shower arm. Attacher le bras de douche. Fije el brazo de ducha. 5/8" (16 mm) Max/Max/Máx 2" (51 mm) Max/Max/Máx Nipple Mamelon Niple 4 Apply plumbers putty or sealant to the shower arm escutcheon.
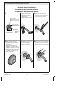
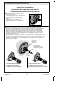
Installation/Installation/Instalación Valve Trim Installation Installation de la garniture de robinet Instalación de la guarnición de válvula 1 Discard the plaster guard. Jeter le renfort en plâtre. Deseche el protector de yeso. 2 Secure the seal plate with the 2-3/8" (60 mm) screws. IMPORTANT: When installing K-2971, if the finished wall is less than 13/16" (21 mm), use the 1-5/8" (41 mm) screws. Glisser la plaque d'étanchéité avec les vis 2-3/8” (60 mm).
Installation/Installation/Instalación Valve Trim Installation Installation de la garniture de robinet Instalación de la guarnición de válvula 4 Turn the valve stem counterclockwise to the "OFF" position. Tourner la tige de la valve complètement vers la gauche à la position fermée "OFF". Gire la espiga de la válvula a la izquierda a la posición cerrada "OFF". 5 Attach the stem adapter. Begin with the standard wall installation. Attach the handle.
Installation/Installation/Instalación 6 Hold the handle in the OFF position and thread the bonnet clockwise. Hold the escutcheon tight against the wall. Maintenir la poignée en position OFF et enfiler le chapeau dans le sens des aiguilles d'une montre. Maintenir l'applique de manière serrée contre le mur. Sostenga la manija en la posición cerrada y enrosque el bonete hacia la derecha. Sostenga ajustado el chapetón contra la pared.
Installation/Installation/Instalación Service the Screen Washer Dépanner la rondelle à grille Dé servicio a la arandela de rejilla 1 4 Remove the showerhead with a strap wrench. Retirer la pomme de douche avec la clé à sangle. Retire la cabeza de ducha con una llave de correa. Reinstall the screen. Réinstaller la crépine. Vuelva a instalar la rejilla. 1183592-2-B 2 Use a thin flat-blade screwdriver 3 Clean the washer. to pry the screen off. Utiliser un tournevis à lame plate pour déloger la crépine.
Care and Cleaning For best results, keep the following in mind when caring for your KOHLER product: • Use a mild detergent such as liquid dishwashing soap and warm water for cleaning. Do not use abrasive cleaners that may scratch or dull the surface. • Carefully read the cleaner product label to ensure the cleaner is safe for use on the material. • Always test your cleaning solution on an inconspicuous area before applying to the entire surface. • Do not allow cleaners to sit or soak on the surface.
Cuidado y limpieza (cont.) Para obtener información detallada de limpieza y los limpiadores a considerar, visite www.kohler.com/clean. Para solicitar información sobre el cuidado y la limpieza, llame al 1-800-456-4537. Warranty KOHLER® Faucet Lifetime Limited Warranty Kohler Co. warrants its Faucets* manufactured after January 1, 1997, to be leak and drip free during normal residential use for as long as the original consumer purchaser owns his or her home.
Warranty (cont.) dispensers; and faucets used in commercial settings, and outside North America, are covered by Kohler Co.’s one-year limited warranty. **Never use cleaners containing abrasive cleansers, ammonia, bleach, acids, waxes, alcohol, solvents or other products not recommended for chrome. This will void the warranty. Garantie Garantie limitée à vie du robinet KOHLER® Kohler Co.
Garantie (cont.) pouvez également avoir d’autres droits qui varient d’un état ou d’une province à l’autre. Ceci constitue la garantie écrite exclusive de Kohler Co.
Garantía (cont.) KOHLER CO. Y/O EL VENDEDOR OFRECEN ESTAS GARANTÍAS QUE SUSTITUYEN TODAS LAS DEMÁS GARANTÍAS, EXPRESAS O IMPLÍCITAS, INCLUYENDO, ENTRE OTRAS, LAS GARANTÍAS IMPLÍCITAS DE COMERCIALIZACIÓN E IDONEIDAD PARA UN USO DETERMINADO. KOHLER CO. Y/O EL VENDEDOR DESCARGAN TODA RESPONSABILIDAD POR CONCEPTO DE DAÑOS PARTICULARES, INCIDENTALES O INDIRECTOS.
1183592-2-B Kohler Co.
Kohler Co.
1183592-2-B