
Installation Guide
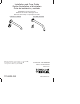


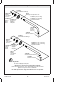

1. Install the Spout
IMPORTANT! Use care when installing the spout to avoid scratching the finish.
Remove the plaster guard and save the three screws. They will be required to
attach the spout shank.
Remove and discard the thread protector.
Thread the spout into the outlet port.
Secure the flange to the wall with the screws (wrench supplied) that were
removed from the thread protector.
Confirm that the O-ring is in the notch in the interior of the spout escutcheon.
Apply plumbers putty or other sealant to the back surface of the spout escutcheon
according to the putty manufacturer’s instructions.
Press the escutcheon firmly against the wall.
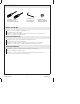
Install the Sensor Cover
Turn the setscrew (already installed in the sensor) counterclockwise until it is
tight. Do not overtighten.
Position the sensor cover and secure with the setscrew. Do not overtighten.
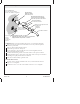
Escutcheon
Applique
Chapetón
Plaster Guard
Renfort en plâtre
Protector de yeso
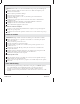
Discard the thread protector.
Jeter la protection de filetage.
Deseche el protector de roscas.
Setscrew
Vis de
retenue
Tornillo de
fijación
Sensor Cover
Cache-capteur
Tapa del sensor
Faucet Outlet Port
Port de sortie de robinet
Puerto de salida de la grifería
Flange/Bride/Brida
Screws/Vis/Tornillos
O-Ring/Joint torique/Arosello
Spout/Bec/Surtidor
Apply plumbers putty or sealant.
Appliquer du mastic de plombier ou d'étanchéité.
Aplique masilla de plomería o sellador.
Kohler Co. 3 1114829-2-B