
Installation Guide
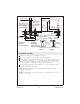


5. Check Operation of Valves
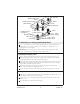
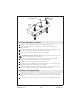
Thread a 1/4” pipe plug into the top of the spout supply tube.
Ensure that the valves are closed (cold — fully counterclockwise; hot —
fully clockwise).
Turn on the main water supply and check the complete installation for leaks
with the valves closed and open. Repair leaks as needed.
Close both valves and turn off the main water supply.
WARNING: Risk of personal injury. Lines will be pressurized. Do not
lean over pipe plug as you remove it.
Wrap a towel around the pipe plug to prevent water spray. Water will
purge from the supply tube when you remove the plug.
Carefully loosen the pipe plug to remove pressure.
Thread the pipe plug back into the spout supply tube. Leave the pipe plug
installed until the spout and handles are installed.
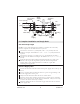
Install the cardboard plaster guards over both valves and the spout supply
tube. Leave in place until the spout and handles are installed.
6. Install Tile (If Applicable)
Verify that there will be a 1–1/4” (3.2cm) distance from the top of the sleeve
to the top of the tile. If there is not, correct the valve clearance as described
earlier.
Install tile up to the plaster guards on the valves and the spout supply tube.
1/4” Pipe Plug
Close
Cold
Close
Hot
1016271-2-A 10 Kohler Co.