
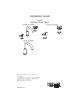
Installation Guide
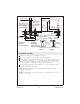

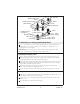

4. Complete Installation on Rough Deck
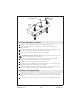
Set Valve Body Height
NOTE: Use one of the following two formulas to calculate the valve body
clearance required for the finish material at your site.
For tile that is less than 1” (2.5cm) thick, add 1–1/4” (3.2cm) to the tile
thickness. Example: Tile thickness is 3/4” + 1–1/4” = 2” (5cm) of clearance
required.
For tile that is between 1” (2.5cm) and 1–1/4” (3.2cm) thick, add only 1”
(2.5cm) to the tile thickness. Example: Tile thickness is 1–1/4” + 1” = 2–1/4”
(5.7cm).
Adjust the threaded collar until the dimension from the top of the valve
threads to the top of the rough deck equals the clearance requirement
needed. Make a note of this dimension. You will use it again after
connecting the supply tube.
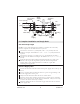
Connect Supply Tube
Measure the distance from the bottom of the spout supply tube to the top of
the tee.
Add 1” (2.5cm) to this measurement and cut a piece of copper tubing to fit
into the supply tube and tee port.
Fully loosen the threaded collars but do not remove them.
Pivot the valve bodies enough to remove the tee and two pieces of tubing.
If the valve body holes are smaller than recommended, it may be necessary
to remove the entire valve body assembly.
Install the tubing into the tee. Match the copper tube from the tee with the
spout supply tube.
2-1/8”
(5.4cm)
Max.
2”
(5cm)
1-1/4” (3.2cm)
Top of Valve
Threads
3/4” (2cm)
Threaded
Collar
Rough
Deck
Tile
Spout
Supply
Tube
Solder
Te
e
Copper
T
ube
Hot
Supply
Cold
Supply
Valve Body
Mounting
Nut
1016271-2-A 8 Kohler Co.