
Installation Guide


3
1012557-2-A
Kohler Co., Kohler, WI U.S.A.
2. INSTALLATION ON FINISHED DECK OR RIM
NOTE: For installation on rough (unfinished) deck,
proceed to Section 3.
Preparation: For installations with 8” (20.3cm) centers
using copper tubing (1/2” nominal, 5/8” O.D.), cut the
tubing to the lengths as follows:
2 pieces: 2-7/8” (7.3cm) long
1 piece: 2-3/8” (6cm) long (for spout supply)
For non-8” (20.3cm) center installations, adjust the
tubing lengths as necessary.
NOTE: Leave the protective sleeve on the spout supply
tube until the spout is installed. This is an O-ring sealing
surface, which may be damaged if unprotected.
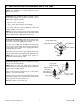
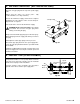
Install Spout Supply Tube: Slide a brass washer from
the bottom of the spout supply tube over the threads until
the washer reaches the supply tube shoulder.
Insert the spout supply tube through the mounting hole
from the top of the deck/rim. Ensure that the flat portion
of the washer faces forward. The supply tube will be
suspended by the washer.
Slide a brass washer onto the spout supply tube from the
bottom, and thread on the mounting nut. Tighten the nut.
NOTE: Do not use the supplied wood screws for
installation on finished deck or rim.
Fig. #2
Supply Tube Shoulder
Brass Washer
Brass Washer
Nut
Spout Supply Tube
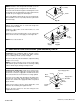
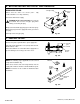
Install Valve Bodies: Thread one mounting nut, flange
side up, onto each valve body.
NOTE: Rims less than 1/4” (6mm) thick require two
rubber washers in the following step; other installations
require only one rubber washer.
Slide one fiber washer, followed by one or two rubber
washers, onto each valve body.
Insert the 2-7/8” (7.3cm) long copper tubes between the
valve bodies and the 1/2” tee. Then insert the 2-3/8” (6cm)
long copper tube into the top of the tee.
DO NOT solder the connections yet.
Fig. #3
Rubber Washer
or Washers
Fiber Washer
Mounting Nut
Valve Body
2-7/8” (7.3cm)
Copper Tubes
2-3/8” (6cm)
Copper Tube
1/2”
Tee