
Installation Instructions


2. Installation to Valves
NOTE: These steps are necessary only for installations incorporating
side body valves.
Tighten the copper adapter to the spout shank.
Determine the number and lengths of copper tubing pieces
needed to complete the installation.
NOTE: Combinations of copper 90° street ells or copper 90° ells can
be used to make the connection to the valves.
Dry fit the tubing, elbows, and tee and check for proper size.
Solder the joints together when the components fit together
properly.
3. Complete the Installation
Ensure that both faucet handles are turned off (hot = clockwise,
cold = counterclockwise).
Turn on the main water supply and check for leaks.
Turn on the hot and cold valves and run water through the spout
to remove debris. Check for leaks.
Turn off the hot and cold valves.
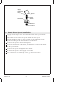
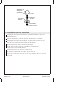
Spout
Spout
Shank
Adapter
Tee
Copper
Tubing
90˚ Street Ell
(4 shown)
Installation Between the Valves
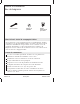
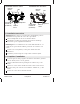
Spout
Spout
Shank
Copper
Tubing
90˚ Street Ell
(6 shown)
Adapter
Tee
Installation Outside the Valves
105614-2-AB 4 Kohler Co.