
Installation Guide


2. Installing the K-262 Handle
IMPORTANT! Risk of product damage. To avoid damaging the
ceramic cap, do not overtighten the flathead screw.
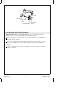
If replacing the ceramic trim, loosen the setscrew and pull the
handle off the stem extension.
Loosen the oval-head screw and remove the bonnet, washer and
spring.
Loosen the dog-point screws and remove the mounting plate.
Remove the ceramic ring.
For new and replacement installations, place a ceramic ring over
the valve.
Secure with a mounting plate and two dog-point screws.
Place the spring, washer, and bonnet over the valve.
Secure the bonnet onto the valve with the oval-head screw.
Place the ceramic cap into the oval handle and secure from
underneath with a flathead screw.
Align and place the handle assembly onto the bonnet. Secure
with the setscrew.
Ceramic
Ring
Ceramic
Cap
Mounting
Plate
Dog-Point
Screws
Oval-Head
Screws
Oval
Handle
Bonnet
Spring
Washer
Setscrew
110424-2-AC 4 Kohler Co.