
Installation Guide

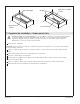

2. Prepare the Counter – Under-mount Only
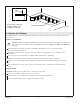
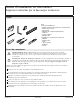
With the edges of the template (provided) parallel with the edges of the counter, affix the template
to the counter using masking tape.
NOTE: A counter with radius edges is recommended.
Determine the preferred edge treatment for the counter. Consult with your local counter fabricator
for instructions on cutting the counter edges properly.
Using the proper cutting method for your counter type, cut along the edge of the template cutout
line.
Remove the template when cutting is complete.
Smooth the edge of the counter as needed.
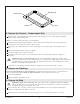
Carefully position the counter on top of the bath to ensure correct fit and appearance. Adjust as
necessary.
CAUTION: Risk of property damage. Braces must be installed to support the weight of the
counter from below. Do not rely on the bath alone to support this weight. Refer to any instructions
supplied with the counter for proper bracing installation. If braces are not installed, the counter
may flex and possibly damage the bath.
Using 2x4s or other bracing material, add braces (required) to the underside of the counter.
3. Prepare the Plumbing
NOTE: For through-the-floor drain installations: A drain hole will need to be cut to accommodate the
drain connections. For above-the-floor drain installations: A hole will not need to be cut.
Position the plumbing.
Cap the supplies and check for leaks.
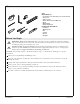
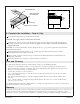
4. Prepare the Bath
WARNING: Risk of personal injury. Wear personal protective equipment and obtain sufficient
help to carefully lift or move the bath. Cast iron baths are extremely heavy. If the cast iron bath is
not lifted properly, personal injury may occur.
Place protective floor covering or throw rug near the installation area. This will prevent damage to
the floor and bath when the bath is set down.
With help, remove the bath from its carton and place it on top of the protective floor covering.
Counter
Bath Opening
Template
Masking Tape
1207305-2-A 4 Kohler Co.