
Installation Guide


Hinge
#8-18
x 3/8"
Hinge Jamb
Screw
Screw
Hinge Jam
Cover
Channel
#8-18
x 3/8"
Threshold Seal
Inside of
Shower
Outside of
Shower
Door Panel
Threshold Seal
Strike Jamb Latch
#6-20
x 1/2"
Strike Jamb
Strike
Jamb
Strike Jamb
Cover
Strike
Seal
Top View
Strike
Seal
Top View
Adjustment
Clamp
3/16" (5 mm)
Top View
Strike
Seal
3/16" (5 mm)
Flat Edge
Wall
Jamb
Wall Jamb
Cover
Handle
Setscrew
Spacer
Spacer
Logo
Inside of Shower
Sealant
Sealant
Outside of Shower
Outside of Shower
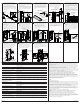
Troubleshooting
Symptom: Installation Recommended Action
1. The door does not close properly. A. Make sure the door seal has been trimmed so a small gap exists on the handle side of the seal. See step 13.
B. Check the hinge installation to verify that the hinge is properly installed into the hinge jamb groove. See step 11.
Symptom: Door Functionality Recommended Action
1. Opening or closing the door panel is difficult. A. Adjust the adjustment clamps to increase the gap between the door panel and the strike jamb. See step 18.
2. The door contacts the bottom track. A. Adjust the adjustment clamps so the door panel opens evenly and does not contact the bottom track. See step 15.
Symptom: Water Leaks Recommended Action
1. Water leaks under the door panel. A. Verify the seal is in place. See step 13.
2. Water leaks past the strike jamb. A. Adjust the door to decrease the gap between the door panel and the strike jamb. See step 18.
B. Adjust the strike jamb so the door panel makes contact with the strike jamb. See step 15.
3. Water leaks under the bottom track. A. From the outside of the shower, apply silicone sealant where the bottom track meets the threshold. See step 21.
4. Water leaks between the wall jamb and the
wall.
A. From the outside of the shower, apply silicone sealant where the wall jamb meets the wall. See step 22.
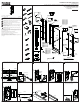
Lay the hinge jamb on a flat, protected surface.
Insert the unslotted wing of the hinge into the
hinge jamb groove. Use four screws to secure the
hinge to the hinge jamb.
Align the hinge assembly even with the top of
the channel. Secure the hinge to the door panel
with the panhead screws. Install the hinge jamb
cover to the hinge jamb.
Lay the door panel on a flat, protected surface.
Starting at the hinge end of the glass, press the
threshold seal onto the bottom of the door panel.
Position a latch in the strike jamb, and secure
it in place with the two screws. Repeat for the
second latch.
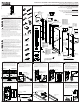
Fit the strike jamb into the wall jamb so the
strike jamb slots fit over the adjustment clamp
screws. Tighten the adjustment clamp screws.
Install the strike jamb cover to the strike jamb.
Make sure the strike seal is fully installed into
the strike jamb channel until it contacts the
bottom track. Cut off any excess seal material at
the top.
Lift the door panel into position, and fit the
hinge jamb into the remaining wall jamb.
Tighten the adjustment clamp screws to secure
the door panel in place.
The gap between the edge of the glass and the
strike jamb should be 3/16” (5 mm). If needed,
loosen the adjustment clamp screws, adjust the
the door, and retighten the screws.
Install the wall jamb covers to the top of the wall
jambs so the flat edges are toward the wall.
Assemble and install the door handles as shown,
so the logo is to the outside. Hand tighten the
handles so the logo is properly oriented.
On the inside of the shower, apply silicone
sealant where the wall jambs meet the walls and
where the bottom track contacts the threshold.
On the outside of the shower, apply silicone
sealant where the wall jambs meet the walls and
where the bottom track meets the threshold.
On the outside of the shower, apply silicone
sealant to the seams between the bottom track
and the hinge jamb, and the strike jamb and the
bottom track.
21218632-2-B ©2014 Kohler Co.
11 12
17
22
13
18
23
16
21
14
19
15
20
Warranty
ONE-YEAR LIMITED WARRANTY
KOHLER plumbing products are warranted to be free of defects in material and workmanship for one year from
date of installation.
Kohler Co. will, at its election, repair, replace or make appropriate adjustment where Kohler Co. inspection discloses
any such defects occurring in normal usage within one (1) year after installation. Kohler Co. is not responsible for
removal or installation costs. Use of in-tank toilet cleaners will void the warranty.
To obtain warranty service contact Kohler Co. either through your Dealer, Plumbing Contractor, Home Center or
E-tailer, or by writing Kohler Co., Attn.: Customer Care Center, 444 Highland Drive, Kohler, WI 53044, USA, or
by calling 1-800-4-KOHLER (1-800-456-4537) from within the USA and Canada, and 001-800-456-4537 from within
Mexico, or visit www.kohler.com within the USA, www.ca.kohler.com from within Canada, or www.mx.kohler.
com in Mexico.
IMPLIED WARRANTIES INCLUDING THAT OF MERCHANTABILITY
AND FITNESS FOR A PARTICULAR PURPOSE ARE EXPRESSLY LIMITED IN DURATION
TO THE DURATION OF THIS WARRANTY. KOHLER CO. AND/OR SELLER DISCLAIM
ANY LIABILITY FOR SPECIAL, INCIDENTAL OR CONSEQUENTIAL DAMAGES. Some states/provinces do
not allow limitations on how long an implied warranty lasts, or the exclusion or limitation of special, incidental or
consequential damages, so these limitations and exclusions may not apply to you. This warranty gives you specific
legal rights. You may also have other rights which vary from state/province to state/province.
This is Kohler Co.’s exclusive written warranty..