
Installation Guide


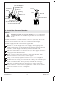


2. Install the Vacuum Breaker
Attach
CAUTION: Risk of property damage. Do not subject the
vacuum breaker to continuous pressure for more than 12
hours.
NOTE: Install the vacuum breaker at least 6″ (152 mm) above the
fixture rim. Consult local codes for vacuum breaker height.
NOTE: Apply thread sealant where applicable.
Thread a 1/2″ IPS nipple into each supply outlet piping and
supply inlet piping on the finished wall. Ensure that the threads
of each 1/2″ IPS nipple extend beyond the finished wall.
Slide the wall bracket over both of the 1/2″ IPS nipples until it is
snug against the finished wall.
Insert one sleeve through each hole of the wall bracket, then
thread each sleeve onto each 1/2″ IPS nipple.
Using a seat wrench, tighten each sleeve. Do not overtighten.
Confirm that an O-ring is located in the outlet port and inlet port
of the vacuum breaker. If not present, reinstall the O-ring(s).
Slide the vacuum breaker into both sleeves at the same time.
Secure with two socket screws. Tighten the socket screws with a
5/32″ hex wrench. Do not overtighten.
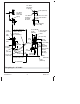
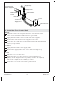
Cover
Finished
Wall
Wall Bracket
Sleeve
O-Ring
Outlet Port
Socket Head Screw
Vacuum Breaker
Inlet Port
1/2" IPS Nipples
1-3/8"
(35 mm)
Cover
Slot
Shroud
Threaded Pin
1034416-2-C 6 Kohler Co.