Generator OWNER’S MANUAL Read this manual carefully before operating this machine. PRO 2.8 i PRINTED ON RECYCLED PAPER 7VU-28199-L1_Hyoshi.indd 1 PRINTED IN JAPAN 2014.01-0.
- Read this manual carefully before operating this machine. This manual should stay with this machine if it is sold. 7VU-28199-L1_Hyoshi.
AE00002 INTRODUCTION Congratulations on your purchase of your new Kohler. This manual will provide you with a good basic understanding of the operation and maintenance of this machine. If you have any questions regarding the operation or maintenance of your machine, please consult a Kohler portable dealer. AE00022 PRO 2.8 i OWNER’S MANUAL First edition, January 2014 © 2014 Reprinted by Kohler Co. under license. All rights reserved.
IMPORTANT MANUAL INFORMATION Particularly important information is distinguished in this manual by the following notations. This is the safety alert symbol. It is used to alert you to potential personal injury hazards. Obey all safety messages that follow this symbol to avoid possible injury or death. WARNING A WARNING indicates a hazardous situation which, if not avoided, could result in death or serious injury.
AE00041 CONTENTS SAFETY INFORMATION........................ 1 Exhaust fumes are poisonous............. 2 Fuel is highly flammable and poisonous............................................. 2 Engine and muffler may be hot............ 2 Electric shock prevention..................... 3 Connection notes................................. 4 Connection........................................... 4 Extension cord notes........................... 4 LOCATION OF IMPORTANT LABELS.........................................
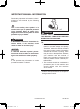
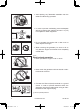
AE00071 SAFETY INFORMATION 9 This generator is not designed for on-board use. Do not use it while installed on the vehicle. 9 Do not modify the generator or use it with its parts removed. 9 Do not allow children to operate the generator. 9 Be sure to carry the generator only by its carrying handle(s). 1 1 Carrying handle(s) (shaded) 741-057 9 Do not place any obstacles on the generator. 1 7VU-28199-L1.indd KohlerPower.
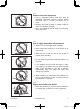
AE00072 Exhaust fumes are poisonous 741-002 9 Using a generator indoors CAN KILL YOU IN MINUTES. Generator exhaust contains carbon monoxide. This is a poison you cannot see or smell. 9 NEVER use inside a home or garage, EVEN IF doors and windows are open. 9 Only use OUTSIDE and far away from windows, doors, and vents. AE00075 Fuel is highly flammable and poisonous 9 Always turn off the engine when refuelling. 9 Never refuel while smoking or in the vicinity of an open flame.
9 Avoid placing any flammable materials near the exhaust outlet during operation. 741-007 9 In order to prevent overheating, ensure adequate airflow by keeping the machine at least 1 m (3 ft) from objects or other equipment. 741-008a 9 Do not operate the engine with a dust cover or other objects covering it. 741-009 7VU-002 9 When covering the generator, be sure to do so only after the engine and muffler have completely cooled down.
AE00088 Connection notes 1 9 Avoid connecting the generator to commercial power outlet. 9 Avoid connecting the generator in parallel with any other generator. 2 1 Correct 2 Incorrect AE00091 Connection 1 WARNING 2 741-040 Before the generator can be connected to a building’s electrical system, a licensed electrician must install an isolation (transfer) switch in the building’s main fuse box.
1 2 3 AE00062 4 5 LOCATION OF IMPORTANT LABELS Please read the following labels carefully before operating this generator. TIP Maintain or replace safety and instruction labels, as necessary. 1 2 DANGER Using a generator indoors CAN KILL YOU IN MINUTES. Generator exhaust contains carbon monoxide. This is a poison you cannot see or smell. NEVER use inside a home or garage, EVEN IF doors and windows are open. Only use OUTSIDE and far away from windows, door, and vents.
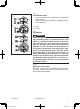
AE00102 DESCRIPTION PRO 2.8 i 1 2 3 4 1 1 2 3 4 1 9 9 5 8 8 5 6 7 6 7 793-084 1 1 1 2 3 4 5 6 7 8 9 0 q w e Carrying handles (shaded) Fuel tank Fuel tank cap Fuel level gauge Ground (earth) terminal Oil filler cap Oil drain bolt Recoil starter Choke knob Fuel cock Air filter case cover Muffler Spark plug 0 e q w 1 2 3 4 AE00103 Control panel 0 9 8 33 590 04 7VU-28199-L1.indd 7 6 5 793-085 KohlerPower.
AE00101 CONTROL FUNCTION AE00111 Oil warning light (red) When the oil level falls below the lower level, the oil warning light (red) comes on and then the engine stops automatically. Unless you refill with oil, the engine will not start again. TIP If the engine stalls or does not start, turn the engine switch to “7” and then pull the recoil starter. If the oil warning light flickers for a few seconds, the engine oil is insufficient. Add oil and restart.
AE00787 Economy control switch 1 1 “I” (ON) 2 763-124a When the economy control switch is turned “I” (ON), the economy control unit controls the engine speed according to the connected load. The results are better fuel consumption and less noise. 2 “3” (OFF) When the economy control switch is turned “3” (OFF), the engine runs at the rated r/min (3,600 r/min) regardless of whether there is a load connected or not.
AE00848 G.F.C.I. Receptacle 1 2 763-105a 3 The G.F.C.I. (Ground Fault Circuit Interrupter) shuts off power to the protected receptacles if a ground fault (electrical leak) is detected. If the reset button pops out, the equipment plugged into the receptacle may be faulty. If this happens, check the equipment carefully. If the equipment appears to be in good condition, press the reset button firmly until a click is heard. This will restore power.
PREPARATION AE00856 Fuel WARNING 9 Fuel is highly flammable and poisonous. Check “SAFETY INFORMATION” (See page 2) carefully before filling. 9 Do not overfill the fuel tank, otherwise it may overflow when the fuel warms up and expands. 9 After fill the fuel, make sure the fuel tank cap is tightened securely. 707-001 1. 2. 3. 4. 5. Stop the engine. Place the generator on a level surface. Remove the fuel tank cap. Check the fuel level. If low, fill the tank with fuel.
6 Recommended fuel: Unleaded gasoline Fuel tank capacity: Total: 9.7 L (2.56 US gal, 2.13 Imp gal) 5 7DF-020 5 “F” 6 “E” Full Empty Your Kohler engine has been designed to use regular unleaded gasoline with a pump octane number ((R + M)/2) of 86 or higher, or research octane number of 91 or higher. AE00222 Engine oil NOTICE The generator has been shipped without engine oil. Do not start the engine until you have filled it with the sufficient engine oil. 1. Place the generator on a level surface.
0°C 25°C å Kohler 10W-30 ∂ SAE 10W ç SAE #20 32°F ∫ SAE #30 80°F Recommended engine oil: å Kohler 10W-30, SAE 10W-30 or 10W-40 ∫ SAE #30 ç SAE #20 ∂ SAE 10W Recommended engine oil grade: API Service SE type or higher Engine oil quantity: 0.6 L (0.63 US qt, 0.53 Imp qt) NOTICE 700-006 The generator has been shipped without engine oil. Do not start the engine till fill with the sufficient engine oil. AE00241 Ground (earth) terminal Make sure to Ground (earth) terminal the generator.
AE00845 PRE-OPERATION CHECK WARNING If any item in the Pre-operation check is not working properly, have it inspected and repaired before operating the generator. The condition of a generator is the owner’s responsibility. Vital components can start to deteriorate quickly and unexpectedly, even if the generator is unused. TIP Pre-operation checks should be made each time the generator is used. Pre-operation check Fuel (See page 10) 9 Check fuel level in fuel tank. 9 Refuel if necessary.
AE00955 OPERATION WARNING 761-073 9 Never operate the engine in a closed area or it may cause unconsciousness and death within a short time. Operate the engine in a well ventilated area. 9 Before starting the engine, do not connect any electric devices. 9 Clean dusts, dirt or water off the receptacle before use. NOTICE The generator has been shipped without engine oil. Do not start the engine till fill with the sufficient engine oil. 1 1 Correct level 700-006a AE00989 Starting the engine 1.
4. Pull the choke knob fully out. 5 Choke knob 5 701-047b TIP The choke is not required to start a warm engine. Push the choke knob in to the original position. 5. Pull the recoil starter slowly until it is engaged, then pull it briskly. 704-016 6. After the engine starts, warm up the engine until the engine does not stop when the choke knob is returned to the original position. 7. Push the choke knob back to the original position.
AE00812 Application range When using the generator, make sure the total load is within rated output of a generator. Otherwise, generator damage may occur. DC AC Power factor 1 0.8–0.95 0.4–0.75 (Efficiency 0.85) PRO 2.8 i –2,500 W –2,000 W –850 W Rated voltage 12 V Rated current 10 A TIP 9 “–” means below. 9 Application wattage indicates when each device is used by itself. 9 The simultaneous usage of AC and DC power is possible but total wattage should not exceed the rated output.
NOTICE 9 Do not overload. The total load of all electrical appliances must not exceed the supply range of the generator. Overloading will damage the generator. 9 When supplying precision equipment, electronic controllers, PCs, electronic computers, microcomputer-based equipment or battery chargers, keep the generator a sufficient distance away to prevent electrical interference from the engine.
AE01001 Connection Alternating Current (AC) WARNING Be sure any electric devices are turned off before plugging them in. NOTICE 9 Be sure all electric devices including the lines and plug connections are in good condition before connection to the generator. 9 Be sure the total load is within generator rated output. 9 Be sure the receptacle load current is within receptacle rated current. 1. Start the engine. 2. Plug into the AC receptacle. 761-074 3. Make sure the AC pilot light (green) is on.
4. Turn the economy control switch to “I” (ON) and turn on any electric devices. 2 2 “I” (ON) 763-129a TIP The economy control switch must be turned to “3” (OFF) when using electric devices that require a large starting current, such as a compressor or a submersible pump. AE00788 Overload indicator light (red) The overload indicator light (red) comes on when an overload of a connected electrical device is detected, the inverter control unit overheats, or the AC output voltage rises.
Battery charging NOTICE 9 Do not connect a VRLA (Valve Regulated Lead Acid) battery. To charge a VRLA battery, a special (constant-voltage) battery charger is required. 9 Do not use AC and DC power at the same time or the generator may be damaged. TIP 9 The generator DC rated voltage is 12 V. 9 Start the engine first, and then connect the generator to the battery for charging. 9 Before starting to charge the battery, make sure that the DC protector is turned “I” (RESET). 1. Start the engine. 2.
NOTICE 9 Be sure the economy control switch is turned off while charging the battery. 9 Be sure to connect the red battery charger lead to the positive (+) battery terminal, and connect the black lead to the negative (–) battery terminal. Do not reverse these positions. 9 Connect the battery charger leads to the battery terminals securely so that they are not disconnected due to engine vibration or other disturbances.
TIP 9 Follow instructions in the owner’s manual for the battery to determine the end of battery charging. 9 Measure the specific gravity of electrolyte to determine if the battery is fully charged. At full charge, the electrolyte specific gravity is between 1.26 and 1.28. 9 It is advisable to check the specific gravity of the electrolyte at least once every hour to prevent overcharging the battery. WARNING 762-012 33 590 04 7VU-28199-L1.
Operating range of DC power supply (exclusively for charging 12 V battery) This power source is designed to charge batteries up to 40 Ah that are half-discharged. Do not charge batteries of a higher capacity than 40 Ah. 12 V battery The time required for recharging a battery varies depending on the discharge level of the battery. When the specific gravity of the battery reaches 1.26 to 1.28, charging is complete. When charging, check the battery’s specific gravity once an hour.
AE00992 Stopping the engine 1. Turn off any electric devices. 2. Turn the economy control switch to the “3” (OFF) position. 1 “3” (OFF) 1 763-126b 3. Disconnect any electric devices. 761-073 4. Turn the engine switch to the “5” (STOP) position. 2 “5” (STOP) 2 763-085e 5. Turn the fuel cock lever to OFF. 3 OFF 3 3 705-038 33 590 04 7VU-28199-L1.indd KohlerPower.
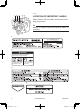
AE00401 PERIODIC MAINTENANCE Safety is an obligation of the owner. Periodic inspection, adjustment and lubrication will keep your generator in the safest and most efficient condition possible. The most important points of generator inspection, adjustment, and lubrication are explained on the following pages. WARNING If you are not familiar with maintenance work, have a Kohler portable dealer do it for you. AE00403 Maintenance chart WARNING Stop the engine before starting maintenance work.
Item Routine Every Preoperation 6 months 12 months check or 100 Hr or 300 Hr Crankcase breather hose • Check breather hose for cracks or damage. • Replace if necessary. Cylinder head • Decarbonize cylinder head. • More frequently if necessary. Valve clearance • Check and adjust when engine is cold. ★ Idle speed • Check and adjust idle speed. ★ Recoil starter • Check recoil starter for damage. ★ Fittings / fasteners • Check all fittings and fasteners. • Correct if necessary.
Spark plug inspection The spark plug is an important engine components, which should be checked periodically. 1. Remove the spark plug cap. 760-023 2. Insert the tool, and turn it counterclockwise to remove the spark plug. 3. Check for discoloration and remove the carbon. The porcelain insulator around the center electrode of spark plug should be a medium-to-light tan color. 4. Check the spark plug type and gap. a 760-001a a Spark plug gap Standard spark plug: 33 132 01-S (Kohler) Spark plug gap: 0.
AE00972 Engine oil replacement WARNING Avoid draining the engine oil immediately after stopping the engine. The oil is hot and should be handled with care to avoid burns. 1. Place the generator on a level surface and warm up the engine for several minutes. Then stop the engine. 2. Remove the oil filler cap. 1 1 Oil filler cap 4 3 2 700-109a 3. Place an oil pan under the engine. Remove the oil drain bolt and gasket so that the oil can be completely drained. 2 Oil drain bolt 3 Gasket 4.
0°C 25°C å Kohler 10W-30 ∂ SAE 10W ç SAE #20 32°F ∫ SAE #30 80°F Recommended engine oil: å Kohler 10W-30, SAE 10W-30 or 10W-40 ∫ SAE #30 ç SAE #20 ∂ SAE 10W Recommended engine oil grade: API Service SE type or higher Engine oil quantity: 0.6 L (0.63 US qt, 0.53 Imp qt) 7. Install the O-ring and the oil filler cap. AE00443 Muffler screen and spark arrester WARNING 741-001 The engine and muffler will be very hot after the engine has been run.
3. Remove the spark arrester. 4 4 Spark arrester 711-054e 4. Remove the carbon deposits on the muffler screen, muffler cap and spark arrester using a wire brush. NOTICE 711-022 When cleaning, use the wire brush lightly to avoid damaging or scratching of the muffler screen, muffler cap and spark arrester. 5. Check the muffler screen and spark arrester. Replace them if damaged. 711-050 6. Install the spark arrester. 6 5 TIP Align the spark arrester lump to the hole in the muffler pipe.
AE00451 2 1 Air filter 3 1. Remove the screws, and then remove the air filter case cover. 2. Remove the foam element. 1 Screw 2 Air filter case cover 3 Foam element 1 3. Wash the foam element in solvent and dry it. WARNING Never use solvent while smoking or in the vicinity of an open flame. 4. Oil the foam element and squeeze out excess oil. The foam element should be wet but not dripping. NOTICE 710-037a Do not wring out the foam element when squeezing it. This could cause it to tear.
Fuel cock WARNING Never use the gasoline while smoking or in the vicinity of an open flame. 1. Stop the engine. 2. Turn the fuel cock lever to OFF. 3. Remove the fuel cock cup, gasket and fuel strainer. 4. Clean the cup and fuel strainer with gasoline and wipe it off. 5. Check the gasket. Replace it if damaged. 6. Install the fuel strainer, gasket, and fuel cock cup. 3 WARNING 2 Be sure the fuel cock cup is tightened securely.
AE01007 G.F.C.I. Receptacle test 1. Start the engine. 2. Press the test button, then check the position of the reset button. 1 2 763-105 3 1 Test button 2 Reset button 4 G.F.C.I. Reset Button Position after Test 763-059 G.F.C.I. Receptacle Operation 3 Pop Out Correct 4 Stay In Incorrect 3. If G.F.C.I. operation is correct, push in the reset button. If the G.F.C.I. operates incorrectly, consult a Kohler portable dealer. WARNING Do not operate the generator with a faulty G.F.C.I. circuit.
AE00512 TROUBLESHOOTING 707-001 Engine won’t start 1. Fuel systems No fuel supplied to combustion chamber. 2 No fuel in tank .... Supply fuel. 2 Fuel in tank .... Fuel cock lever to ON. 2 Clogged fuel line .... Clean fuel line. 2 Foreign matter in fuel cock .... Clean fuel cock. 2 Clogged carburetor .... Clean carburetor. 705-037a 2. Engine oil system Insufficient 2 Oil level is low .... Add engine oil. 700-006 3. Electrical systems 2 Engine switch to “7” (ON) and pull the recoil starter.
AE00515 A ENGINE DOES NOT START B Turn the engine switch to “7” (ON), then pull the recoil starter and check if the oil warning light flickers. E C H Does not flicker D Check engine oil level. Flickers Pull the recoil starter and check the spark plug for spark strength. (See “WARNING”) F OK Consult a Kohler portable dealer. G Level low Add engine oil. WARNING 9 To prevent FIRE HAZARDS be sure fuel is not present in the spark plug area.
AE00601 STORAGE Long term storage of your generator will require some preventive procedures to guard against deterioration. AE00611 Drain the fuel 1. Turn the engine switch to “5” (STOP). 1 “5” (STOP) 1 763-085e 2. Remove the fuel tank cap and fuel tank filter. Extract the fuel from the fuel tank into an approved gasoline container using a commercially available hand siphon. Then, install the fuel tank filter and fuel tank cap. WARNING Fuel is highly flammable and poisonous.
6. Drain the fuel remaining in the carburetor into an approved container by loosening the drain screw on the carburetor float chamber. 4 Drain screw 4 7VU-004 7. Tighten the drain screw. 8. Turn the engine switch to “5” (STOP). 9. Turn the fuel cock lever to OFF. 10. Tighten further if any screws, bolts and nuts are loose. 11. Store the generator in a dry, well-ventilated place, with the cover placed over it. AE00621 Engine Perform the following steps to protect the cylinder, piston ring, etc.
AE00789 EXHAUST EMISSION CONTROL SYSTEM AND COMPONENTS Item Acronym 9 CARB. ASSY., LH. & JT., . ...................... CARB (Carburetor) CARBURETOR2 9 C.D.I. UNIT ASSY. & C.D.I....................... EI (Electronic Ignition) MAGNETO ASSY. & PLUG, SPARK 9 CRANKCASE1 & HEAD, ........................ PCV (Positive Crankcase CYLINDER1 Ventilation) 9 AIR FILTER ASSY. .................................. ACL (Air Cleaner) 9 MUFF.
AE00701 SPECIFICATIONS AE00702 Dimensions Overall length Overall width Overall height Dry weight Unit mm (in) mm (in) mm (in) kg (lb) PRO 2.8 i 487 (19.2) 395 (15.6) 425 (16.7) 31 (66.1) AE00704 Engine Unit Type Cylinder arrangement Displacement cm3 Bore × Stroke mm (in) Operation hours Hr Fuel Fuel tank capacity L (US gal, Imp gal) Engine oil quantity L (US qt, Imp qt) Ignition system Spark plug: Type Gap mm (in) Noise level* dB / LWA dB (A) / 7 m PRO 2.
CONSUMER INFORMATION SERIAL NUMBER: AE00012 Identification number records MODEL SERIAL No. Record your serial number in the spaces provided, to assist you in ordering spare parts from a Kohler portable dealer. Also record and keep the serial number in a separate place in case your machine is stolen. AE00011 Machine identification 1 The machine serial number is stamped in the location as shown.
AE00751 WIRING DIAGRAM PRO 2.
- Read this manual carefully before operating this machine. This manual should stay with this machine if it is sold. 7VU-28199-L1_Hyoshi.
Generator OWNER’S MANUAL Read this manual carefully before operating this machine. PRO 2.8 i PRINTED ON RECYCLED PAPER 7VU-28199-L1_Hyoshi.indd 1 PRINTED IN JAPAN 2014.01-0.