USER MANUAL & CARE GUIDE Gas Grill Model: Side Burner Model: KO-BAK3BG (LP/NG) KO-BAK4BG (LP/NG) KO-BAK5BG (LP/NG) KO-BAK1BG (LP/NG) KO-BAK2BG (LP/NG) DANGER: WARNING: IF YOU SMELL GAS: 1) Shut off the gas supply to the appliance at its source. 2) Extinguish any open flames. 3) Open grill hood to release any accumulation of gas vapor. 4) If a gas odor persists, Keep away from your appliance and contact your gas supplier or fire department immediately.
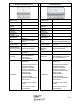
MODEL: KO-BAK3BG (LP/NG) 3 BURNER KOKOMO GRILL MODEL: KO-BAK4BG-LP/NG 4 BURNER GRILL CUTOUT DIMENSIONS W:23 1/2” H:7 5/8” D:20 1/4” CUTOUT DIMENSIONS W:30 7/8” H:7 5/8”D:20 1/4” BTU OUTPUT 12,000 BTU PER BURNER X 3 BTU OUTPUT 12,000 BTU PER BURNER X4 INFERRED BACK BURNER TOTAL BTU PRIMARY IGNITION SECONDARY IGNITION COOKING GRIDE DIMENSIONS TOTAL COOKING AREA FLAME TAMER ROTISSERIE KIT (MOTOR & FORKS) BURNER GAS TYPE WARRANTY NONE 36,000 SURE LIGHT IGNITION FLASH TUBE 22 1/2” X 18 1/4” 560 SQ.
MODEL: KO-BAK5BG-LP/NG 5 BURNER GRILL CUTOUT DIMENSIONS BTU OUTPUT INFERRED BACK BURNER TOTAL BTU PRIMARY IGNITION SECONDARY IGNITION COOKING GRIDE DIMENSIONS TOTAL COOKING AREA FLAME TAMER ROTISSERIE KIT (MOTOR & FORKS) BURNER GAS TYPE WARRANTY W:37 3/4” H:7 5/8”D:20 1/4” 12,000 BTU PER BURNER X4 12,000 BTU PER BURNER X1 60,000 BTU SURE LIGHT IGNITION FLASH TUBE 30 1/4” X 18 1/4” 920 SQ.
PG 4
NOTE: CHECK WITH CITY AND FIRE DEPARTMENT FOR LOCAL BUILDING CODES. A PERMIT MAY BE REQUIRED FOR OUTDOOR KITCHEN CONSTRUCTION.
PG 6
PG 7
KO-BAK1BG-LP/NG SIGLE SIDE BURNER Cutout Dimensions Total BTU Output Number of Burners Burner Ignition Gas Type Warranty W: 11 1/2” H:0” D:15 1/2” 12,000BTU(1Bnr) 1 Aluminum & Brass SURE LIGHT Burners are shipped LP. Each shipment contains an NG Conversion Kit. 1 year KO-BAK2BG-LP/NG DOUBLE SIDE BURNER Cutout Dimensions Total BTU Output Number of Burners Burner Ignition Gas Type Warranty W: 11” H: 6 3/4” D: 20 1/4” 24,000BTU(2Bnr) 2 Aluminum & Brass SURE LIGHT Burners are shipped NG.
PG 9
BUILDING BBQ SPECIFICATIONS ALL BBQ ISLANDS MUST BE MANUFACTURED FROM “NONCOMBUSTIBLE” MATERIAL.
Safety and Installation Instructions WARNING To reduce the risk of fire, electric shock, or injury, read and follow these basic precautions before operating your gas grill or side burners. GRILL INSTALLATION This gas grill must be installed in accordance with all local codes. If installation is planned in an area with no local codes, the gas grill must be installed in accord with the National Fuel Gas Code ANSI Z223.1 and storage and handling of liquefied petroleum gases, ANSI/NFPA 58 or CSA B149.
Instructions Overview Location of your Barbecue: Most importantly, this is an outdoor appliance. Ensure your barbecue is positioned safely away from anything that can catch fire. Under no circumstance is this barbecue to be used indoors. This includes garages or any other enclosed area. Clearance from Combustibles: Ensure your barbecue remains at a distance of at least 18” from any combustible material such as wood, rock, paper and plants.
Safety and Installation Warnings Please read all instructions before installing or operating your gas grill to prevent injury and appliance damage. Before installation or service, disconnect the power supply to the work area by removing the fuse, "tripping" the circuit breaker, or unplugging the unit. All gas grills will get hot during use. Use extreme caution when operating the grill. Do not touch hot surfaces. Always use the handle to open or close the grill.
Never connect the appliance to an unregulated gas supply line. Grills operated without a regulator are unsafe and will not be serviced until installed properly and safely. Unsafe operation without a gas regulator will void warranty of the grill. Grills operated with NG (natural gas) gas must be installed with the NG regulator supplied with the unit and set to 4.0" water column pressure.
Connection 1) Slide the grill forward to gain access to the regulator and gas connection point in the rear. 2) Connect a suitable natural gas flex connector to the grill regulator. 3) Check the grill controls to ensure all control valves are in the full OFF position. 4) Turn on the main gas supply and check all connections for leaks using soapy water as described in the leak testing procedure section.
7) Turn all control knobs back to the full OFF position. a. If you are unable to stop a leak turn all control knobs back to the full OFF position, shut off the gas supply to the grill and release pressure in the hose and manifold by pushing in and turning any of the control valves one quarter turn counter-clockwise. 8) On LP systems, remove the cylinder from the grill. 9) Call an authorized gas appliance service technician or an LP gas dealer. 10) Do not use the appliance until the leak is corrected.
Liquid Propane (LP) Gas Requirements LP TANK REQUIREMENTS: A collar to protect the cylinder threads on the customer supplied tank. An arrangement for gas vapor withdrawal. A safety relief device having direct communication with the vapor space of the cylinder. A method of mounting. When not in use, the tank shut off valve should be turned off. WARNING All purging and refilling of LP gas cylinders must be performed by qualified personnel in the LP gas industry.
Transporting and Storing LP Gas Transport only one cylinder at a time. Ensure the cylinder is secured in an upright position with the control valve turned off and the dust cap in place. Be sure to store cylinders outdoors and out of the reach of children. Do not store cylinders in a building, garage, or any other enclosed area. Leak Testing All gas piping and connections must be tested for leaks after installation or service. All leaks must be corrected immediately.
FOR YOUR SAFETY 1. Do not store or use gasoline or other flammable vapors and liquids in the vicinity of this or any other appliance. 2. Do not store any propane/butane (G31-G30) cylinder (that is not connected for use) in the vicinity of this or any other appliance. Installing the Grill in a BBQ Island You will need a second person to help you avoid damaging the grill or your barbecue island.
Electrical Precautions Extension cords are available and may be used if care is exercised in their use. If an extension cord is used: The marked electrical rating of the cord set or extension cord should be at least as great as the electrical rating of the appliance The cord should be arranged so that it will not touch hot surfaces, sharp edges or drape over the countertop or tabletop (where it can be pulled or tripped over unintentionally).
Always open the grill hood carefully, using only the handle - the hood may be hot. Children should not be left alone or unattended in an area where any appliance is in use. They should never be allowed to touch, sit or stand on any part of the appliance. Do not store items of interest to children in cabinets above the grill or in the grill. Children climbing on the appliance to reach these items could be seriously injured. Wear proper clothing when operating appliances.
Locating the Product Serial Number: The serial number for your KOKOMO appliance is located on the left hand side of the Firebox. You will need this number to properly register your grill and activate coverage. Write this information in the space provided below for your records.
Lighting Instructions Caution: Never operate the grill unattended. Prior to using your grill, verify that all of the following is correct: The burner tube is free of any debris or obstruction. The proper gas type and regulator settings were installed. The proper gas connection is complete. Minimum clearances are maintained. All packaging has been removed. All parts and components are properly in place. An installer-supplied manual gas shut-off valve is fully accessible.
Lighting the Grill 1. Open the hood. 2. Keep your face as far away from the burners as possible. 3. Slowly rotate the burner knob counter-clockwise to the high position. 4. You will hear a loud click as the electric lighter produces a spark. Listen for the sound of the gas igniting. If the burner does not light on the first try, repeat immediately. 5. If the burner does not light in five seconds then wait five minutes until the gas clears before attempting to light it again.
WARNING: “Flashback” may occur in or around the burner tubes. Flashback exhibits a characteristic “whooshing” sound. If this should occur, immediately turn off your burners, then remove and clean them with soap and water and a brush until all foreign objects are removed. Fuel (Gas) Conversion Instructions for KoKoMo Gas Grills. CAUTION: This should only be performed by a licensed gas professional.
Warranty What follows is a simple and general outline of the warranty for our gas grills. Please refer to your specific product owner’s manual to confirm your specific warranty details Limited Warranty – Grills KoKoMo Grills warrants, to the original purchaser of the Outdoor Gas Grill, that when subject to normal residential use it is free from defects in workmanship and materials for the periods specified below. This warranty excludes grills used in rental or commercial applications.
Here is a list of our most frequently asked questions. If there is something you need help with and it is not listed below, please visit our help desk: www.kokomogrills.com How do you hook up the side burner? Note: Use Teflon tape on all threaded connections. 1. Connect a short double ended 3/8 female flare gas line to the back of the BBQ. 2. Then connect a 3/8 Flare "T" Fitting to the gas line. 3.
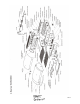
BBQ Parts – Warranty / Order 1. Cooking Grill BAK4BG--001 Y 2. Flame Tamer w/ Briquettes BAK4BG--002 Y 3. Flavor Bars 4 Burner BAK4BG--004 Y 4. Drip Tray BAK4BG--005 Y 5. Burner-Controlling Valve BAK4BG--006 Y 6. Back Burner Valve BAK4BG--007 Y 7. Controlling Knob BAK4BG--008 Y 8. Stainless Steel Burner BAK4BG--009 Y 9. Warming Rack BAK4BG--0010 Y 10. Hood Handle BAK4BG--011 Y 11. Thermometer BAK4BG--012 Y 12. Cooking Plate BAK4BG--013 Y 13.