Light Vibes® Deluxe Bassinet Instructions Instrucciones para el Moisés de lujo Light Vibes® ©2004 Kolcraft® Enterprises, Inc. All Rights Reserved.
WARNING READ ALL INSTRUCTIONS BEFORE ASSEMBLY AND USE OF PRODUCT. Failure to follow these warnings and instructions could result in serious injury or death. Make sure bassinet is fully assembled and secure before use. IMPORTANT SAFETY INFORMATION: When NOT to Use Your Bassinet • FALL HAZARD - To help prevent falls, do not use this product when the infant begins to push up on hands and knees or is 3 months old or weighs 15 lbs. (6.8 kg), whichever comes first.
ADVERTENCIA LEA TODAS LAS INSTRUCCIONES ANTES DE ENSAMBLAR Y USAR ESTE PRODUCTO. El no cumplir con las instrucciones y las advertencias podria causar lesiones graves y hasta la muerte. Asegúrese de que el moisés está completamente ensamblado y asegurado antes de usar.
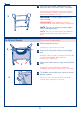
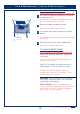
Parts List Lista de partes Rods - A (4) Varillas - A (4) Rods - B (2) Varillas - B (2) Rear Leg Tubes with Locks - A (2) Tubos con seguros de las patas traseras - A (2) Front Leg Tubes B (2) Tubos de las patas delanteras - B (2) Curved Support Wires (2) Soportes curvos de alambre (2) Canopy Toldo Light Vibes® Electronics Electrónicos de Light Vibes® Basket Canasta Bassinet Moisés Tools Needed: Phillips Screwdriver Herramienta necesitado: Destornillador de estrella Bassinet Pad Colchoncito del moi
the two curved support wires onto 3 Insert bassinet frame until they “click” into place. Inserte los dos alambres curvos de soporte en el marco del moisés hasta que se oiga que han entrado en su sitio. 3 IMPORTANT: Curved support wires must face outward. IMPORTANTE: Los soportes curvos de alambre deben estar orientados hacia afuera. NOTE: Do not use without curved support wires attached to base. NOTA: No use sin antes tener los soportes curvos de alambre bien afianzados en la base.
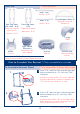
To Install Batteries in Light Vibes Electronics (select models) Para instalar las pilas en el vibrador suave (modelos selectos) Requires 4 “AA” batteries (not included). Se requieren 4 pilas AA (no incluidas). 1 To install batteries, use a Phillips screwdriver 1 to remove battery cover. Para instalar las pilas, utilice un destornillador de cruz para quitar la tapa de las pilas. 2 Place batteries in compartment as shown. Coloque las pilas tal como se muestra.
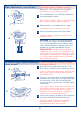
To Assemble Bassinet Hooks Ganchos 1 Para ensamblar el moisés not remove floorboard from bassinet 1 Do cover. Open the support bars and clip each leg into the hooks on the floorboard. No saque la tabla del suelo de la cubierta del moisés. Abra las barras de soporte y ajuste cada pata en los enganches en la tabla del suelo. canopy brackets through bassinet cover 2 Slide slits on each end. Pase los soportes del toldo por los cortes de la cubierta en cada punta del moisés.
To Attach Canopy Para sujetar el toldo 1 Attach canopy as shown. 1 Sujete el toldo como se muestra. 2 Pull back canopy fabric over bassinet frame. Jale la tela del toldo sobre el marco del moisés. included (no assembly required) on 3 Mobile select models only. 2 Se incluye mobil (no se necesita ensamblaje) en ciertos modelos. NOTE: Canopy fabric is not removable from canopy frame. NOTA: El tejido de la cubierta no se puede remover de la estructura de la cubierta.
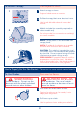
To Use Light Vibes Electronics (select models) Para usar el mecanismo electrónico (modelos selectos) turn the electronics on, turn the power 1 To switch to the on (II) position on the side of the unit. 1 Para prender el mechanismo electronico cambia el suiche de corriente a la posición prendido (I) que esta en el lado del módulo. BASIC BASICO Press “Vibration” button to activate vibrating motion. Select “Speed” to adjust. To deactivate, press “Vibration” button again.
Care & Maintenance / Cuidado & Manteniniento 1 TO REMOVE BASSINET COVER PARA REMOVER LA CUBIERTA DEL MOISÉS Unsnap the straps around bassinet frame to remove bassinet. Desabroche las correas alrededor del marco del moisés para quitar el moisés. 2 Remove canopy and bassinet pad. Remueva la cubierta y el colchón. 3 Unsnap bassinet cover from bassinet floor board. 1 Straps Correas Desabroche la cubierta del moisés de la tabla de la base. 4 Remove bassinet cover from floorboard.
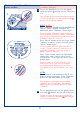
TO PROPERLY RE-MOUNT THE BASSINET COVER PARA VOLVER INSTALAR LA CUBIERTA DEL MOISÉS 1 floorboard into bassinet cover 1 Replace with snaps and hooks facing up. Reemplace el suelo en la cubierta del moisés con los cierres y ganchos mirando hacia arriba. 2 bassinet over and slide plastic anchor 2 Turn through slits to secure bassinet cover. Slits Ranuras Gire el moisés y deslice el ancla de plástico a través de las ranuras para asegurar la cubierta del moisés.
Attach canopy and replace bassinet pad in 7 bassinet, making sure pad is flat and firmly in place. Curved Support Wires Soportes curvos 8 Una la cubierta y ponga el colchoncito dentro del moisés. Presione el colchoncito asegurándose que esté plano y se encuentre fijo en su sitio. CAUTION: Fitted bassinet sheet should securely wrap at least 2" (5 cm) beneath entire pad to reduce chance of entanglement. PRECAUCIÓN:: La sábana ceñida del moisés debe quedar bien sujeta 5 cm.
Limited Warranty / Garantía limitada Kolcraft® warrants this product to be free of defects in materials and workmanship, as follows: For a period of ONE YEAR from the date of purchase, Kolcraft will repair or replace, at its option, the defective product. If you have a problem or are not satisfied with this product, please contact the Consumer Service Department at Kolcraft. REPAIR OR REPLACEMENT AS PROVIDED UNDER THIS WARRANTY IS THE EXCLUSIVE REMEDY OF THE CONSUMER.
Personal Record Card / Tarjeta de registro personal Once in a while, we are less than perfect and one of our products reaches a customer with a problem. In most cases, we can solve your problem with replacement parts. Please contact us before you return one of our products to the store. Once a product is returned, it cannot be resold. The materials and the energy used to make it are wasted. Please fill in the information in the space provided and attach a copy of your purchase receipt.
Replacement Parts List / Lista de piezas de repuesto Marque con un círculo el repuesto qu necesita Circle the Part You Need Rod - A Varillas - A $3.00 each/cada uno Rear Leg Tube with Lock - A Tubos con seguros de las patas traseras - A Front Leg Tube - B Tubos de las patas delanteras - B $4.00 each/cada uno $3.00 each/cada uno $4.00 each/cada uno Curved Support Wire Soportes curvos de alambre Rod - B Varilla - B Light Vibes® Electronics Electrónicos de Light Vibes® Basket Canasta $12.00 $5.
Replacement Parts Order Form / Formulario para ordenar piezas de repuesto Complete the following form. Your model number and date of manufacture must be included on the form to ensure proper replacement parts. Complete el siguiente formulario. Debe incluir en el formulario el número de su modelo y fecha de fabricación para asegurarse de que obtiene las piezas de repuesto adecuadas.