Jeep® Overland Limited Jogging Stroller Instructions Hoja de instrucciones de la carriola de Jogging Jeep® Overland Limited ©2007 Kolcraft® Enterprises, Inc. All Rights Reserved.
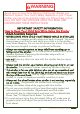
WARNING Avoid serious injury from falling or sliding out. Always use Restraint System. Your child's safety depends on you. Proper stroller use cannot be assured unless you follow these instructions. DO NOT USE STROLLER UNTIL YOU READ AND UNDERSTAND THESE INSTRUCTIONS. IMPORTANT SAFETY INFORMATION: How to Keep Your Child Safe While Using this Stroller • Adult Assembly Required. • NEVER LEAVE YOUR CHILD UNATTENDED WHILE IN STROLLER. Accidents can happen quickly while your back is turned.
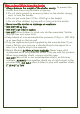
What to Avoid While Using this Stroller • Always balance the weight of the stroller evenly. To prevent the stroller from becoming unstable or tipping: • Do not place parcels or accessory items on the stroller canopy, seat, or over the handle. • Do not put more than 10 lbs. (4.54 kg) in the basket. • Do not allow children to play with or hang onto the stroller. • Never use this stroller on stairways or escalators. • DO NOT lift by tray. • DO NOT put child in basket.
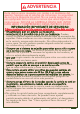
ADVERTENCIA Evite daños serios causados por caídas o al deslizarse del asiento. Siempre use el sistema de cinturones. La seguridad de su hijo/a depende de usted. No se puede asegurar un uso apropiado de la carriola a menos que usted siga estas instrucciones. NO USE LA CARRIOLA HASTA QUE USTED HAYA LEÍDO Y COMPRENDIDO ÉSTAS INSTRUCCIONES. INFORMACIÓN IMPORTANTE DE SEGURIDAD: Cómo mantener a su hijo seguro mientras utiliza ésta carriola • Ensamblado por un adulto es necesario.
• Si no instala y ajusta las ruedas equipadas con los cubos de liberación rápida las ruedas se pueden salir durante el uso, resultando en heridas serias. Qué evitar mientras utiliza ésta carriola • Siempre mantenga el peso de la carriola repartido por igual. Para evitar que la carriola esté inestable o se voltée: • No coloque paquetes ni accesorios sobre el toldo, los asientos o la manija. • No ponga objetos que pesen más de 10 libras (4,54 kg) en la canasta.
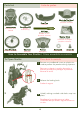
Lista de partes Parts List Front Tray Charola Stroller Frame Estructura de la carriola Front Wheel (1) Rueda delantera (1) Rear Wheels (2) Ruedas traseras (2) Odometer Marcador Air Pump (select models) Bomba de aire (modelos selectos) Footrest Apoyapiés Music On The Move® (select models) (modelos selectos) Weather Shield (select models) Protector de timepo (modelos selectos) Washers (4) Arandelas (4) Screws (4) Tornillos (4) How to Assemble Your Stroller / Cómo ensamblar su carriola To Open Stro
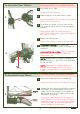
Para ensamblar las ruedas traseras To Assemble Rear Wheels 1 Lay stroller on its side. Ponga la carriola de lado. 2 Slide wheel pins into axle hole as shown. 2 Meta los pasadores de la rueda en el agujero del eje, como se muestra. down on wheel until you hear a click. 3 Push Pull up on wheel to make sure it is properly secured. Haga presión sobre la rueda hasta oir un click. Jale la rueda hacia arriba para asegurar que está en su sitio. 4 Repeat for second side.
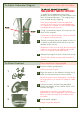
Loosen the round nut on the wheel enough 3 for the wheel to slide onto the frame. If the Spring Resorte 3 round nut comes all the way off, be sure to reassemble it with the spring as shown. Suelte la tuerca redonda en la rueda lo suficiente para que la rueda pueda entrar en el marco. Si la tuerca redonda sale completamente, asegúrese de volver a Round Nut Tuerca redonda ensamblar el resorte como se muestra. Position wheel lever, 90° angle from wheel as 4 shown, and slide wheel axle onto frame.
To Adjust Odometer Magnet Para ajustar el imán del contador TO ADJUST ODOMETER MAGNET PARA AJUSTAR EL IMÁN DEL CONTADOR In order for the odometer to function properly, the magnet on the front wheel must be in the correct position. The magnet may have shifted during shipping. Para que el contador funcione adecuádamente, el imán frente a la rueda debe estar en la posición correcta. El imán puede haber cambiado durante el envío.
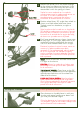
To Attach Front Tray Para instalar la charola delantera tray onto round post while pushing in 1 Slide spring loaded buttons, and a click is heard. Make sure there is no gap between stroller frame and front tray. 1 Resbale la charola sobre el poste redondo mientras presiona los botones de resorte, hasta que escuche un clic. Asegúrese de que no hay ningún hueco entre la estructura de la carriola y la charola delantera.
To Install Batteries into Music On The Move® Para instalar las pilas en Music On The Move® Requires 4 “AA” Batteries (Not Included). Requiere 4 Pilas “AA” (No Incluídas). Lift up the foam padding in the bottom of 1 the unit. 1 Eleve el colchón de espuma en la base de la unidad. NOTE: Foam is used to reduce skipping & eliminate sliding of your portable unit. If your player does not fit inside, remove foam. NOTA: se utiliza espuma para reducir el movimiento y el deslizamiento en su unidad portatil.
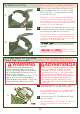
To Adjust Hand Brake Para ajustar el freno de mano TO TIGHTEN HAND BRAKE TENSION: PARA AJUSTAR LA TENSIÓN DEL FRENO DE MANO: nut A by turning it away from you, 1 Loosen while holding nut B in place. Suelte la tuerca A girandola en sentido contrario a usted, mientras mantiene la tuerca B en su lugar. nut B, away from you while holding 2 Rotate nut A in place. Gire la tuerca B, en sentido contrario a usted, mientras mantiene la tuerca A en su lugar.
FIRST TIME USE NOTE: Be sure to activate the hand brake 25 times to stretch the cable. Readjust if necessary. Adjustments must be made periodically due to cable stretch and wear on the rubber brake shoes. Do not use your stroller until you have thoroughly tested your brakes. NOTA PARA EL PRIMER USO: Asegúrese de activar el freno de mano 25 veces para estirar el cable. Reajuste si es necesario.
2 Snap rear of basket around the back tube as shown. Abroche la trasera de la canasta alrededor de atras de el tubo como se muestra.
How to Properly Use Your New Stroller / Cómo usar su nuevo carriola correctamente To Secure Child In Stroller Para asegurar al niño en la carriola WARNING ADVERTENCIA Avoid serious injury from falling or sliding out. Always use restraint system. Do not use product without full 5 point Harness Restraint. Removing the shoulder straps will not adequately restrain child. Evite daños serios causados por caídas o al deslizarse del asiento. Use siempre el sistema de cinturónes.
To Adjust Shoulder Strap Height Lower Higher Para ajustar la altura de las cintas de los hombros NOTE: For a secure fit, straps should be at or below the child's shoulder. Adjust straps to higher position as your child grows. NOTA: Para que estén ajustadas de forma adecuada, las sujeciones deben estar en, o por abajo, del hombro del niño. Ajuste las sujeciones a una posiciónes más alta a medida que su hijo crece.
Para unir la protección contra el mal tiempo (modelos selectos) To Attach Weather Shield (select models) WARNING SUFFOCATION HAZARD: Never leave child unattended while using this weather shield. Only use with this product. When using weather shield, canopy must be open. DO NOT leave child in sun under weather shield, as child may overheat. ALWAYS store weather shield out of child’s reach in the provided bag. DO NOT allow children to play with weather shield, IT IS NOT A TOY.
To Recline Seat Para reclinar el asiento WARNING To avoid finger entrapment or pinching, do not adjust the seat back while child is in the stroller. To avoid head entrapment, always fasten the canopy to the seat back when using the stroller in the reclined position. ADVERTENCIA Para evitar heridas en los dedos, no ajuste el respaldo del asiento con el niño adentro.
Para usar adecuadamente la correa de seguridad To Properly Use the Tether 1 Always attach tether around your wrist when using jogging stroller, so that the stroller will not roll away from you. Sitúe siempre la correa alrededor de su muñeca cuando esté utilizando la carriola de trotar para que la carriola no se deslice delante de usted. 1 Uso y almacenamiento de la bomba de aire (modelos selectos) Airpump use and storage (select models) Keep air pump stored in basket when not in use.
To Operate Music On The Move® Para operar Music On The Move® 1 Connect the Music On The Move plug to the headphone jack of your personal sound system (radio, cassette, CD, MP3 or mini disk player). Conecte el conector de Music On The Move al conector de su sistema personal de sonido (radio, casette, CD, MP3 o reproductor de mini discos). 1 2 Turn on Music On The Move by locating the power switch as shown. A red light will indicate that the power is on.
Para iniciar el contador To Set Up Odometer Current Speed Velocidad actual Kilometers/Miles Kilómetros/millas Mode Symbol Símbolo del modo Selected Function Display Pantalla de función seleccionada SET/RESET button Botón SET/RESET MODE Button Botón del MODE TO TURN ODOMETER ON: Press SET/RESET button once. PARA CONECTAR EL CONTADOR: Pulse el botón SET/RESET una vez. TO TURN ODOMETER OFF: The odometer will automatically shut off after 2 minutes of inactivity.
To Operate Odometer Para operar el contador TO DISPLAY ELAPSED TIME: PARA MOSTRAR EL TIEMPO QUE HA PASADO: Press MODE button until a “T” is 1 displayed in the Mode Symbol area. Pulse el botón MODE hasta que 1 aparezca una “T” en el área de 2 Elapsed time will be displayed in the 2 El tiempo transcurrido se mostrará en Pressing the SET/RESET button will reset the time to zero. Símbolo de modo. Si presiona el botón SET/RESET el botón se reiniciará a cero. lower portion of the screen.
Para reemplazar la batería en el contador To Replace Battery in Odometer NOTE: Requires an LR44 battery. Replacement battery not included. Battery Cover Cubierta de la batería NOTA: Requiere una batería LR44. La batería de reemplazo no está incluída. 1 Remove odometer from clip. 1 Remueva el contador del clip. 2 Turn odometer upside down. 2 Ponga el contador al revés.
To Fold Stroller Para plegar la carriola 1 Lock foot brake. Asegure el freno de pie. 2 Recline seat. 4 Recline el asiento. 3 Close canopy. Cierre el toldo. trigger fold on frame below parent 4 Locate tray. Pull up latches on frame to fold. 6 Localice el gatillo para plegar la estructura bajo la charola para padres. Jale los cierres en la estructura, para plegar. 5 Push stroller forward to fold stroller. Empuje la carriola hacia adelante para plegar. 6 Engage locking latch. Ponga el seguro.
Limited Warranty / Garantía limitada Jeep® is a registered trademark of Chrysler LLC, and is used under license by Kolcraft®. © Chrysler LLC 2007. Kolcraft® warrants this product to be free of defects in materials and workmanship, as follows: For a period of ONE YEAR from the date of purchase, Kolcraft will repair or replace, at its option, the defective product. If you have a problem or are not satisfied with this product, please contact the Consumer Service Department at Kolcraft.
Personal Record Card / Tarjeta de registro personal Once in a while, we are less than perfect and one of our products reaches a customer with a problem. In most cases, we can solve your problem with replacement parts. Please contact us before you return one of our products to the store. Once a product is returned, it cannot be resold. The materials and the energy used to make it are wasted. Please fill in the information in the space provided and attach a copy of your purchase receipt.
Replacement Parts List / Lista de piezas de repuesto Marque con un círculo el repuesto que necesita Circle the Part You Need Replacement parts may look slightly different than what is shown below. Las piezas de recambio se pueden ver ligeramente diferentes de como se muestran abajo. Front Wheel Rueda delantera $10.00 Rear Wheel Ruedas traseras $11.00 each/cada uno Bakset with Cargo Bags Canasta con bolsillos $13.00 Front Tray Charola $10.
Replacement Parts Order Form / Formulario para ordenar piezas de repuesto / Formulaire de commande pour pièces de rechange •Complete the following form. Your model number and date of manufacture must be included on the form to ensure proper replacement parts. •Complete el siguiente formulario. Debe incluir en el formulario el número de su modelo y fecha de fabricación para asegurarse de que obtenga las piezas de repuesto adecuadas. •Remplissez le formulaire suivant.