Jeep® Tandem Stroller Instructions Instrucciones para carriola tándem Jeep® by ©2006 Kolcraft® Enterprises, Inc. All Rights Reserved.
WARNING Avoid serious injury from falling or sliding out. Always use Restraint System. Your child's safety depends on you. Proper stroller use cannot be assured unless you follow these instructions. DO NOT USE STROLLER UNTIL YOU READ AND UNDERSTAND THESE INSTRUCTIONS. IMPORTANT SAFETY INFORMATION: How to Keep Your Child Safe While Using this Stroller • NEVER LEAVE YOUR CHILD UNATTENDED WHILE IN STROLLER. Accidents can happen quickly while your back is turned.
How to Use this Stroller with Your Infant Car Seat • AVOID SERIOUS INJURY FROM FALLS: • This product is only to be used with certain Infant Car Seats. See below for list of compatible Infant Car Seats. • When using this product with your Infant Car Seat, infant must always be secured in the car seat with the car seats harness. • To ensure your Infant Car Seat is properly installed on the stroller, make sure it is: • Facing the person pushing the stroller.
ADVERTENCIA Evite daños serios causados por caídas o al deslizarse del asiento. Siempre use el sistema de cinturones. La seguridad de su hijo/a depende de usted. No se puede asegurar un uso apropiado de la carriola a menos que usted siga estas instrucciones. NO USE LA CARRIOLA HASTA QUE USTED HAYA LEIDO Y COMPRENDIDO ESTAS INSTRUCCIONES. INFORMACIÓN IMPORTANTE DE SEGURIDAD: Cómo mantener a su hijo seguro mientras utiliza ésta carriola • NUNCA DEJE A SU NIÑO SOLO EN LA CARRIOLA.
Cómo utilizar esta carriola con el asiento infantil para auto • EVITE DAÑOS SERIOS CAUSADOS POR CAÍDAS O AL DESLIZARSE DEL ASIENTO: • Esté producto es para ser usado solamente con ciertos asientos infantiles. Vea la lista de los Asientos de Automóvil para Niños compatibles abajo. • Para usar esté producto con su asiento infantil para auto, el niño siempre debe estar asegurado en el asiento con los cinturones de seguridad.
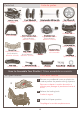
Parts List Lista de partes Stroller Frame Estructura de la carriola Front Canopy Toldo delantero Front Wheels (2) Ruedas delanteras (2) Brake Assembly with Rear Axle Montaje de freno con eje trasero Non Electronic Toys Juguetes no electrónicos (Select Models) (Modelos selectos) Electronic Toys Juguetes electrónicos (Select Models) (Modelos selectos) Rear Wheels (2) Ruedas traseras (2) Front Tray Charola delantera Cargo Bags (2) Bolsas de carga (2) Parent Tray Cup Holder Charola para adultos Carga
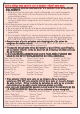
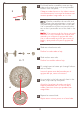
Para ensamblar las ruedas delanteras To Assemble Front Wheels 1 Turn stroller over as shown. Coloque la carriola orientada como se muestra en el dibujo. front wheels as shown. Tab must be 2 Align facing away from stroller (towards you). Alinée la unidad de las ruedas delanteras como se muestra en el dibujo. La lengüeta debe estar orientada en dirección opuesta a la carriola (orientada hacia usted). 1 3 Push front wheels onto stroller leg until it snaps into place.
Push both brake assemblies onto rear leg 3 tubes at the same time until spring loaded buttons click into place. 3 Coloque ambos frenos en los tubos traseros simultáneamente, hasta que los botones con resortes queden asegurados en su sitio. Button Botone NOTE: If brake assemblies do not click and hold in place, the spring button is stuck and not protruding through the hole in the tube. Use a screwdriver or pliers to move the button so that it protrudes out of the hole in the tube.
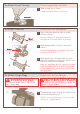
To Attach Front Canopy Cómo enganchar el toldo 1 Slide canopy on as shown. Coloque el toldo come se muestra. To Attach Footrest Instalación del apoyapiés Align and place footrest against stroller 1 frame as shown. 1 Mount Montura Mount Montura 2 Alinee y coloque el apoyapiés contra la armazón de la carriola como se muestra. Slide footrest down until it fits onto the 2 mount. Deslize el apoyapiés hacia abajo hasta que entre en la montura.
To Attach Front Tray Para instalar la charola tray between plastic tabs onto metal 1 Align tubing as shown. Alinee la charola en el tubo de metal entre las cejillas de plástico come se muestra. 1 2 Snap tab in place. Asegure las lengüetas en su sitio. 3 Repeat for second side. Repita los pasos en el segundo lado.
To Install Batteries in Electronic Toys (select models) Para instalar las pilas en los juguetes electrónicos (modelos selectos) insert batteries, use a Phillips head screw1 To driver to unfasten battery cover. Insert batter- ON OFF 1 ies as shown. Requires 2 “AA” batteries (Not Included). Secure battery cover. Para insertar las pilas, use un destornillador con punta de cruz para quitar la tapa del compartimiento de pilas. Insertar las pilas como se ve en el dibujo. Requiere 2 “AA” pilas (No Incluídas).
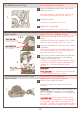
To Attach Rear Tray Para instalar la charola de trasera tray on top of stroller as shown, just in 1 Rest front of the buttons. Coloque la bandeja sobre el coche conforme es mostrado en la parte frontal de los botones. Front of Stroller Frente del la carriola NOTE: Be sure the cup holder is on the right side of the stroller as shown. NOTA: Asegúrese que el soporte del vaso esté del lado derecho del coche conforme a lo mostrado, observe el sentido del frente del coche.
To Attach Parent Tray Para instalar la charola para adultos (select models) (modelos selectos) ADVERTENCIA WARNING Do not place more than 3 lbs. (1.36 kg) in this tray to avoid tipping! Do not place hot liquids in this tray. Hot liquids can burn your child. No ponga más de 1.36 kg (3 libras) de peso en esta charola para evitar volcaduras. No coloque liquidos calientes en esta bandeja. Liquidos calientes pueden quemar a su niño. Push front of parent tray over canopy wire.
To Attach Basket Para instalar la canastilla the Basket U-Tube with the Basket 1 Align Frame in the rear of the stroller as shown. 1&2 Alinée el tubo en forma de U de las canastilla con la estructura de la canastilla en la parte trasera de la carriola como se muestra. in spring loaded buttons on Basket U2 Press Tube and slide into the Basket Frame until both buttons click into place.
How to Properly Use Your New Stroller / Cómo usar su nuevo carriola correctamente Para usar los frenos To Operate Brakes Unlock Quitar 1 Push levers on both rear wheels down to lock. 2 Lock Poner Para poner los frenos empuje pedales hacia abajo. 1 To Secure Child In Stroller 2 Pull levers up to unlock. Para quitar los frenos tire de los pedales hacia arriba. Para asegurar al niño en la carriola WARNING ADVERTENCIA Avoid serious injury from falling or sliding out. Always use restraint system.
To Recline Seat Para reclinar el asiento WARNING • Child may slip into leg openings and strangle. Never use in reclined carriage position unless boot is raised and boot is secured. • To avoid finger entrapment or pinching, do not adjust the seat back while child is in the stroller. • To avoid head entrapment, always fasten canopy to seat back when using rear seat in reclined position. ADVERTENCIA • El niño podría resbalarse en las aperturas de las piernas y estrangularse.
To Attach Rear Boot Para instalar el morral WARNING Child may slip into leg openings and strangle. Never use in reclined carriage position unless boot is raised and boot is secured. ADVERTENCIA El niño podría resbalarse en las aperturas de las piernas y estrangularse. Nunca utilice la carriola en posición reclinada, a menos que el morral se encuentre elevado al máximo y el alambre se encuentre asegurado al morral inferior. rear tray to back position so that the 1 Adjust buttons are engaged.
To Use Rear Seat with Infant Car Seat Para usar el asiento al postrero con asiento de auto TO OPERATE REAR TRAY OPERACIÓN DE LA CHAROLA TRASERA buttons at the same time and slide the 1 Press rear tray forward or backward. Oprima ambos botones simultáneamente y deslice la charola para adelante o para atrás. tray to front or rear position as speci2 Adjust fied below according to your Infant Car Seat. Do not remove tray. 2 Ajuste la charola hacia adelante o atrás, según necesite para su asiento de carro.
car seat in rear seating area of stroller so 5 Place that child is facing handle of stroller. Make sure car seat is resting against rear tray and that the car seat is level. Your child’s head should be slightly above their knees. 5 Coloque el asiento de auto en la areá trasera de la carriola de forma que el niño esté de frente al mango de la carriola. Asegure que el asiento de auto esté descansando contra la charola y que se encuentre nivelado.
Para asegurar el asiento infantil To Secure Infant Car Seat 1 2 Lock both foot brakes to keep stroller from rolling. Asegure los dos frenos de pie para evitar que la carriola ruede. 2 3 To fasten car seat restraint belts - open up loop of the restraint belt. Adjust belt until the buckles almost touch. Para abrochar los cinturones del asiento de auto, abrá el lazo del cinturón de ajuste. Ajuste el cinturón hasta que las hebillas casi se toquen. 3 3 Pull end tab of restraint belt to set.
Para doblar a carriola To Fold Stroller 1 Pull stroller backwards to straighten front wheels (unlock swivel wheels). Jale la carriola hacia atrás para enderezar las ruedas delanteras (quite el seguro de las ruedas giratorias). 2 Lock brakes. Asegure los frenos. 3 3 Push front canopy forward until it rests on front tray. Close rear canopy. Empuje el toldo delantero hacia adelante hasta que descanse sobre la charola delantera. Cierre el toldo trasero.
Care & Maintenance / Cuidado & Manteniniento • Utilice un lubricante ligero con silicona o grafito para que su carriola se deslice suavemente y para evitar que las ruedas rechinen. Es importante el aceitar eje y las ruedas. • Limpie las partes de metal con un trapo húmedo y luego séquelas. • Limpie la tela tejida o las partes de vinilo con jabón suave y agua. • Seque la carriola con un trapo suave cuando se haya mojado para evitar de que se oxide.
Limited Warranty / Garantía limitada Jeep® is a registered trademark of DaimlerChrysler Corporation, and is used under license by Kolcraft®. © DaimlerChrysler Corporation 2006. Kolcraft® warrants this product to be free of defects in materials and workmanship, as follows: For a period of ONE YEAR from the date of purchase, Kolcraft will repair or replace, at its option, the defective product.
Personal Record Card / Tarjeta de registro personal Once in a while, we are less than perfect and one of our products reaches a customer with a problem. In most cases, we can solve your problem with replacement parts. Please contact us before you return one of our products to the store. Once a product is returned, it cannot be resold. The materials and the energy used to make it are wasted. Please fill in the information in the space provided and attach a copy of your purchase receipt.
Replacement Parts List / Lista de piezas de repuesto Marque con un círculo el repuesto que necesita Circle the Part You Need Replacement parts may look slightly different than what is shown below. Rear Wheel Ruedas traseras $7.00 Front Wheel Ruedas delanteras $14.00 each/cada uno Brake Assembly with Rear Axle Montaje de freno con eje trasero $11.00 Non Electronic Toys Juguetes no electrónicos $10.00 Basket U-tube Tubo forma de U de la canastilla $2.
Replacement Parts Order Form / Formulario para ordenar piezas de repuesto Complete the following form. Your model number and date of manufacture must be included on the form to ensure proper replacement parts. Complete el siguiente formulario. Debe incluir en el formulario el número de su modelo y fecha de fabricación para asegurarse de que obtenga las piezas de repuesto adecuadas.