® + _ ©2010 Kolcraft® Enterprises, Inc. All Rights Reserved.
WARNING READ ALL INSTRUCTIONS BEFORE ASSEMBLY AND USE OF PRODUCT. Failure to follow these warnings and the instructions could result in serious injury or death. Make sure bassinet is fully assembled and secure before use. IMPORTANT SAFETY INFORMATION: When NOT to Use Your Bassinet • FALL HAZARD - To help prevent falls, do not use this product when the infant begins to push up on hands and knees or is 3 months old or weighs 15 lbs. (6.8 kg), whichever comes first.
• ALWAYS attach clips tightly to the bassinet frame according to instructions. Check frequently. • DO NOT add additional strings or straps to attach to crib or bassinet. FCC Statement (United States Only) This equipment has been tested and found to comply with the limits for a Class B digital device, pursuant to Part 15 of the FCC Rules. These limits are designed to provide reasonable protection against harmful interference in a residential installation.
ADVERTENCIA LEA TODAS LAS INSTRUCCIONES ANTES DE ENSAMBLAR Y USAR ESTE PRODUCTO. El no cumplir con las instrucciones y las advertencias podria causar lesiones graves y hasta la muerte. Asegúrese de que el moisés está completamente ensamblado y asegurado antes de usar.
Otras cosas a evitar • NO transporte o mueva el moisés con el bebé adentro. • NO use el moisés cerca de animales domésticos o de otros niños sin asegurar los frenos. • NO use el moisés dentro de un vehículo de motor. • NUNCA use el moisés cerca de escaleras o escalones. • Para reducir el riesgo de SIDS (Síndrome de Muerte Infantíl), los pediatras recomiendan que los infantes sanos sean situados en su espalda para dormir, a menos que se aconseje lo contrario por el médico.
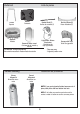
Parts List Frame Soporte Lista de piezas Basket Canasata Basket Rods (2) Varillas de canasta (2) Rocking Bases (2) Base mecedora (2) + _ Bassinet Moisés Light Vibes® Deluxe Electronics Electrónica de lujo Light Vibes® Bassinet Pad & Sheet Colchoncito del moisés y sábana *Toys may vary *Juguetes pueden variar Tool Needed: Phillips Screwdriver Herramienta necesitado: Destornillador de estrella Trouble Shooting Wrong Alignment Alineación incorrecta Canopy with Toys* Toldo con juguetes* Resolució
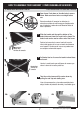
HOW TO ASSEMBLE YOUR BASSINET / CÓMO ENSAMBLAR SU MOISÉS To Assemble Bassinet Stand Para ensamblar la base del moisés 1 Open frame. Push down on the side locks to secure frame. Make sure frame locks are straight before use. 1 Estructura abierta. Al empujar los laterales, la estructura se traba de manera segura. Asegúrese de que la traba de la estructura esté derecha antes de usar el producto. 2 Slide the basket rods through the bottom of the basket holes and insert the ends into the frame.
5 Insert the frame into the rocking base by pushing in on the spring loaded buttons and inserting the bottom of the frame tubes into the rocking base as shown. The spring loaded buttons should pop out of the rocking base to ensure a secure fit. See Page 6 for Troubleshooting. Inserte la estructura en la base mecedora empujando hacia adentro los botones accionados por resortes e insertando la parte inferior de los tubos de la estructura adentro de la base mecedora, como se muestra.
To Assemble Bassinet and Attach Basket 1 Hooks Ganchos Para ensamblar el moisés y unir la canasta 1 Do not remove floorboard from bassinet cover. Open the support bars and clip each leg into the hooks on the floorboard. No saque la tabla del suelo de la cubierta del moisés. Abra las barras de soporte y ajuste cada pata en los enganches en la tabla del suelo. 2 Fasten all the snaps on bassinet cover to floorboard. Asegure todos los broches de la cubierta del moises a la tabla de la base.
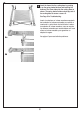
5 Close the locking attachment clips to secure bassinet 5 bed to frame. Cierre los clips de unión para asegurar la cama de la cuna al soporte. NOTE: Pull up to ensure secure. NOTA: Jale hace arriba para asegurar que este seguro. 6 Hang each elastic loop onto each of the four basket hooks as shown. Basket Hooks Ganchos de canasta Colga cada lazo de elástico en cada de los ganchos de la canasta como se muestra. NOTE: You must unhook basket’s elastic loops before removing bassinet bed from frame.
To Install batteries in Light Vibes® Deluxe Electronics Para instalar las pilas en el mecanismo electrónico 3 “AA” batteries (not included). To insert 1 Requires batteries, use a Phillips screwdriver to unfasten battery cover. Requiere 3 pilas “AA” (no incluídas). Para poner las pilas use un desarmador de cruz para quitar la tapa. 1 3 “AA” batteries in battery compartment as 2 Place shown. Inserte 3 pilas “AA” en el compartimento como se muestra.
To Attach Canopy Para sujetar el toldo 1 1 Attach canopy by snapping ends to the frame. Una el toldo abrochando los extremos a la estructura. 2 Velcro fabric together. 2 Una el material usando el Velcro. 3 3 Pull back canopy fabric over bassinet frame. Jale la tela del toldo sobre el marco del moisés.
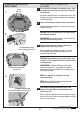
HOW TO PROPERLY USE YOUR NEW BASSINET / CÓMO USAR SU NUEVO MOISÉS CORRECTAMENTE To Use Brakes Para usar los frenos ADVERTENCIA WARNING Avoid accidents. Do not use the bassinet with the wheels unlocked around stairs or other children. Locked Cerrado Unlocked Cerrado Evite accidentes. No use el moisés cerca de escaleras o de otros niños sin poner los frenos. 1 Push levers on wheels down to lock. Oprima las palancas en las ruedas, hacia abajo para asegurarlas. 2 Pull levers up to unlock.
To Convert to Rocking Base Para convertir la base mecedora CAUTION: Do not use if one end is in rock position and the other end is in roll position. For correct use, lower all wheels for “roll mode” and raise all wheels for “rock mode”. PRECAUCIÓN: No utilice la cuna si un punta está en la posición de mecedora y el otro está en la posición rodante. Para el uso correcto, eleve ambos puntas para el "modo rodar" y baje ambos puntas para el "modo mecer".
To Convert to Rolling Base Para convertir a la base que rueda CAUTION: Do not use if one end is in rock position and the other end is in roll position. For correct use, lower all wheels for “roll mode” and raise all wheels for “rock mode”. PRECAUCIÓN: No utilice la cuna si un punta está en la posición de mecedora y el otro está en la posición rodante. Para el uso correcto, eleve ambos puntas para el "modo rodar" y baje ambos puntas para el "modo mecer".
Care & Maintenance / Cuidado & Manteniniento TO REMOVE BASSINET COVER PARA REMOVER LA CUBIERTA DEL MOISÉS 2 Unhook basket elastic loops from basket hooks on 1 the bottom of the bassinet. Des enganche los lazos de elástico de los ganchos de la canasta abajo de el moisés. 2 Unsnap the clips around bassinet frame to remove bassinet. Desabroche the clips alrededor del marco del moisés para quitar el moisés. 3 Remove canopy and bassinet pad. Remueva la cubierta y el colchón.
TO WASH BASSINET COVER PARA LAVAR LA CUBIERTA DEL MOISÉS Hand wash bassinet cover with water and mild soap. Lave de mano la cubierta del moisés con agua y jabó suave. Line Dry. Do not dry this bassinet cover in clothes dryer. This may shrink the cover. Tiéndala a secar. No ponga a secar la cubierta del moisés en la secudora. Esto puede encoger la cubierta. CAUTION: For the safety of your child, it is vital that the bassinet cover is re-mounted completely and correctly.
Hooks Ganchos 4 4 Pull up bassinet frame to unfold support bars and clip each support leg into the hooks on the floorboard. Estire del marco del moisés para desplegar las barras de soporte y ajuste cada pata de soporte a los ganchos en el suelo del moisés. 5 Fasten all snaps on bassinet cover to floorboard. 5 Asegure todos los broches de la cubierta del moisés a la tabla de la base. 6 To place canopy back onto frame, slide canopy frame through small stitch holes at the bottom of the canopy end pieces.
9 Attach canopy and replace bassinet pad in bassinet, making sure pad is flat and firmly in place. 9 Una la cubierta y ponga el colchoncito dentro del moisés. Presione el colchoncito asegurándose que esté plano y se encuentre fijo en su sitio. CAUTION: Fitted bassinet sheet should securely wrap at least 2" (5 cm) beneath entire pad to reduce chance of entanglement. 10 PRECAUCIÓN: La sábana ceñida del moisés debe quedar bien sujeta 5 cm.
LIMITED WARRANTY / GARANTÍA LIMITADA Kolcraft® warrants this product to be free of defects in materials and workmanship, as follows: For a period of ONE YEAR from the date of purchase, Kolcraft will repair or replace, at its option, the defective product. If you have a problem or are not satisfied with this product, please contact the Consumer Service Department at Kolcraft. REPAIR OR REPLACEMENT AS PROVIDED UNDER THIS WARRANTY IS THE EXCLUSIVE REMEDY OF THE CONSUMER.
PERSONAL RECORD CARD / TARJETA DE REGISTRO PERSONAL Once in a while, we are less than perfect and one of our products reaches a customer with a problem. In most cases, we can solve your problem with replacement parts. Please contact us before you return one of our products to the store. Once a product is returned, it cannot be resold. The materials and the energy used to make it are wasted. Please fill in the information in the space provided and attach a copy of your purchase receipt.
Replacement Parts List / Lista de piezas de repuesto Circle the Part You Need Marque con un círculo el repuesto que necesita Replacement parts may look slightly different than what is shown below. Las piezas de repuesto se pueden ver un poco diferentes de como se muestran abajo. Frame Soporte $15.00 Basket Rod Varillas de Canasta Rocking Base Base mecedora $2.00 each/cada uno $15.00 each/ cada Canopy with Toys Toldo con juguetes $15.00 + _ Basket Canasata $12.
REPLACEMENT PARTS ORDER FORM / FORMULARIO PARA ORDENAR PIEZAS DE REPUESTO Complete el siguiente formulario. Debe incluir en el formulario el número de su modelo y fecha de fabricación para asegurarse de que obtenga las piezas de repuesto adecuadas. Complete the following form. Your model number and date of manufacture must be included on the form to ensure proper replacement parts.