Contours® Options® / Optima™ Tandem Stroller Instruction Sheet Hoja de instrucciones de la carriola Contours® Options® / Optima™ Tandem ©2011 Kolcraft® Enterprises, Inc.
WARNING Avoid serious injury from falling or sliding out. Always use Restraint System. Your child's safety depends on you. Proper stroller use cannot be assured unless you follow these instructions. DO NOT USE STROLLER UNTIL YOU READ AND UNDERSTAND THESE INSTRUCTIONS. IMPORTANT SAFETY INFORMATION: How to Keep Your Child Safe While Using this Stroller • Adult Assembly Required. • Never leave your child unattended while in stroller. Accidents can happen quickly while your back is turned.
How to Use this Stroller with Your infant car seat • To ensure your infant car seat is properly installed on the stroller, make sure it is: - Facing the person pushing the stroller. - Tightly secured to the stroller with the car seat restraint straps. • If at any time your infant car seat does not secure properly to the stroller, or if you have questions about assembly or use of the stroller, DO NOT use this product. Call Kolcraft at 1-800-453-7673.
ADVERTENCIA Evite daños serios causados por caídas o al deslizarse del asiento. Siempre use el sistema de cinturones. La seguridad de su hijo/a depende de usted. No se puede asegurar un uso apropiado de la carriola a menos que usted siga estas instrucciones. NO USE LA CARRIOLA HASTA QUE USTED HAYA LEIDO Y COMPRENDIDO ESTAS INSTRUCCIONES. INFORMACIÓN IMPORTANTE DE SEGURIDAD: Cómo mantener a su hijo seguro mientras utiliza ésta carriola • Ensamblado por un adulto es necesario.
• Si necesitara ajustar la carriola, asegúrese de que los niños no estén en contacto con las piezas móviles, de lo contrario podrían lesionarse. • No permita que el niño se suba por sí solo en la carriola. La carriola se puede voltear y el niño puede lesionarse. • Use únicamente piezas de reemplazo del fabricante. • No ponga su niño en la canasta. • NO lo suba con bandeja/barra o juguetes.
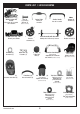
PARTS LIST | LISTA DE PARTES Stroller Frame with Basket Estructura de la carriola con canastilla Pins (2) Alfileres (2) Stroller Handle Asa de la carriola Screws (2) Tornillos (2) (modelos selectos) Parent Tray Charola para adultos Washers (2) Arandelas (2) Basket Tube Tubo de la canastilla (Select Models) Front Wheels (2) Ruedas delanteras (2) Cotter Pins (2) Pasadors (2) Reversible Seats (2) Asientos reversibles (2) Hub Caps (2) Tapóns del cubo (2) Front Bars (2) Barras frontales (2) Rear W
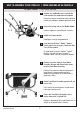
HOW TO ASSEMBLE YOUR STROLLER | CÓMO ENSAMBLAR SU CARRIOLA To Open Stroller | Para abrir carriola 1 Remove any cardboard inserts or plastic ties used to protect the product during shipment. Remueva cualquier inserción de cartón o plástico puesto para proteger el producto durante el envío. 2 Release the locking latch on the Stroller Frame. 1-3 Suelte el seguro en la estructura de la carriola. 3 Unfold to full open position. Despliégue la carriola completamente.
To Attach Basket | Para instalar la canastilla 1 Align the Basket Tube with the Basket Frame in the rear of the stroller as shown. Alinée el tubo de la canastilla con la estructura de la canastilla en la parte trasera de la carriola, como se muestra. 1 2 Press in spring loaded buttons on Basket Tube 2 and slide into the Basket Frame until both buttons click into place.
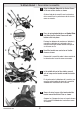
To Attach Stroller Handle | Para instalar el asa de la carriola 1 Slide the Stroller Handle down onto the stroller frame, until the holes on each side of the Stroller Handle can be seen in the frame. Deslice el asa de la carriola en la estructura de la carriola hasta que los agujeros en cada lado del asa de la carriola se puedan ver en la estructura. 1 2 Secure the Stroller Handle with a screw on each side of the frame. 2 Asegure el asa de la carriola con un tornillo en cada lado de la estructura.
To Attach Front Wheels | Para ensamblar las ruedas delanteras 1 Align Front Wheel as shown. Alinée la unidad de las ruedas delanteras como se muestra en el dibujo. 2 Push Front Wheel up into the Front Wheel Assembly until a “Click” is heard. Empuje la unidad de las ruedas en la pata de la carriola hasta que quede bien ajustada en su lugar. 1&2 3 Repeat for other wheel. Tug firmly on each wheel to be sure they are securely in place. Repita la operación con las otras ruedas.
4 Slide Rear Wheel onto axle. Deslize la rueda sobre el eje. 5 Slide Washer onto axle. 4-7 Deslize la arandela sobre el eje. 6 Fit straight part of Cotter Pin through hole on axle as shown. Inserte la parte recta del pasador por el agujero del eje, como se muestra. Line up tabs in the Hub Cap with slots in the wheel, 7 snap hub cap into place. 6 Alinée las lengüetas de cada uno de el tapone protectore con las ranuras de la rueda y presione hasta que queden bien asegurados. 8 Repeat for other side.
NOTE: To remove Infant Car Seat Adapter, push both buttons on the frame hub in, then lift the Infant Car Seat Adapter up. NOTA: para remover el adaptador de asiento de automóvil, presione ambos botones en el enlace de la estructura y luego tire del adaptador de asiento de automóvil hacia arriba.
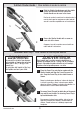
To Attach Canopy | Para ajustar sombrilla 1 Remove and discard the protective sleeve from the end of the Canopy Stay used to protect the product during shipment. 1 Remueva y desecha la manga protectora de la punta de la permanencia de la sombrilla usada para proteger el producto durante el envío. Protective Sleeve Manga protectora Canopy Stay Permanencia de sombrilla 2 2 Align the Canopy Stay over the Canopy Clip. Alinea la permanencia de la sombrilla sobre el clip de la sombrilla.
To Assemble iPod® Dok (select models) | Para ensamblar iPod® Dok (modelos selectos) WARNING ADVERTENCIA DO NOT turn the iPod® Dok upside down, unless the Dok is in the closed and latched position. iPod® could fall out. NO gire el iPod® Dok de arriba a abajo a menos que el Dok esté en la posición de cerrado y asegurado. El iPod® se puede caer para fuera. which iPod® model you own (iPod® mini, 1 Determine 60GB iPod®, 40GB iPod®, 30GB iPod® or the 20GB iPod®). See www.apple.
For use on a flat surface such as a table top, rest the iPod® Dok on the surface in the open position. For portable use with your stroller, push the speaker housing and the iPod® cradle together until you hear a snap. DO NOT turn the iPod® Dok upside down, unless the Dok is in the closed or latched position. 6 6 Para usar en una superficie plana con la superficie de una mesa, sitúe el iPod® Dok en la superficie en la posición abierta.
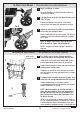
To Attach Reversible Seats | Para situar los asientos reversibles ADVERTENCIA WARNING Cuando use este producto sólo con un niño, use sólo el asiento o adaptador de automóvil en la posición frontal. When using this product with only 1 child, only use the seat or car seat adapter in the front position. B A C D Reversible Seats can be positioned in these directions: Los asientos de automóvil reversibles se pueden posicionar en estas direcciones: A. Facing Parent | Mirando al adulto B.
HOW TO PROPERLY USE YOUR NEW STROLLER | CÓMO USAR SU NUEVO CARRIOLA CORRECTAMENTE To Insert iPod Dok to Canopy (select models) | Para insertar el iPod Dok al toldo (modelos selectos) CAUTION Loud volume can damage your baby’s hearing. When turning on music, gradually adjust the volume to a comfortable listening level so baby’s not startled. PRÉCAUTION Un volume trop fort peut endommager les capacités auditives de votre enfant.
Para asegurar otro asiento infantil acceptable (modelos selectos) To Secure All Acceptable Infant Car Seats (select models) ADVERTENCIA WARNING Al usar este producto, evite daños serios causados por caídas o al deslizarse del asiento. El niño debe estar asegurado en el asiento. Use siempre el cinturón. Consulte las instrucciones del asiento de bebé para auto para ajustario adecuadamente.
4 For a secure fit, wrap restraint straps around the frame and position through Infant Car Seat belt slots and buckle. Tighten Restraint Straps. Special Instructions for Car Seats without belt slots: Secure Infant Car Seat to Adapter by wrapping restraint around frame and over seats lowest center point near handle and buckle them together. Tighten Restraint Straps.
8 Make sure Infant Car Seat is secure. Test Infant Car Seat installation by moving it in all directions to ensure a tight fit to Adapter. Asegúrese de que el asiento de bebé para el auto esté bien sujetado. Compruebe la instalación del asiento de auto infantil moviéndolo en toda dirección para asegurar que esté fijo en el adaptador. NOTE: Your Infant Car Seat may have a level indicator. It is not necessary for use with this carrier and the indicator may fall outside the recommended area.
To Recline Seat | Para reclinar el asiento WARNING ADVERTENCIA To avoid finger entrapment or pinching, do not adjust the seat back while child is in the stroller. To avoid head entrapment, always fasten the canopy to the seat back when using the stroller in the reclined position. Para evitar heridas en los dedos, no ajuste el respaldo del asiento con el niño dentro.
Instalación del soporte del cuello To Install Infant Neck Roll (select models) (modelos selectos) Infant neck roll is to be used with newborns who can not hold up their head. It should be used only when the seat is reclined. It can be removed when a child can hold their head up unassisted. El soporte del cuello debe de ser usado con recién nacidos que no pueden sostener su cabeza para arriba. Debe de ser usado solamente cuando la asiento este reclinado.
To Secure Child In Stroller Seat | Para asegurar al niño en el asiento de auto WARNING ADVERTENCIA Evite daños serios causados por caídas o Avoid serious injury from falling or sliding out. Always use restraint system. Do not use product without full 5-point Harness Restraint. Removing the shoulder straps will not adequately restrain child. al deslizarse del asiento. Use siempre el sistema de cinturónes. No utilice el producto sin un arnés de sujección de 5 puntos.
To Adjust Shoulder Strap Height | Para ajustar la altura de las cintas de los hombros Lower Mas baja Higher Mas alta NOTE: For a secure fit, straps should be at or below the child's shoulder. Adjust straps to higher position as your child grows. NOTA: Para que estén ajustadas de forma adecuada, las sujeciones deben estar en, o por abajo, del hombro del niño. Ajuste las sujeciones a una posiciónes más alta a medida que su hijo crece.
To Fold Stroller | Para doblar la carriola 1 Lock brakes. Asegure los frenos. 2a 2 For the tightest fold, either: Para plegarlo de forma más ajustada: 2b a) Remove rear seat or Infant car seat adapater and make sure front seat is facing handle. Remueva el asiento de atrás o el adaptador de asiento infantil y asegúrese de que el asiento frontal está mirando al asa. b) Remove front seat and make sure Rear Seat is facing forward.
7 Step down on basket lever with foot and push stroller handle forward, allowing the stroller to become compact. Pise la palanca de la canastilla y presione el asa de la carriola hacia adelante, dejando que la carriola se pliegue. 7 8 Engage locking latch. 8 Ponga el seguro. 9 Place removed Seat or Infant Car Seat Adapter, facing other seat and tucked in front of tray. Sitúe el asiento o adaptador de asiento de automóvil que ha removido, mirando al otro asiento e insertado en la charola frontal.
CARE & MAINTENANCE | CUIDADO & MANTENINIENTO • To keep your stroller running smoothly and •Utilice un lubricante ligero con silicona o grafito para que su carriola se deslice suavemente y avoid squeaking wheels use a silicon or para evitar que las ruedas rechinen. Es imporgraphite based lubricant. It is important to tante el aceitar eje y las ruedas. get it into the axle and the wheel assembly. •Limpie las partes de metal con un trapo • Clean metal parts with a damp cloth and húmedo y luego séquelas.
LIMITED WARRANTY / GARANTÍA LIMITADA Kolcraft® warrants this product to be free of defects in materials and workmanship, as follows: For a period of ONE YEAR from the date of purchase, Kolcraft will repair or replace, at its option, the defective product. If you have a problem or are not satisfied with this product, please contact the Consumer Service Department at Kolcraft. REPAIR OR REPLACEMENT AS PROVIDED UNDER THIS WARRANTY IS THE EXCLUSIVE REMEDY OF THE CONSUMER.
PERSONAL RECORD CARD / TARJETA DE REGISTRO PERSONAL Once in a while, we are less than perfect and one of our products with a problem reaches a customer. In most cases, we can solve your problem with replacement parts. Please contact us before you return one of our products to the store. Once a product is returned, it cannot be resold. The materials and the energy used to make it are wasted. Please fill in the information in the space provided and attach a copy of your purchase receipt.
Consumer Service: 1.800.453.7673 www.kolcraft.
REPLACEMENT PARTS LIST / LISTA DE PIEZAS DE REPUESTO Circle the Part You Need | Marque con un círculo el repuesto que necesita Replacement parts may look slightly different than what is shown below. $13.00 Basket Canasta $12.00 Front Wheel Rueda delantera Las piezas de repuesto se pueden ver un poco diferentes de como se muestran abajo. $8.00 Basket Tube Tubo de la canastilla $13.00 Stroller Handle Asa de la carriola $11.00 Brake Assembly with Rear Axle Montaje de freno con eje trasero $11.
REPLACEMENT PARTS ORDER FORM / FORMULARIO PARA ORDENAR PIEZAS DE REPUESTO Complete the following form. Your model number and date of manufacture must be included on the form to ensure proper replacement parts. Complete el siguiente formulario. Debe incluir en el formulario el número de su modelo y fecha de fabricación para asegurarse de que obtenga las piezas de repuesto adecuadas.