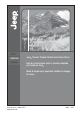
UTILITY TRANSPORT Jeep® Traveler Tandem Stroller Instruction Sheet COVERAGE Hoja de Instrucciones para la carriola acoplada para viajeros Jeep® Mode d’emploi pour poussette tandem de voyage de Jeep® Consumer Service: 1.800.453.7673 www.kolcraft.
WARNING Avoid serious injury from falling or sliding out. Always use Restraint System. Your child's safety depends on you. Proper stroller use cannot be assured unless you follow these instructions. DO NOT USE STROLLER UNTIL YOU READ AND UNDERSTAND THESE INSTRUCTIONS. IMPORTANT SAFETY INFORMATION: How to Keep Your Child Safe While Using this Stroller • Adult Assembly Required. • NEVER LEAVE YOUR CHILD UNATTENDED WHILE IN STROLLER. Accidents can happen quickly while your back is turned.
• THIS IS NOT AN EXERCISE STROLLER! Do not use this product while running, jogging, in-line skating or participating in other athletic activities. • DO NOT put child in basket. • Take care when folding and unfolding to prevent finger pinching. • Product may become unstable if a parcel bag, other than the one recommended by the manufacturer is used. • DO NOT allow children to climb into stroller unassisted. Stroller may tip over and injure child. • Only use replacement parts supplied by the manufacturer.
ADVERTENCIA Evite daños serios causados por caídas o al deslizarse del asiento. Siempre use el sistema de cinturones. La seguridad de su hijo/a depende de usted. No se puede asegurar un uso apropiado de la carriola a menos que usted siga estas instrucciones. NO USE LA CARRIOLA HASTA QUE USTED HAYA LEIDO Y COMPRENDIDO ESTAS INSTRUCCIONES. INFORMACIÓN IMPORTANTE DE SEGURIDAD: Cómo mantener a su hijo seguro mientras utiliza ésta carriola • Ensamblado por un adulto es necesario.
• Nunca utilice esta carriola en escaleras o escaleras automáticas. • No levante la carriola por las barras frontales. • Si necesitara ajustar la carriola, asegúrese de que los niños no estén en contacto con las piezas móviles, de lo contrario podrían lesionarse. • ¡Esta carriola no está diseñada para hacer ejercicio! No debe ser utilizada para correr, trotar, patinar o participar en otras actividades atléticas. • No ponga su niño en la canasta.
MISE EN GARDE Pour éviter que l’enfant ne se blesse grièvement en tombant ou en glissant, toujours utiliser la ceinture de sécurité. La sécurité de votre enfant dépend de vous. Suivez ces instructions afin d’utiliser la poussette convenablement. N’UTILISER LA POUSSETTE QU’APRES AVOIR LU ET COMPRIS CES INSTRUCTIONS. INFORMATIONS IMPORTANTES SUR LA SÉCURITÉ : Comment garantir la sécurité de votre enfant avec cette poussette • Doit être assemblé par un adulte.
• Ne jamais utiliser cette poussette dans un escalier ou un escalier roulant. • NE PAS soulever par les barres avant. • Veillez à tenir les enfants éloignés de toute pièce mobile quand vous réglez a poussette, afin d’éviter qu’ils ne se blessent. • NE PAS UTILISER CETTE POUSSETTE LORSQUE VOUS FAITES VOS EXERCICES! Ne pas utiliser lorsque vous courrez, faites du jogging, du patin en ligne ou toutes autres activités athlétiques. • Ne mettez pas l'enfant dans un panier.
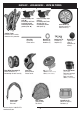
PARTS LIST - LISTA DE PARTES - LISTE DE PIÈCES Brake Assembly Left (with ▲) Ensamblaje del Freno izquierdo (con ▲) Assemblage de frein gauche (avec ▲) Brake Assembly Right (with ★) Ensamblaje del Freno derecho (con ★) Assemblage de frein droit (avec ★) Rear Wheels (2) Ruedas traseras (2) Roues arrière (2) Stroller Frame Estructura de la carriola Armature de la poussette Washers (2) Arandelas (2) Rondelles (2) Rear Axle Eje trasero Essieu arrière Front Wheel Assembly (2) Ruedas delanteras (2) Assemblag
HOW TO ASSEMBLE YOUR STROLLER - CÓMO ENSAMBLAR SU CARRIOLA - ASSEMBLAGE DE VOTRE POUSSETTE To Open Stroller - Para abrir la carriola - Pour déplier la poussette 1 Remove any cardboard inserts or plastic ties used to protect the product during shipment. ES: Extraiga todos los insertos de cartón o sujetadores de plástico utilizados para proteger el producto durante el envío. FR: Retirez tout emballage de carton et attaches de plastique de protection lors du transport.
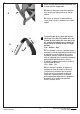
4 Rotate the front footrest forward and down until it snaps onto the support tube. ES: Mueva el apoyapiés frontal hacia delante y hacia abajo hasta que se trabe en el tubo de soporte. 4 FR: Tournez et abaissez le repose-pied vers l'avant jusqu'à ce qu'il s'enclenche sur le tube support. extend handle, a) first push and hold the 5 To safety lock at the top of the handle to the left.
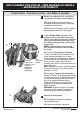
To Assemble Rear Wheels - Para ensamblar las ruedas traseras - Assemblage des roues arrière 1 Turn stroller over as shown. There is a LEFT and RIGHT ★ ▲ Brake Lever Symbol Palancas del Freno símbolo Leviers de frein symbole 1&2 brake assembly. Be sure to assemble them onto the correct rear leg tube. LEFT and RIGHT will be identified as shown. Each brake assembly will have either a triangle or a star on the bottom of the part.
3 Remove and discard protective foam sleeves from ends of rear axle. Insert axle into outside hole of brake assembly and slide it through frame. 3 ES: Extraiga y deseche las mangas de espuma protectora de las terminales del eje. Inserte el eje dentro del orificio exterior del ensamblaje del freno y deslícelo a través de la estructura. FR: Retirez et éliminez les manchons protecteurs en mousse des bouts d'essieux. Insérer l’essieu dans le trou extérieur du frein et l’enfoncer dans l'armature.
To Attach Front Wheels - Fixation des roues avant - Para ensamblar las ruedas delanteras 1 Lay stroller back on handle. ES: Basculez la poussette vers l'arrière en l'appuyant sur la poignée. FR: Invierta la carriola y apóyela sobre su manija. 2 Position front wheel assembly as shown. ES: Positionnez la roue avant comme indiqué. FR: Coloque el ensamblaje de la rueda delantera como se muestra. 2 front wheel assembly onto front leg tube 3 Push until it clicks into place.
To Attach Front Tray - Fixation du plateau avant - Para instalar la charola WARNING ADVERTENCIA MISE EN GARDE Para prevenir lesionar a su niño, Pour prévenir les blessures à To prevent injury to your child, take care when inserting tray into frame. tenga cuidado al insertar la bandeja en la estructura. votre bébé, faites attention lorsque vous insérez le plateau dans l'armature. 1 Align tray into hole located on left side of seat while facing front of stroller.
To Attach Toy (select models) - Para anexar el juguete (modelos selectos) - Fixation de jouet (certains modèles) CAUTION PRECAUCIÓN MISE EN GARDE Toys intended to be assembled by adult! ¡Los juguetes están diseñados para Assemblage de jouets destiné aux ser ensamblados por un adulto! adultes! 1 Face the steering wheel of the toy towards the front seat. ES: Coloque el volante de juguete hacia el asiento frontal. FR: Positionnez le volant jouet face au siège.
To Attach Front Canopy - Para anexar el toldo frontal - Installation du toit avant tinted visor facing forward, align canopy 1 With clip hole with the post on the front of the frame next to the front seat and snap onto the frame. Canopy Clip Hole Orificio del sujetador del toldo Trou de l'étrier du toit ES: Con el visor de color hacia delante, alinee el orificio del sujetador del toldo con la protuberancia de la estructura frontal, cerca del asiento frontal y trábelo a la estructura.
HOW TO PROPERLY USE YOUR NEW STROLLER - CÓMO UTILIZAR CORRECTAMENTE SU NUEVA CARRIOLA - UTILISATION SÉCURITAIRE DE VOTRE NOUVELLE POUSSETTE To Operate Brakes - Para usar los frenos - Utilisation des freins 1 Push levers on both rear wheels down to lock. Unlock Destrabar Déverrouillage ES: Empuje hacia abajo ambas ruedas posteriores hasta trabarlas. FR: Poussez les leviers des deux roues arrière pour verrouiller. Lock Trabar Verrouillage 2 Pull levers up to unlock.
4 To fasten restraint system buckles - push together. Be sure both buckles are fastened to secure child safely. 4 ES: Para abrochar las hebillas del sistema de seguridad - empuje en forma conjunta. Verifique que ambas hebillas estén abrochadas para asegurar al niño correctamente. FR: Pour enclencher l'attache de ceinture de sécurité - poussez l'un dans l'autre. Assurez-vous que les deux attaches de ceinture de sécurité sont enclenchées pour assurer la sécurité de l'enfant.
To Adjust Shoulder Strap Height - Para ajustar la altura de la correa de los hombros - Pour ajuster la hauteur des sangles passant aux épaules NOTE: For a secure fit, straps should be at or below the child's shoulder. Adjust straps to higher position as your child grows. Lower Más bajo Plus bas ES: NOTA: Para lograr un calce seguro, las correas deben permanecer a la altura o por debajo del hombro del niño. Ajuste las correas a una posición más elevada a medida que el niño crezca.
3 Make sure toggles are horizontal and flat against the back of the seat. ES: Asegúrese de que los sujetadores queden horizontales y planos contra el espaldar del asiento.
To Recline Rear Seat - Para reclinar el asiento trasero - Pour reposer siège arrière WARNING ADVERTENCIA MISE EN GARDE Para evitar atrapar o pellizcar Pour éviter le coincement et le To avoid finger entrapment or pinching, do not adjust the seat back while child is in the stroller. los dedos, no ajuste el espaldar del asiento mientras el niño esté en la carriola.
To Secure All Acceptable Infant Car Seats - Para asegurar todos los asientos de niños para automóviles de manera correcta - Pour fixer tous les sièges auto bébé convenablement WARNING ADVERTENCIA MISE EN GARDE Al utilizar este producto, para Lorsque vous utilisez ce produit, When using this product, to avoid serious injury from falling or sliding out, infant must always be secured in the Infant Car Seat with the Car Seat harness. Refer to Infant Car Seat Instructions for proper adjustment.
3 Lower the Infant Car Seat. ES: Baje el asiento de niños para automóviles. FR: Pour abaisser le siège d'auto pour enfant. infant car seat restraint belts through 4 Thread the clips on the top of the car seat. Special Instructions for Car Seats without belt slots: Secure Infant Car Seat to Stroller by wrapping restraint around frame and over seat’s lowest center point near handle and buckle them together. Tighten Restraint Straps.
TO SECURE INFANT CAR SEAT PARA ASEGURAR EL ASIENTO DE NIÑOS PARA AUTOS FIXATION DU SIÈGE AUTO BÉBÉ fasten car seat restraint belts - open up loop 5 To of the restraint belt. Adjust belt until the buckles almost touch. ES: Para abrochar los cinturones de seguridad del asiento para autos - abra el lazo del cinturón de seguridad. Ajuste el cinturón hasta que las hebillas casi se toquen. FR: Pour fixer les ceintures de maintien du siège auto, ouvrez la bride de la ceinture de maintien.
NOTE: Your Infant Car Seat may have a level indicator. It is not necessary for use with this product and the indicator may fall outside the recommended area. The level indicator is for use while the Infant Car Seat is in an automobile. Your child’s head should always be above their knees. ES: NOTA: El asiento de niños para automóviles puede tener un indicador de niveles. No es necesario utilizarlo con este producto y el indicador puede caerse fuera del área recomendada.
To Fold Stroller - Para plegar la carriola - Pliage de la poussette 1 Lock brakes. ES: Trabe los frenos. FR: Verrouillage des freins. 2 Close Front Canopy fully and push all the way forward until it touches the front footrest. 2 ES: Cierre el toldo frontal completamente y empújelo hacia adelante hasta que toque el apoyapiés frontal. 3 FR: Fermez complètement le toit avant et repoussez-le complètement vers l'avant pour atteindre le repose-pied.
5 To fold, a) first slide and hold the Safety Lock a Button at the top of the handle to the left. b) Second, while holding the Safety Lock Button squeeze the folding trigger to unlock the handle and push it all the way down. NOTE: Once the handle is past the lowest handle height position, you no longer need to hold the safety lock or the folding trigger. 5 b ES: Para plegar, a) primero deslice y mantenga la Traba de Seguridad hacia la izquierda en la parte superior de la manija.
TO MAKE STROLLER MORE COMPACT PARA HACER LA CARRIOLA MÁS COMPACTA POUR MAXIMISER L'AFFAISSEMENT DE LA POUSSETTE stroller on its back and rotate front 8 Lay wheels inward. ES: Coloque la carriona al revés y rote las ruedas frontales hacia adentro. FR: Déposez la poussette face contre terre et tournez les roues avant vers l'intérieur. the front canopy to expose the front 9 Raise footrest. Lift up on the footrest until it unlocks and fold it upwards against the frame.
12 Tilt stroller on back wheels and pull/push like a suitcase. ES: Incline la carriola sobre las ruedas posteriores y tire/empuje como una valija. 12 FR: Inclinez la poussette vers les roues arrière et tirez/poussez comme une valise. NOTE: If your feet hit the stroller while pulling, raise handle to the first (lowest handle position) handle position and continue pulling.
CARE & MAINTENANCE • To keep your stroller running smoothly and avoid squeaking wheels use a silicone or graphite based lubricant. It is important to get it into the axle and the wheel assembly. • Clean metal parts with a damp cloth and wipe dry. • Clean woven fabric or vinyl parts with mild soap and water solution. • Dry wet stroller with a soft cloth to prevent rusting. • When storing stroller, never stack other items on top of it; this may damage the stroller.
LIMITED WARRANTY Jeep® is a registered trademark of Chrysler Group LLC and is used under license by Kolcraft®. © Chrysler Group LLC 2011. Kolcraft® warrants this product to be free of defects in materials and workmanship, as follows: For a period of ONE YEAR from the date of purchase, Kolcraft will repair or replace, at its option, the defective product. If you have a problem or are not satisfied with this product, please contact the Consumer Service Department at Kolcraft.
GARANTÍA LIMITADA Jeep® es una marca registrada de Chrysler Group LLC y es utilizada, bajo licencia por Kolcraft®. © Chrysler Group LLC 2011. Kolcraft® garantiza que este producto estará libre de defectos en materiales y fabricación de la siguiente manera: Por un período de UN AÑO después de la fecha de compra, Kolcraft reparará o reemplazará, a su opción, el producto defectuoso.
GARANTIE LIMITÉE Jeep® est une marque déposée de la Chrysler Group LLC et est utilisé sous licence par Kolcraft®. © Chrysler Group LLC 2011. Kolcraft® garantit cet article contre tout défaut de fabrication, selon les décrets suivants: Kolcraft s’engage à réparer ou remplacer, à sa convenance, l’article défectueux pendant UN AN à partir de la date d’achat. Si vous avez un problème ou n’êtes pas entièrement satisfait de cet article, veuillez contacter le Service à la Clientèle de Kolcraft.
Consumer Service: 1.800.453.7673 www.kolcraft.
REPLACEMENT PARTS LIST / LISTA DE PIEZAS DE REPUESTO / LISTE DES PIÈCES DE RECHANGE Circle the Part You Need Marque con un círculo el repuesto que necesita Encerclez la pièce dont vous avez besoin $13.00 Basket Canasta Panier $14.00 Front Canopy Toldo frontal Toit avant Consumer Service: 1.800.453.7673 www.kolcraft.com Les pièces de rechange peuvent différer légèrement des illustrations. $7.00 Rear Wheel Rueda trasera Roue arrière $7.
Replacement Parts Order Form / Formulario para ordenar piezas de repuesto / Formulaire de commande pour pièces de rechange • Complete the following form. Your model number and date of manufacture must be included on the form to ensure proper replacement parts. • Complete el siguiente formulario. Debe incluir en el formulario el número de su modelo y fecha de fabricación para asegurarse de que obtenga las piezas de repuesto adecuadas. • Remplissez le formulaire suivant.